HP PageWide XL 4700 Assembly Instructions 1
HP PageWide XL 4700 Manual
 |
View all HP PageWide XL 4700 manuals
Add to My Manuals
Save this manual to your list of manuals |
HP PageWide XL 4700 manual content summary:
- HP PageWide XL 4700 | Assembly Instructions 1 - Page 1
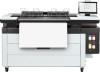
EN HP PageWide XL Drawer Assembly Instructions JA HP PageWide XL ZHTW HP PageWide XL KO HP PageWide XL ID Petunjuk Pemasangan Laci HP PageWide XL © Copyright 2020 HP Development Company, L.P. Large Format Division Camí de Can Graells 1-21 · 08174 Sant Cugat del Vallès Barcelona · Spain All - HP PageWide XL 4700 | Assembly Instructions 1 - Page 2
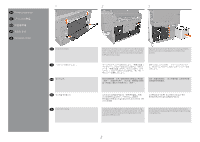
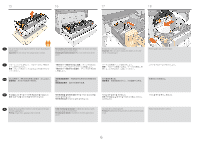
EN Printer preparation JA ZHTW KO ID Persiapan printer 1 EN Remove the basket. JA ZHTW KO ID Lepaskan keranjang. 2 3 Remove the rear printer covers: number 1 to install the drawer in the second position (accessory), and numbers 1, 2, and 3 in order, to install the drawer in the third - HP PageWide XL 4700 | Assembly Instructions 1 - Page 3
remove the front cover exposing the drawer slot. Important: Hold the cover while removing the final screw to stop it falling. Take the right drawer guide (marked with an R) from the top of the box. Important: Do not remove the internal cardboard and tape. Install the drawer - HP PageWide XL 4700 | Assembly Instructions 1 - Page 4
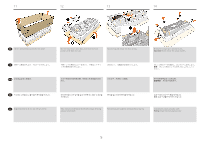
8 9 EN Check both guides are correctly installed on the back slot, they should be difficult to move. Check the wheels are aligned as shown. EN Drawer installation JA ZHTW - HP PageWide XL 4700 | Assembly Instructions 1 - Page 5
11 12 13 14 EN Lift the cardboard box up and off of the drawer. Open the lower tray's carton flaps, and remove the back portions of the lower end caps. Open the bag and remove the desiccant bag. Remove the orange tapes and white foams. Important: Do not remove the oranges handles. JA - HP PageWide XL 4700 | Assembly Instructions 1 - Page 6
Remove the cable protection flange. Important: Take care when moving the drawer, as the cable can be easily damaged. Pull the guides out onto the drawer. JA ZHTW KO ID Angkat busa yang lebih rendah bersama dengan laci dengan menarik gagang busa. Penting - HP PageWide XL 4700 | Assembly Instructions 1 - Page 7
on each side. Important: Make sure the two preinstalled pins match the holes. Fix both sides of the inside of the drawer to the guide using one T20 screw each side. Hold the drawer by the orange handles and remove the foam. 各側に2本のT20 2 各側に1本のT20 T20 T20 KO ID Keluarkan - HP PageWide XL 4700 | Assembly Instructions 1 - Page 8
23 24 25 26 EN Remove the pin and the drawer lock bar. Remove the stoppers from inside the drawer. JA ZHTW KO ID Lepas pin dan bilah kunci laci. Lepas pembatas dari dalam laci. Remove the orange handles by removing the screws shown in the image. Note: The screws are on the - HP PageWide XL 4700 | Assembly Instructions 1 - Page 9
27 EN Close the drawer. Important: Take care with the cable. JA ZHTW KO ID Tutup laci. Penting: Tangani kabel dengan hati-hati. 28 29 Connect the plastic piece on the back side of the printer; slot it into the holes and push down. Connect the drawer cable on the back of the printer. EN - HP PageWide XL 4700 | Assembly Instructions 1 - Page 10
recognize the installed drawer, and if installing the printer for the first time, automatically start configuration. If not go to the Service menu install/unistall drawers. Lepaskan pita oranye, dan set label. Tempelkan pada label pengenal untuk nomor gulungan, di bagian depan - HP PageWide XL 4700 | Assembly Instructions 1 - Page 11
11
-
 1
1 -
 2
2 -
 3
3 -
 4
4 -
 5
5 -
 6
6 -
 7
7 -
8
-
9
-
10
-
11
 |
 |
© Copyright 20
20
HP Development Company, L.P.
Large Format Division
Camí de Can Graells 1-21 · 08174
Sant Cugat del Vallès
Barcelona · Spain
All rights reserved
Printed in XXX
ZHTW
KO
JA
ID
EN
HP PageWide XL Drawer
Assembly Instructions
HP PageWide XL
ドロワ
ー組み立て説明書
HP PageWide XL
纸卷匣
組裝說明
HP PageWide XL
용지함
조립 지침
Petunjuk Pemasangan
Laci HP PageWide XL
EN
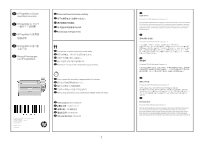
Please read these instructions carefully.
JA
以下の指示をよくお読みください。
ZHTW
請仔細閱讀下列說明。
KO
이 지침을 주의깊게 읽으십시오.
ID
Baca petunjuk ini dengan cermat.
EN
2 people are required to perform certain tasks.
JA
特定の作業は、2名で行う必要があります。
ZHTW
某些工作需要 2 個人才能執行。
KO
일부 작업의 경우 2명이 필요합니다.
ID
Diperlukan 2 orang untuk menjalankan tugas tertentu.
45’
EN
Time required for assembly is approximately 45 minutes .
JA
組み立て所要時間は約45分です。
ZHTW
組裝大約要花 45 分鐘的時間。
KO
조립에 소요되는 시간은 약 45분입니다.
ID
Waktu yang diperlukan untuk pemasangan adalah sekitar 45 menit.
EN
Tools required:
T20 Screwdriver
JA
必要な工具:
T20ドライバ
ZHTW
必要工具:
T20 螺絲起子
KO
필요한 공구:
T20 드라이버
ID
Alat yang diperlukan:
Obeng T20
EN
Legal notices
© Copyright 20
20
HP Development Company, L.P.
The information contained herein is subject to change without notice. The only warranties
for HP products and services are set forth in the express warranty statements accompa
-
nying such products and services. Nothing herein should be construed as constituting an
additional warranty. HP shall not be liable for technical or editorial errors or omissions
contained herein.
JA
法律に関する注記
© Copyright 2020 HP Development Company, L.P.
ここに記載した内容は、予告なしに変更することがあります。
HP製品およびサービスに対する保証は、当該製品およびサービスに付属の限定
的保証規定に明示的に記載されているものに限られます。 本書中のいかなる記
載も、付加的な保証を構成するものとして解釈されないものとします。 弊社
は、本書に含まれる技術上または編集上の誤りおよび欠落について、一切責任
を負うものではありません。
ZHTW
法律聲明
©
Copyright 2020 HP Development Company, L.P.
此文件所包含資訊如有更改,恕不另行通知。HP 產品與服務的保固範圍,僅限於產
品與服務隨附的保固聲明中所提供的保固項目。 本文件的任何部分都不可構成任何
額外的保固。 HP 不負責本文件在技術上或編輯上的錯誤或疏失。
KO
법적 고지사항
© Copyright 20
20
HP Development Company, L.P.
여기에 수록된 정보는 조건에 따라 예고 없이 변경될 수 있습니다.
HP 제품 및 서비스에 대한 유일한 보증은 해당 제품 및 서비스에 동봉된 보증서에
명시되어 있습니다. 이 문서의 어떠한 내용도 추가 보증으로 간주되어서는 안 됩니다.
HP는 이 문서에 포함된 기술 또는 편집상의 오류나 누락된 내용에 대해 책임지지
않습니다.
ID
Informasi hukum
© Copyright 20
20
HP Development Company, L.P.
Informasi yang terdapat dalam dokumen ini dapat berubah tanpa pemberitahuan sebelumnya.
Satu-satunya jaminan bagi produk dan layanan HP ditetapkan dalam pernyataan jaminan
tersurat yang diberikan bersama produk dan layanan tersebut. Tidak ada pernyataan apa pun
dalam dokumen ini yang dapat dianggap sebagai jaminan tambahan. HP tidak bertanggung
jawab atas kesalahan teknis atau editorial maupun kekurangan yang terdapat dalam dokumen ini.
1