HP PageWide XL 4700 Assembly Instructions 1 - Page 6
on the end cap next to the printer., Place next to the front of the, Remove the cable protection
 |
View all HP PageWide XL 4700 manuals
Add to My Manuals
Save this manual to your list of manuals |
Page 6 highlights
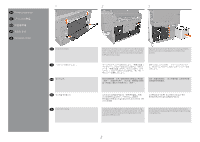
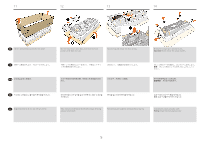
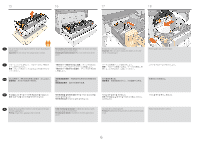
15 16 17 18 EN Lift up the lower foam together with the drawer by pulling the foam handles. Important: Do not remove the orange handles or hubs. Not installing the bottom drawer: Place the drawer and foam on the end cap next to the printer. Installing the bottom drawer: Place next to the front of the printer. Remove the cable protection flange. Important: Take care when moving the drawer, as the cable can be easily damaged. Pull the guides out onto the drawer. JA ZHTW KO ID Angkat busa yang lebih rendah bersama dengan laci dengan menarik gagang busa. Penting: Jangan lepas gagang oranye atau hub. Tidak memasang laci bawah: Letakkan laci dan busa pada penutup ujung di sebelah printer. Memasang laci bawah: Letakkan di sebelah bagian depan printer. Lepaskan flens pelindung kabel. Penting: Pindahkan laci dengan hati-hati, karena kabel mudah rusak. Tarik pemandu keluar ke arah laci. 6
-
 1
1 -
 2
2 -
 3
3 -
 4
4 -
 5
5 -
 6
6 -
 7
7 -
 8
8 -
 9
9 -
 10
10 -
 11
11
 |
 |
