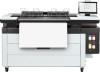
HP PageWide XL 4700 Assembly Instructions 1 - Page 3

重要事項:, 附註:

Page 3 highlights

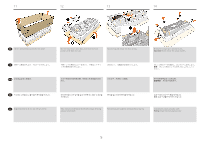
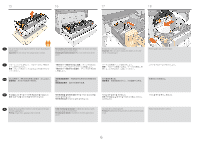
4 5 6 7 EN Left side of the printer: Remove the side cover corresponding to the drawer being installed. Remove the 2 screws located on the both sides of the drawer (2 bottom ones for bottom drawer) and remove the front cover exposing the drawer slot. Important: Hold the cover while removing the final screw to stop it falling. Take the right drawer guide (marked with an R) from the top of the box. Important: Do not remove the internal cardboard and tape. Install the drawer guide on the right side. Slide the guide all the way in, and fix with 1 screw. Take the left drawer guide (marked with an L) and insert it into the left side of the printer. Note: No screw is required. JA ZHTW 2 2 2 2 R 1 1 L L KO ID Sisi kiri dari printer: Lepas penutup bagian samping yang berhubungan dengan laci yang sedang dipasang. 2 2 Lepas 2 sekrup yang terdapat pada kedua sisi laci (2 di bagian bawah untuk laci bawah), lalu lepas penutup depan agar slot laci terlihat. Penting: Pegang penutup saat melepas sekrup terakhir agar tidak terjatuh. R 1 Ambil pemandu laci kanan (yang ditandai dengan R) dari bagian atas kemasan. Penting: Jangan lepaskan karton dan pita bagian dalam. Pasang pemandu laci di sisi kanan. Dorong pemandu sampai ke dalam, lalu kencangkan dengan 1 sekrup. L Ambil pemandu laci kiri (yang ditandai dengan L), lalu masukkan ke sisi kiri printer. Catatan: Tidak memerlukan sekrup. 3

  • 1
  • 2
  • 3
  • 4
  • 5
  • 6
  • 7
  • 8
  • 9
  • 10
  • 11

3
ZHTW
KO
JA
ID
EN
Left side of the printer: Remove the side cover corresponding
to the drawer being installed.
プリンタの左側: 取り付けるドロワーに対応するサイ
ド カバーを取り外します。
印表機左側: 移除將安裝之紙卷匣的側面蓋板。
프린터의 왼쪽: 설치 중인 용지함에 해당하는 옆면 덮개를
제거합니다.
Sisi kiri dari printer: Lepas penutup bagian samping yang
berhubungan dengan laci yang sedang dipasang.
Remove the 2 screws located on the both sides of the drawer
(2 bottom ones for bottom drawer) and remove the front
cover exposing the drawer slot.
Important:
Hold the cover while removing the final screw to
stop it falling.
ドロワーの両側にある2本のネジを外し(下部ドロワ
ーの場合は一番下の2本)、フロント カバーを取り外
して、ドロワーのスロットにアクセスできる状態にし
ます。
重要:
最後のネジを外す間、カバーを支えて落ちない
ようにしてください。
取出位於紙卷匣兩側的 2 顆螺絲(2 顆用於底部紙卷匣的
底部螺絲),並移除露出紙卷匣插槽的前側蓋板。
重要事項:
取出最後一顆螺絲時取握住蓋板,以避免蓋
板掉落。
용지함 양옆의 나사 2개(하단 용지함 아래에 있는 2개)
를 제거한 다음, 용지함 슬롯을 드러내는 전면 덮개를
제거합니다.
중요:
덮개가 떨어지지 않도록 마지막 나사를 제거하는 동안
잡고 계십시오.
Lepas 2 sekrup yang terdapat
pada kedua sisi laci (2 di bagian
bawah untuk laci bawah), lalu lepas penutup depan agar slot
laci terlihat.
Penting:
Pegang penutup saat melepas sekrup terakhir agar
tidak terjatuh.
Take the right drawer guide (marked with an R) from the top
of the box.
Important:
Do not remove the internal cardboard and tape.
Install the drawer guide on the right side. Slide the guide all
the way in, and fix with 1 screw.
箱の一番上から右のドロワー ガイド(Rと示されたも
の)を取り出します。
重要:
内側の段ボールとテープを取り外さないでくだ
さい。
右側にドロワーガイドを取り付けます。 ガイドを奥ま
でスライドさせ、1本のネジで固定します。
從包裝箱上層取出右側紙卷匣導板。
重要事項:
請勿取出內部紙板和撕下膠帶。
將紙卷匣導輪安裝在右側。 將導板滑到最底,然後用 1
顆螺絲固定。
상자 위에서 오른쪽 용지함 가이드(R 표시됨)를 꺼냅니다.
중요:
내부의 카드보드 및 테이프를 제거하지 마십시오.
오른쪽에 용지함 가이드를 설치합니다. 가이드를 완전히
밀어 넣은 다음, 나사 1개를 사용하여 고정합니다.
Ambil pemandu laci kanan (yang ditandai dengan R) dari
bagian atas kemasan.
Penting:
Jangan lepaskan karton dan pita bagian dalam.
Pasang pemandu laci di sisi kanan. Dorong pemandu sampai
ke dalam, lalu kencangkan dengan 1 sekrup.
Take the left drawer guide (marked with an L) and insert it into
the left side of the printer.
Note:
No screw is required.
左のドロワー ガイド(Lと示されたもの)を取り出し、
プリンタの左側に挿入します。
注記:
ネジは必要ありません。
取出左側紙卷匣導板(以 L 標示),接著將導板插入印
表機左側。
附註:
不需使用螺絲。
왼쪽 용지함 가이드(L 표시 됨)를 프린터의 왼쪽에
삽입합니다.
참고:
나사는 필요없습니다.
Ambil pemandu laci kiri (yang ditandai dengan L), lalu
masukkan ke sisi kiri printer.
Catatan:
Tidak memerlukan sekrup.
4
5
6
7