HP Pavilion a200 Part Replacement Instructions - Page 6
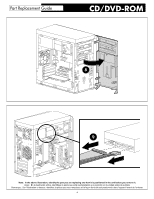
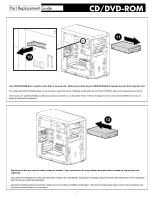
In the above illustration, identify the part you are replacing and how it is positioned in the unit
 |
View all HP Pavilion a200 manuals
Add to My Manuals
Save this manual to your list of manuals |
Page 6 highlights
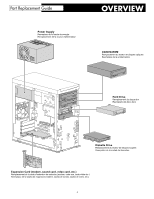
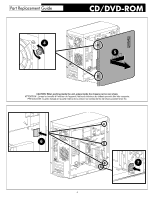
8 9 Note: In the above illustration, identify the part you are replacing and how it is positioned in the unit before you remove it. Aviso: En la ilustración arriba, identifique la pieza que está reemplazando y su posición en la unidad antes de quitarla. Remarque : Sur l'illustration ci-dessus, identifiez la pièce que vous remplacez et la façon dont elle est positionnée dans l'appareil avant de l'enlever. 6
-
 1
1 -
 2
2 -
 3
3 -
 4
4 -
 5
5 -
 6
6 -
 7
7 -
 8
8 -
 9
9 -
 10
10 -
 11
11 -
 12
12 -
13
-
14
-
15
-
16
-
17
-
18
-
19
-
20
-
21
-
22
-
23
-
24
-
25
-
26
-
27
-
28
-
29
-
30
-
31
-
32
-
33
-
34
-
35
-
36
-
37
-
38
-
39
-
40
-
41
-
42
-
43
 |
 |

6
9
8
Note:
In the above illustration, identify the part you are replacing and how it is positioned in the unit before you remove it.
Aviso:
En la ilustración arriba, identifique la pieza que está reemplazando y su posición en la unidad antes de quitarla.
Remarque : Sur l’illustration ci-dessus, identifiez la pièce que vous remplacez et la façon dont elle est positionnée dans l’appareil avant de l’enlever.