HP Presario 6600 Installing the Wireless Keyboard and Mouse Set
HP Presario 6600 - Desktop PC Manual
 |
View all HP Presario 6600 manuals
Add to My Manuals
Save this manual to your list of manuals |
HP Presario 6600 manual content summary:
- HP Presario 6600 | Installing the Wireless Keyboard and Mouse Set - Page 1
Installing the Wireless Keyboard and Mouse Set Installation de l'ensemble clavier/souris sans fil Instalación del set de teclado y ratón inalámbricos Installazione della tastiera e del mouse senza fili De draadloze muis- en toetsenbordset installeren Installere settet med trådløst tastatur og trådl - HP Presario 6600 | Installing the Wireless Keyboard and Mouse Set - Page 2
- HP Presario 6600 | Installing the Wireless Keyboard and Mouse Set - Page 3
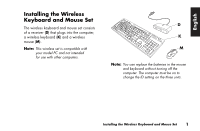
English Installing the Wireless Keyboard and Mouse Set The wireless keyboard and mouse set consists of a receiver (D) that plugs into the computer, a wireless keyboard (K) and a wireless mouse (M). Note: This wireless set is compatible with your model PC and not intended for use with other - HP Presario 6600 | Installing the Wireless Keyboard and Mouse Set - Page 4
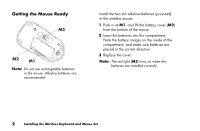
Getting the Mouse Ready M3 M2 M1 Note: Do not use rechargeable batteries in the mouse. Alkaline batteries are recommended. Install the two AA alkaline batteries (provided) in the wireless mouse: 1 Push in at M1, and lift the battery cover (M2) from the bottom of the mouse. 2 Insert the batteries - HP Presario 6600 | Installing the Wireless Keyboard and Mouse Set - Page 5
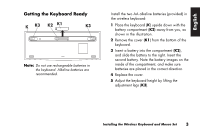
English Getting the Keyboard Ready K K3 K2 K1 K3 Note: Do not use rechargeable batteries in the keyboard. Alkaline batteries are recommended. Install the two AA alkaline batteries (provided) in the wireless keyboard: 1 Place the keyboard (K) upside down with the battery compartment (K2) away - HP Presario 6600 | Installing the Wireless Keyboard and Mouse Set - Page 6
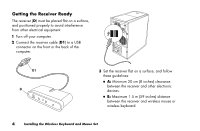
Getting the Receiver Ready The receiver (D) must be placed flat on a surface, and positioned properly to avoid interference from other electrical equipment. 1 Turn off your computer. 2 Connect the receiver cable (D1) to a USB connector on the front or the back of the computer. D1 D 3 Set the - HP Presario 6600 | Installing the Wireless Keyboard and Mouse Set - Page 7
English ■ C: Minimum 20 cm (8 inches) clearance between the receiver and the monitor. ■ Place no electronic device between the receiver and wireless mouse or wireless keyboard. C A B B Note: This is one example of the setup. Other setup positions are also possible. Warning: To avoid causing - HP Presario 6600 | Installing the Wireless Keyboard and Mouse Set - Page 8
Setting Up the Wireless Set The mouse and keyboard have 255 IDs that are randomly selected when you press the ID button. This helps protect against interference from other wireless devices in the same area. Important: The word CONNECT is the label for the ID button on the bottom of the mouse and - HP Presario 6600 | Installing the Wireless Keyboard and Mouse Set - Page 9
English 3 On the bottom of the mouse, press the ID button (N) once with a blunt pointed object. The mouse sends a new ID, and flashes the mouse sensor light (M3) three times. The receiver flashes the blue activity light (J) three times and then stops to show it has accepted the new ID for the mouse - HP Presario 6600 | Installing the Wireless Keyboard and Mouse Set - Page 10
5 On the bottom of the keyboard, press the ID button (L) once with a blunt pointed object. The keyboard sends a new ID, and the blue activity light (J) on the receiver flashes three times, and then stops to show it has accepted the new ID for the keyboard. K L Note: At this time, when you press a - HP Presario 6600 | Installing the Wireless Keyboard and Mouse Set - Page 11
English Using the Wireless Set The lights on the receiver (D) indicate: ■ Receiver activity (J) The blue light flashes when you move or click the mouse, or press any key on the keyboard. ■ Number lock on (F) ■ Caps lock on (G) ■ Scroll lock on (H) The receiver ID button (E) is on the front of the - HP Presario 6600 | Installing the Wireless Keyboard and Mouse Set - Page 12
5 times each hour until the batteries are changed. If you use a mouse pad, choose a light-coloured one, not a dark one, to conserve battery power. Troubleshooting If the wireless mouse or keyboard does not work, do the following: ■ Check that the receiver cables go to the USB connector on the front - HP Presario 6600 | Installing the Wireless Keyboard and Mouse Set - Page 13
better reception. Use the optical mouse on an opaque surface. Use a light-coloured surface for better mouse performance. ■ If you still experience reception problems, reset the ID buttons of all three units by following the steps in the section "Setting Up the Wireless Set." ■ If the mouse cursor - HP Presario 6600 | Installing the Wireless Keyboard and Mouse Set - Page 14
12 Installing the Wireless Keyboard and Mouse Set - HP Presario 6600 | Installing the Wireless Keyboard and Mouse Set - Page 15
Français Installation de l'ensemble clavier/souris sans fil L'ensemble clavier/souris sans fil se compose d'un récepteur (D) à brancher sur l'ordinateur, d'un clavier sans fil (K) et d'une souris sans fil (M). Remarque : Cet ensemble sans fil est compatible avec votre modèle d'ordinteur et n'est - HP Presario 6600 | Installing the Wireless Keyboard and Mouse Set - Page 16
Préparation de la souris M3 M2 M1 Remarque : N'utilisez pas de piles rechargeables. Il est recommandé d'utiliser des piles alcalines. Insérez les deux piles alcalines AA (fournies) dans la souris sans fil : 1 Appuyez sur le taquet M1 et soulevez le couvercle (M2) sur le dessous de la souris. 2 - HP Presario 6600 | Installing the Wireless Keyboard and Mouse Set - Page 17
Français Préparation du clavier K K3 K2 K1 K3 Remarque : N'utilisez pas de piles rechargeables. Il est recommandé d'utiliser des piles alcalines. Insérez les deux piles alcalines AA (fournies) dans le clavier sans fil : 1 Retournez le clavier (K) et placez-le de manière à ce que le compartiment - HP Presario 6600 | Installing the Wireless Keyboard and Mouse Set - Page 18
Préparation du récepteur Le récepteur (D) doit être placé à plat et positionné correctement afin d'éviter les interférences d'autres équipements électriques. 1 Éteignez votre ordinateur. 2 Branchez le câble du récepteur (D1) à un port USB à l'arrière ou à l'avant de l'ordinateur. D1 D 3 Posez le - HP Presario 6600 | Installing the Wireless Keyboard and Mouse Set - Page 19
■ C : Distance minimale de 20 cm entre le récepteur et le moniteur. ■ Ne placez aucun appareil électronique entre le récepteur et la souris ou le clavier sans fil. Français C A B B Remarque : Ceci est un exemple de configuration. D'autres positions sont aussi possibles. Avertissement : Pour é - HP Presario 6600 | Installing the Wireless Keyboard and Mouse Set - Page 20
Configuration de l'ensemble sans fil La souris et le clavier disposent de 255 numéros d'identification (ID) dont un est sélectionné au hasard quand vous appuyez sur le bouton ID. Ceci a pour but d'éviter les interférences avec d'autres appareils sans fil situés à proximité. Important : L'étiquette - HP Presario 6600 | Installing the Wireless Keyboard and Mouse Set - Page 21
Français 3 Appuyez une fois sur le bouton ID (N) situé sous la souris à l'aide d'un objet pointu à bout arrondi. La souris envoie un nouvel ID et son voyant de détection (M3) clignote trois fois. Le témoin lumineux bleu (J) du récepteur clignote trois fois puis s'arrête ; cela signifie qu'il a - HP Presario 6600 | Installing the Wireless Keyboard and Mouse Set - Page 22
Important : Si 30 secondes s'écoulent avant que vous ne puissiez finir l'étape 5, vous devez répétez les étapes 4 et 5 pour régler le numéro d'ID du récepteur. Si vous avez appuyé plus d'une fois sur le bouton d'ID durant le réglage du clavier (étape 5), vous devez recommencer à l'étape 4 et régler - HP Presario 6600 | Installing the Wireless Keyboard and Mouse Set - Page 23
Français Réinitialisation des boutons ID lors du remplacement des piles Lorsque vous avez remplacé les piles de la souris ou du clavier, réinitialisez les boutons d'ID du récepteur et de l'unité. Vous devez d'abord appuyer sur le bouton ID du récepteur, puis sur celui de la souris. Reportez-vous - HP Presario 6600 | Installing the Wireless Keyboard and Mouse Set - Page 24
Posez le récepteur sur une surface non métallique pour améliorer la réception. La souris optique utilise un faisceau lumineux pour détecter les mouvements. Utilisez la souris optique sur une surface opaque ; elle ne fonctionne pas sur les surfaces vitrées, transparentes ou réfléchissantes. Important - HP Presario 6600 | Installing the Wireless Keyboard and Mouse Set - Page 25
Français Dépannage Si la souris ou le clavier sans fil ne fonctionne pas, procédez comme suit : ■ Vérifiez que le câble du récepteur est branché au port USB à l'avant ou à l'arrière de l'ordinateur. ■ Cliquez sur l'un des boutons de la souris et déplacez-la ou appuyez sur une touche du clavier pour - HP Presario 6600 | Installing the Wireless Keyboard and Mouse Set - Page 26
■ Si le curseur de la souris se déplace trop vite, vous pouvez régler la vitesse de déplacement du curseur en utilisant les propriétés de la souris dans le Panneau de Configuration. Vous noterez que la souris déplace le pointeur sur l'écran deux fois plus rapidement qu'une souris traditionnelle (à - HP Presario 6600 | Installing the Wireless Keyboard and Mouse Set - Page 27
Instalación del set de teclado y ratón inalámbricos El set de teclado y ratón inalámbricos incluye un receptor (D) que se conecta en el ordenador, un teclado inalámbrico (K) y un ratón inalámbrico (M). Nota: Este ratón es compatible con su modelo de PC y no está pensado para su uso con otros - HP Presario 6600 | Installing the Wireless Keyboard and Mouse Set - Page 28
Preparación del ratón M3 M2 M1 Nota: No use pilas recargables en el ratón. Se recomienda el uso de pilas alcalinas. Instale las dos pilas alcalinas tipo AA (suministradas) en el ratón inalámbrico: 1 Haga presión en M1 y levante la tapa de las pilas (M2) en la parte inferior del ratón. 2 - HP Presario 6600 | Installing the Wireless Keyboard and Mouse Set - Page 29
Preparación del teclado K K3 K2 K1 K3 Nota: No use pilas recargables en el teclado. Se recomienda el uso de pilas alcalinas. Instale las dos pilas alcalinas tipo AA (suministradas) en el teclado inalámbrico: 1 Ponga el teclado bocabajo (K) con el compartimiento de las pilas (K2) como se muestra - HP Presario 6600 | Installing the Wireless Keyboard and Mouse Set - Page 30
Preparación del receptor El receptor (D) debe colocarse sobre una superficie plan y correctamente ubicado para evitar interferencias con otros equipos eléctricos. 1 Apague el ordenador. 2 Conecte el cable del receptor (D1) al conector USB de la parte delantera o trasera del ordenador. D1 D 3 Ponga - HP Presario 6600 | Installing the Wireless Keyboard and Mouse Set - Page 31
■ C: Tiene que haber una distancia mínima de 20 cm (8 pulgadas) entre el receptor y el monitor. ■ No coloque ningún dispositivo electrónico entre el receptor y el ratón o el teclado inalámbricos. Español C A B B Nota: Éste es un ejemplo de la instalación. También son posibles otras posiciones. - HP Presario 6600 | Installing the Wireless Keyboard and Mouse Set - Page 32
Configuración del set inalámbrico El ratón y el teclado tienen 255 identificadores, que se seleccionan aleatoriamente cuando se pulsa el botón identificador. Esto ayuda a proteger contra interferencias producidas por otros dispositivos inalámbricos en la misma zona. Importante: Los botones - HP Presario 6600 | Installing the Wireless Keyboard and Mouse Set - Page 33
Importante: Si transcurren 30 segundos antes de terminar el paso 3, tendrá que repetir los pasos 2 y 3 para configurar el identificador del ratón. Si pulsa el botón identificador más de una vez durante la configuración del ratón (paso 3), tendrá que comenzar de nuevo en el paso 2 y configurar el - HP Presario 6600 | Installing the Wireless Keyboard and Mouse Set - Page 34
4 En la parte delantera del receptor, pulse una vez el botón identificador (E). El piloto de actividad (J) del receptor comienza a parpadear y continúa así hasta que se termina el paso siguiente o hasta que hayan transcurrido 30 segundos. D E F GH J 5 Pulse una vez con un objeto de punta roma el - HP Presario 6600 | Installing the Wireless Keyboard and Mouse Set - Page 35
Nota: Una vez que funcionen el receptor, el ratón y el teclado, puede volver a configurar independientemente el botón identificador del ratón (N) o del teclado (L) tras pulsar el botón identificador (E) del receptor. Reconfiguración de los botones identificadores al sustituir las pilas Al cambiar - HP Presario 6600 | Installing the Wireless Keyboard and Mouse Set - Page 36
Use el receptor sobre una superficie no metálica para lograr una mejor recepción. El ratón óptico utiliza una luz para detectar movimiento. Utilice el ratón óptico sobre una superficie opaca; el ratón óptico no puede funcionar sobre superficies de cristal, traslúcidas o reflectantes. Importante: - HP Presario 6600 | Installing the Wireless Keyboard and Mouse Set - Page 37
Resolución de problemas Si el ratón o el teclado inalámbrico no funciona, siga estos pasos: ■ Compruebe que los cables del receptor estén conectados en el conector USB de la parte delantera o posterior del ordenador. ■ Haga clic con un botón del ratón y muévalo, o pulse cualquier tecla del teclado - HP Presario 6600 | Installing the Wireless Keyboard and Mouse Set - Page 38
■ Si aún experimenta problemas de recepción, vuelva a configurar los botones identificadores de las tres unidades siguiendo los pasos que se indican en la sección "Configuración del set inalámbrico". ■ Si el cursor del ratón se mueve demasiado rápido, puede cambiar la velocidad de movimiento del - HP Presario 6600 | Installing the Wireless Keyboard and Mouse Set - Page 39
Installazione della tastiera e del mouse senza fili Il prodotto comprende un ricevitore (D) che si collega al computer, una tastiera (K) e un mouse senza fili (M). Nota Questo prodotto è compatibile con il modello di computer posseduto e non è adatto per altri computer. D K M Nota È possibile - HP Presario 6600 | Installing the Wireless Keyboard and Mouse Set - Page 40
Preparazione del mouse M3 M2 M1 Nota Non utilizzare batterie ricaricabili per il mouse. Si raccomandano batterie alcaline. Inserire nel mouse le due batterie alcaline stilo (AA) incluse nella confezione: 1 Sul fondo del mouse, premere sul punto M1 e sollevare il coperchio del vano batterie (M2). - HP Presario 6600 | Installing the Wireless Keyboard and Mouse Set - Page 41
Preparazione della tastiera K K3 K2 K1 K3 Nota Non utilizzare batterie ricaricabili per la tastiera. Si raccomandano batterie alcaline. Inserire nella tastiera le due batterie alcaline stilo (AA) incluse nella confezione: 1 Collocare la tastiera (K) capovolta, con il vano batterie (K2) rivolto - HP Presario 6600 | Installing the Wireless Keyboard and Mouse Set - Page 42
Preparazione del ricevitore Il ricevitore (D) deve essere collocato disteso e in posizione tale da evitare interferenze con gli altri dispositivi elettrici. 1 Spegnere il computer. 2 Inserire il cavo del ricevitore (D1) nel connettore USB posto sul pannello anteriore o posteriore del computer. D1 D - HP Presario 6600 | Installing the Wireless Keyboard and Mouse Set - Page 43
■ C: Conservare una distanza minima di 20 cm tra il ricevitore e il monitor. ■ Tra il ricevitore e il mouse/tastiera senza fili non devono essere frapposti altri apparecchi elettronici. C A B B Nota Questa è solo una configurazione di esempio, ne sono possibili anche altre. Avvertenza Per - HP Presario 6600 | Installing the Wireless Keyboard and Mouse Set - Page 44
Configurazione del set senza fili Il mouse e la tastiera dispongono di 255 ID che vengono selezionati automaticamente quando si preme il pulsante ID. Questo permette di evitare interferenze con altri dispositivi senza fili che si trovassero in prossimità. Importante Il pulsante ID sulla base di ogni - HP Presario 6600 | Installing the Wireless Keyboard and Mouse Set - Page 45
Importante Se dopo 30 secondi non è ancora stato eseguito il punto 3 è necessario ripetere i punti 2 e 3 per configurare l'ID del mouse. Se il pulsante dell'ID viene premuto più volte durante la configurazione del mouse (punto 3), è necessario ricominciare dal punto 2 e impostare l'ID del ricevitore - HP Presario 6600 | Installing the Wireless Keyboard and Mouse Set - Page 46
4 Premere una volta sola il pulsante ID (E) sulla parte anteriore del ricevitore. La spia (J) del ricevitore indicante lo stato di attività lampeggia finché non verrà completata l'operazione successiva o non saranno trascorsi 30 secondi. D E F GH J 5 Premere una volta sola il pulsante ID (L) - HP Presario 6600 | Installing the Wireless Keyboard and Mouse Set - Page 47
Nota Quando ricevitore, mouse e tastiera funzionano, è possibile resettare separatamente il pulsante ID del mouse (N) o della tastiera (L) dopo aver premuto il pulsante ID del ricevitore (E). Reset dei pulsanti ID dopo la sostituzione delle batterie Quando le batterie di mouse o tastiera vengono - HP Presario 6600 | Installing the Wireless Keyboard and Mouse Set - Page 48
Per una migliore ricezione è consigliabile utilizzare il ricevitore su una superficie non metallica. Il mouse ottico usa un raggio di luce per rilevare i movimenti. Il mouse ottico deve essere utilizzato su superfici opache, non su superfici di vetro, riflettenti o trasparenti. Importante Il mouse - HP Presario 6600 | Installing the Wireless Keyboard and Mouse Set - Page 49
Risoluzione dei problemi Nel caso in cui il mouse o la tastiera senza fili non funzionino, procedere come segue: ■ Controllare che i cavi del ricevitore siano inseriti nel connettore USB posto sul pannello anteriore o posteriore del computer. ■ Fare clic su un pulsante del mouse e spostarlo, oppure - HP Presario 6600 | Installing the Wireless Keyboard and Mouse Set - Page 50
■ Se il cursore del mouse si sposta troppo velocemente, è possibile regolarlo con le proprietà del mouse nel Pannello di controllo. Il mouse senza fili si sposta sullo schermo a velocità doppia rispetto a un mouse comune. Questo perché lo spostamento avviene a 800 dpi (punti per pollice), mentre un - HP Presario 6600 | Installing the Wireless Keyboard and Mouse Set - Page 51
Nederlands De draadloze muis- en toetsenbordset installeren De draadloze muis- en toetsenbordset bestaat uit een ontvanger (D) die op de computer wordt aangesloten, een draadloos toetsenbord (K) en een draadloze muis (M). Opmerking: Deze draadloze set is compatibel met uw model pc en niet bedoeld - HP Presario 6600 | Installing the Wireless Keyboard and Mouse Set - Page 52
De muis gereedmaken M3 M2 M1 Opmerking: Gebruik geen oplaadbare batterijen in de muis. Gebruik bij voorkeur alkalinebatterijen. Plaats de twee (meegeleverde) AA alkalinebatterijen in de draadloze muis: 1 Druk op positie M1 aan de onderkant van de muis en verwijder het klepje van het batterijvak - HP Presario 6600 | Installing the Wireless Keyboard and Mouse Set - Page 53
Nederlands Het toetsenbord gereedmaken K K3 K2 K1 K3 Opmerking: Gebruik geen oplaadbare batterijen in het toetsenbord. Gebruik bij voorkeur alkalinebatterijen. Plaats de twee (meegeleverde) AA alkalinebatterijen in het draadloze toetsenbord: 1 Leg het toetsenbord (K) ondersteboven neer met het - HP Presario 6600 | Installing the Wireless Keyboard and Mouse Set - Page 54
De ontvanger gereedmaken De ontvanger (D) moet in de juiste positie op een vlak oppervlak worden geplaatst om interferentie van andere elektrische apparaten te vermijden. 1 Schakel de computer uit. 2 Sluit het snoer van de ontvanger (D1) aan op een van de USB-poorten aan de achterkant van de - HP Presario 6600 | Installing the Wireless Keyboard and Mouse Set - Page 55
Nederlands ■ C: Minimumafstand van 20 cm tussen ontvanger en beeldscherm. ■ Zorg dat zich geen andere elektronische apparaten tussen ontvanger en muis of toetsenbord bevinden. C A B B Opmerking: Dit is een voorbeeldopstelling. Andere opstellingen zijn ook mogelijk. Waarschuwing: Houd om - HP Presario 6600 | Installing the Wireless Keyboard and Mouse Set - Page 56
De draadloze set instellen De muis en het toetsenbord beschikken over 255 ID's, die willekeurig worden gekozen als u op de ID-knop drukt. Zo wordt storing door andere draadloze apparaten in de omgeving voorkomen. Belangrijk: De ID-knop op de onderkant van muis en toetsenbord heeft het label CONNECT. - HP Presario 6600 | Installing the Wireless Keyboard and Mouse Set - Page 57
Nederlands Belangrijk: Als er 30 seconden zijn verstreken voordat u stap 3 uitvoert, moet u stap 2 en 3 herhalen om de muis-ID in te stellen. Als u bij het instellen van de muis (stap 3) de ID-knop per ongeluk meerdere keren indrukt, moet u opnieuw beginnen bij stap 2, het instellen van de ID van - HP Presario 6600 | Installing the Wireless Keyboard and Mouse Set - Page 58
4 Druk eenmaal op de ID-knop (E) aan de voorkant van de ontvanger. Het lampje (J) gaat knipperen en gaat weer uit wanneer de volgende stap is voltooid of 30 seconden zijn verstreken. D E F GH J 5 Druk eenmaal op de ID-knop (L) op de onderkant van het toetsenbord. Gebruik hiervoor een niet te - HP Presario 6600 | Installing the Wireless Keyboard and Mouse Set - Page 59
Nederlands Opmerking: Als ontvanger, muis en toetsenbord eenmaal werken, kunt u de ID's van muis en toetsenbord onafhankelijk van elkaar instellen. U drukt daarvoor eerst op de IDknop van de ontvanger (E) en daarna op de ID-knop van de muis (N) of de ID-knop van het toetsenbord (L). ID-knoppen - HP Presario 6600 | Installing the Wireless Keyboard and Mouse Set - Page 60
Plaats de ontvanger op een niet-metalen oppervlak voor de beste ontvangst. De optische muis gebruikt licht om beweging te detecteren. De muis moet dan ook worden gebruikt op een ondoorzichtig oppervlak. De muis werkt niet op glas of op een doorzichtig of weerspiegelend oppervlak. Belangrijk: Na 20 - HP Presario 6600 | Installing the Wireless Keyboard and Mouse Set - Page 61
Nederlands Problemen oplossen Als de muis of het toetsenbord niet werkt, doet u het volgende: ■ Controleer of het snoer van de ontvanger is aangesloten op een van de USB-poorten aan de voor- of achterkant van de computer. ■ Klik met een muisknop en beweeg de muis of druk op een toets van het - HP Presario 6600 | Installing the Wireless Keyboard and Mouse Set - Page 62
■ Als de muiscursor te snel beweegt, kunt u de cursorbeweging aanpassen via het onderdeel Eigenschappen voor Muis in het Configuratiescherm. De cursor beweegt tweemaal zo snel over het scherm als bij gebruik van een standaardmuis. Bij de draadloze muis beweegt de cursor met 800 punten per inch (dpi - HP Presario 6600 | Installing the Wireless Keyboard and Mouse Set - Page 63
Norsk Installere settet med trådløst tastatur og trådløs mus Settet med trådløst tastatur og trådløs mus består av en mottaker (D) som plugges inn i datamaskinen, et trådløst tastatur (K) og en trådløs mus (M). Obs! Dette trådløse settet er kompatibelt med PC-modellen din og er ikke beregnet på - HP Presario 6600 | Installing the Wireless Keyboard and Mouse Set - Page 64
Klargjøre musen M3 M2 M1 Obs! Ikke bruk oppladbare batterier i musen. Alkaliske batterier anbefales. Sett inn de to alkaliske AA -batteriene (medfølger) i den trådløse musen: 1 Trykk inn ved M1, og løft opp batteridekselet (M2) på undersiden av musen. 2 Sett batteriene på plass. Legg merke til - HP Presario 6600 | Installing the Wireless Keyboard and Mouse Set - Page 65
Norsk Klargjøre tastaturet K K3 K2 K1 K3 Obs! Ikke bruk oppladbare batterier i tastaturet. Alkaliske batterier anbefales. Sett inn de to alkaliske AA-batteriene (medfølger) i det trådløse tastaturet: 1 Plasser tastaturet (K) opp ned med batteriholderen (K2) bort fra deg, som vist i - HP Presario 6600 | Installing the Wireless Keyboard and Mouse Set - Page 66
Klargjøre mottakeren Mottakeren (D) må plasseres på et flatt underlag og være plassert slik at interferens fra andre elektriske komponenter unngås. 1 Slå av datamaskinen. 2 Sett inn mottakerkabelen (D1) i USB-kontakten på for- eller baksiden av datamaskinen. D1 D 3 Plasser mottakeren på et flatt - HP Presario 6600 | Installing the Wireless Keyboard and Mouse Set - Page 67
■ C: Minst 20 cm (8 tommer) klaring mellom mottakeren og skjermen. ■ Plasser ingen elektroniske enheter mellom mottakeren og trådløs mus eller trådløst tastatur. Norsk C A B B Obs! Dette er ett eksempel på oppsett. Du kan også velge andre oppsettposisjoner. Advarsel: Plasser mottakeren minst 20 - HP Presario 6600 | Installing the Wireless Keyboard and Mouse Set - Page 68
Installere det trådløse settet Musen og tastaturet har 255 IDer, som velges tilfeldig når du trykker på ID-knappen. Dette er en beskyttelse mot interferens fra andre trådløse enheter i samme område. Viktig: Ordet CONNECT er navnet på ID-knappen på undersiden av musen og tastaturet. Bruk en spiss - HP Presario 6600 | Installing the Wireless Keyboard and Mouse Set - Page 69
Norsk Viktig: Hvis det går 30 sekunder før du har fullført trinn 3, må du gjenta trinn 2 og 3 for å angi mus-IDen. Hvis du trykker på ID-knappen mer enn én gang under konfigureringen av musen (trinn 3), må du begynne på nytt med trinn 2 og angi mottaker-IDen. 3 Trykk én gang med en spiss gjenstand - HP Presario 6600 | Installing the Wireless Keyboard and Mouse Set - Page 70
4 Trykk én gang på ID-knappen (E) foran på mottakeren. Aktivitetslampen (J) på mottakeren begynner å blinke og fortsetter å blinke til det neste trinnet er fullført, eller det har gått 30 sekunder. D E F GH J 5 Trykk én gang med en spiss gjenstand på ID-knappen (L) på undersiden av tastaturet. - HP Presario 6600 | Installing the Wireless Keyboard and Mouse Set - Page 71
Norsk Obs! Når mottakeren, musen og tastaturet fungerer, kan du tilbakestille ID-knappen for musen (N) eller tastaturet (L) separat etter at du har trykket på ID-knappen (E) for mottakeren. Stille inn ID-knapper på nytt når du skifter batterier Når du skifter batteriene i musen eller tastaturet, - HP Presario 6600 | Installing the Wireless Keyboard and Mouse Set - Page 72
For å få best mulig mottak bør mottakeren brukes på et underlag som ikke er av metall. Den optiske musen bruker et lys for å føle bevegelse. Bruk den optiske musen på et ugjennomskinnelig underlag. Den optiske musen fungerer ikke på glassflater, gjennomsiktige eller reflekterende underlag. Viktig: - HP Presario 6600 | Installing the Wireless Keyboard and Mouse Set - Page 73
Norsk Problemløsing Hvis den trådløse musen eller det trådløse tastaturet ikke virker, må du gjøre følgende: ■ Kontroller at mottakerkablene er satt i USB-kontakten foran eller bak på datamaskinen. ■ Klikk på en knapp på musen og beveg den, eller trykk på en knapp på tastaturet for å se om den blå - HP Presario 6600 | Installing the Wireless Keyboard and Mouse Set - Page 74
■ Hvis du fremdeles har problemer, stiller du inn ID-knappene på alle tre enhetene ved å følge trinnene i avsnittet "Installere det trådløse settet". ■ Hvis musemarkøren beveger seg for raskt, - HP Presario 6600 | Installing the Wireless Keyboard and Mouse Set - Page 75
Installera det trådlösa tangentbordet och den trådlösa musen Uppsättningen med det trådlösa tangentbordet och musen består av en mottagare (D) som kopplas till datorn, ett trådlöst tangentbord (K) och en trådlös mus (M). Obs! Den trådlösa uppsättningen är kompatibel med din datormodell och är inte - HP Presario 6600 | Installing the Wireless Keyboard and Mouse Set - Page 76
Förbereda musen för användning M3 M2 M1 Obs! Använd inte laddningsbara batterier i musen. Alkaliska batterier rekommenderas. Installera de båda alkaliska batterierna av typ AA (medföljer) i den trådlösa musen: 1 Tryck inåt vid M1 och lyft batteriluckan (M2) på musens undersida. 2 Sätt i - HP Presario 6600 | Installing the Wireless Keyboard and Mouse Set - Page 77
Förbereda tangentbordet för användning K K3 K2 K1 K3 Obs! Använd inte laddningsbara batterier i tangentbordet. Alkaliska batterier rekommenderas. Installera de båda alkaliska AA-batterierna (medföljer) i det trådlösa tangentbordet: 1 Ställ tangentbordet (K) upp-och-ner med batterifacket (K2) - HP Presario 6600 | Installing the Wireless Keyboard and Mouse Set - Page 78
Förbereda mottagaren för användning Mottagaren (D) måste placeras på ett plant underlag och i ett sådant läge att du undviker störningar från annan elektrisk utrustning. 1 Stäng av datorn. 2 Anslut mottagarkabeln (D1) till en USB-anslutning på datorns fram- eller baksida. D1 D 3 Placera mottagaren - HP Presario 6600 | Installing the Wireless Keyboard and Mouse Set - Page 79
■ C: Minst 20 cm fritt utrymme mellan mottagaren och datorskärmen. ■ Ställ inte någon elektronisk utrustning mellan mottagaren och de trådlösa enheterna (musen och tangentbordet). Svenska C A B B Obs! Detta är ett exempel på installationen. Andra placeringar är också möjliga. Varning! För att - HP Presario 6600 | Installing the Wireless Keyboard and Mouse Set - Page 80
Installera den trådlösa uppsättningen Musen och tangentbordet har 255 ID-kanaler som väljs slumpmässigt när du trycker på ID-knappen. Detta ger ett visst skydd mot störningar från andra trådlösa apparater i närheten. Viktig: CONNECT anger ID-knappen på undersidan av musen och tangentbordet. Tryck in - HP Presario 6600 | Installing the Wireless Keyboard and Mouse Set - Page 81
3 Tryck en gång på ID-knappen (N) på undersidan av musen med ett trubbigt föremål. Musen sänder ett nytt ID. Givarlysdioden (M3) blinkar tre gånger. På mottagaren blinkar den blå aktivitetslampan (J) tre gånger och slutar sedan. Då har mottagaren accepterat musens nya ID. N M3 Viktig: Musen går ö - HP Presario 6600 | Installing the Wireless Keyboard and Mouse Set - Page 82
Viktig: Om det har gått mer än 30 sekunder innan du har slutfört steg 5, måste du göra om steg 4 och 5 och ställa in tangentbords-ID. Om ID-knappen har tryckts ned mer än en gång under installationen av tangentbordet (steg 5) måste du börja om med steg 4 och ställa in mottagar-ID. 5 Tryck en gång på - HP Presario 6600 | Installing the Wireless Keyboard and Mouse Set - Page 83
Ställa in ID-knapparna igen efter batteribyte När batterierna sätts tillbaka i musen eller i tangentbordet, måste ID-knapparna på mottagaren och på enheten ställas in igen. Du måste trycka på ID-knappen på mottagaren först. Därefter trycker du på ID-knappen på musen eller på tangentbordet. Mer - HP Presario 6600 | Installing the Wireless Keyboard and Mouse Set - Page 84
Använd mottagaren på en icke-metallisk yta för att få bättre mottagning. Den optiska musen använder en lampa för att känna av rörelser. Använd den optiska musen på ett ogenomskinligt underlag. Musen fungerar inte på glasytor, genomskinliga eller reflektiva ytor. Viktig: Musen går över i viloläge - HP Presario 6600 | Installing the Wireless Keyboard and Mouse Set - Page 85
Felsökning Om den trådlösa musen eller det trådlösa tangentbordet inte fungerar gör du så här: ■ Se till att mottagarkabeln är kopplad till USB-anslutningen på datorns fram- eller baksida. ■ Klicka med en av musknapparna och flytta musen, eller tryck på en tangent på tangentbordet och se om den blå - HP Presario 6600 | Installing the Wireless Keyboard and Mouse Set - Page 86
■ Om muspekaren rör sig för fort kan du ändra hastigheten med hjälp av musens egenskaper i Kontrollpanelen. Den trådlösa musen flyttar pekaren på skärmen dubbelt så fort som en vanlig mus. Den trådlösa musen flyttar markören med 800 punkter per tum (dpi), medan en vanlig mus flyttar markören med 400 - HP Presario 6600 | Installing the Wireless Keyboard and Mouse Set - Page 87
Installieren des kabellosen Tastatur/Maus-Sets Das kabellose Tastatur/Maus-Set besteht aus einem an den Computer anzuschließenden Empfänger (D), einer kabellosen Tastatur (K) und einer kabellosen Maus (M). Hinweis: Das kabellose Set ist mit Ihrem PCModell kompatibel und nicht für die Verwendung mit - HP Presario 6600 | Installing the Wireless Keyboard and Mouse Set - Page 88
Vorbereiten der Maus M3 M2 M1 Hinweis: Verwenden Sie in der Maus keine wiederaufladbaren Batterien. Es wird die Verwendung von Alkali-Batterien empfohlen. Legen Sie die zwei mitgelieferten AA-AlkaliBatterien in die kabellose Maus ein: 1 Drücken Sie an der mit M1 markierten Stelle auf den Deckel - HP Presario 6600 | Installing the Wireless Keyboard and Mouse Set - Page 89
Vorbereiten der Tastatur K K3 K2 K1 K3 Hinweis: Verwenden Sie in der Tastatur keine wiederaufladbaren Batterien. Es wird die Verwendung von Alkali-Batterien empfohlen. Legen Sie die zwei mitgelieferten AA-AlkaliBatterien in die kabellose Tastatur ein: 1 Legen Sie die Tastatur (K) mit der - HP Presario 6600 | Installing the Wireless Keyboard and Mouse Set - Page 90
Vorbereiten des Empfängers Der Empfänger (D) muss auf eine flache Unterlage gestellt und korrekt positioniert sein, um Störung durch andere elektrische Geräte zu vermeiden. 1 Schalten Sie den Computer aus. 2 Verbinden Sie das Empfängerkabel (D1) mit einem USB-Anschluss an der Vorder- oder Rückseite - HP Presario 6600 | Installing the Wireless Keyboard and Mouse Set - Page 91
■ C: Mindestens 20 cm Abstand zwischen dem Empfänger und dem Monitor. ■ Positionieren Sie keine elektrischen Geräte zwischen dem Empfänger und der kabellosen Maus bzw. Tastatur. C A B B Hinweis: Nachfolgend finden Sie ein Beispiel für die Aufstellung der Geräte. Andere Aufstellungen sind - HP Presario 6600 | Installing the Wireless Keyboard and Mouse Set - Page 92
Einrichten des kabellosen Sets Die Maus verfügt über 255 Kanäle bzw. IDs. Durch Drücken der ID-Taste wird nach dem Zufallsprinzip ein Kanal ausgewählt. Dieses Prinzip gewährleistet den Schutz gegen Funkstörung durch andere kabellose Geräte in der näheren Umgebung. Wichtig: Die ID-Taste auf der - HP Presario 6600 | Installing the Wireless Keyboard and Mouse Set - Page 93
Wichtig: Wenn Sie den Schritt 3 nicht innerhalb von 30 Sekunden ausgeführt haben, müssen Sie die Schritte 2 und 3 zur Einstellung der Maus-ID wiederholen. Wenn die ID-Taste beim Konfigurieren der Maus (Schritt 3) mehrmals gedrückt wird, müssen Sie noch einmal mit Schritt 2 beginnen und die Empfänger - HP Presario 6600 | Installing the Wireless Keyboard and Mouse Set - Page 94
4 Drücken Sie die ID-Taste (E) auf der Vorderseite des Empfängers einmal. Daraufhin blinkt die Aktivitätsanzeige (J) am Empfänger, bis die nächsten beiden Schritte abgeschlossen sind (maximal 30 Sekunden). D E F GH J 5 Verwenden Sie einen spitzen Gegenstand, um die ID-Taste (L) auf der - HP Presario 6600 | Installing the Wireless Keyboard and Mouse Set - Page 95
Hinweis: Wenn Empfänger, Maus und Tastatur betriebsbereit sind, können Sie die ID-Taste der Maus (N) oder der Tastatur (L) nach dem Drücken der ID-Taste des Empfängers (E) separat zurücksetzen. Erneutes Auswählen der IDs beim Auswechseln der Batterien Nach dem Auswechseln der Batterien in der Maus - HP Presario 6600 | Installing the Wireless Keyboard and Mouse Set - Page 96
Verwenden Sie den Empfänger auf einer nicht metallischen Oberfläche, um einen besseren Empfang zu erreichen. Die optische Maus verwendet eine Leuchtanzeige, um Bewegung festzustellen. Verwenden Sie die Maus auf einer nicht transparenten Oberfläche. Die Maus kann nicht auf gläsernen, durchsichtigen - HP Presario 6600 | Installing the Wireless Keyboard and Mouse Set - Page 97
wird im oberen rechten Bereich des Bildschirms ein entsprechendes Symbol angezeigt. Hinweis: Das Symbol zur Anzeige eines niedrigen Batteriestands erscheint 5 Mal pro Stunde, bis die Batterien ausgewechselt werden. Wenn Sie eine Mausunterlage benutzen, wählen Sie eine helle Farbe aus, um weniger - HP Presario 6600 | Installing the Wireless Keyboard and Mouse Set - Page 98
■ Stellen Sie sicher, dass die Batterien in der Maus und der Tastatur korrekt eingelegt sind. ■ Stellen Sie sicher, dass der Abstand zwischen dem Empfänger und anderen elektrischen Geräten (Computer, Bildschirm, Tastatur usw.) mindestens 20 cm beträgt. Positionieren Sie die Tastatur und die Maus - HP Presario 6600 | Installing the Wireless Keyboard and Mouse Set - Page 99
Deutsch Installieren des kabellosen Tastatur/Maus-Sets 97 - HP Presario 6600 | Installing the Wireless Keyboard and Mouse Set - Page 100
Part Number: 3100505881
-
 1
1 -
 2
2 -
 3
3 -
 4
4 -
 5
5 -
 6
6 -
 7
7 -
8
-
9
-
10
-
11
-
12
-
13
-
14
-
15
-
16
-
17
-
18
-
19
-
20
-
21
-
22
-
23
-
24
-
25
-
26
-
27
-
28
-
29
-
30
-
31
-
32
-
33
-
34
-
35
-
36
-
37
-
38
-
39
-
40
-
41
-
42
-
43
-
44
-
45
-
46
-
47
-
48
-
49
-
50
-
51
-
52
-
53
-
54
-
55
-
56
-
57
-
58
-
59
-
60
-
61
-
62
-
63
-
64
-
65
-
66
-
67
-
68
-
69
-
70
-
71
-
72
-
73
-
74
-
75
-
76
-
77
-
78
-
79
-
80
-
81
-
82
-
83
-
84
-
85
-
86
-
87
-
88
-
89
-
90
-
91
-
92
-
93
-
94
-
95
-
96
-
97
-
98
-
99
-
100
 |
 |

Installing the Wireless Keyboard and Mouse Set
Installation de l’ensemble clavier/souris sans fil
Instalación del set de teclado y ratón inalámbricos
Installazione della tastiera e del mouse senza fili
De draadloze muis- en toetsenbordset installeren
Installere settet med trådløst tastatur og trådløs mus
Installera det trådlösa tangentbordet och den trådlösa musen
Installieren des kabellosen Tastatur/Maus-Sets