HP Pro 3000 Hardware Reference Guide - HP Pro 2000 and 3000 Series Microtower - Page 11
Replacing the Front Bezel
 |
View all HP Pro 3000 manuals
Add to My Manuals
Save this manual to your list of manuals |
Page 11 highlights
3. To remove the 3.5-inch bezel blank, press the two retaining tabs towards the outer left edge of the bezel (2) and pull the bezel blank inwards to free it from the front bezel (3). Figure 4 Removing a Bezel Blank 4. Replace the front bezel. Replacing the Front Bezel Insert the three hooks on the left side of the bezel into the slots on the chassis (1) and rotate the bezel on from left to right (2) so that it snaps in place. Figure 5 Replacing the Front Bezel Replacing the Front Bezel 5
-
 1
1 -
2
-
3
-
4
-
5
-
 6
6 -
 7
7 -
 8
8 -
 9
9 -
 10
10 -
 11
11 -
 12
12 -
 13
13 -
 14
14 -
 15
15 -
 16
16 -
17
-
18
-
19
-
20
-
21
-
22
-
23
-
24
-
25
-
26
-
27
-
28
-
29
-
30
-
31
-
32
-
33
-
34
-
35
-
36
-
37
-
38
-
39
-
40
-
41
-
42
-
43
-
44
 |
 |

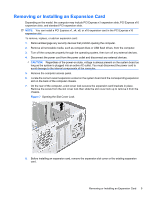
3.
To remove the 3.5-inch bezel blank, press the two retaining tabs towards the outer left edge of the
bezel (2) and pull the bezel blank inwards to free it from the front bezel (3).
Figure 4
Removing a Bezel Blank
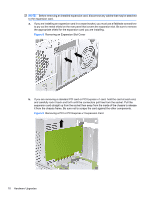
4.
Replace the front bezel.
Replacing the Front Bezel
Insert the three hooks on the left side of the bezel into the slots on the chassis (1) and rotate the bezel
on from left to right (2) so that it snaps in place.
Figure 5
Replacing the Front Bezel
Replacing the Front Bezel
5