HP Pro 3000 Hardware Reference Guide - HP Pro 2000 and 3000 Series Microtower - Page 29
Installing an Internal 3.5-inch Hard Drive, Installing the Hard Drive in the Drive Cage
 |
View all HP Pro 3000 manuals
Add to My Manuals
Save this manual to your list of manuals |
Page 29 highlights
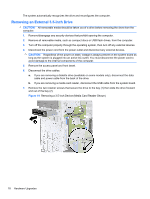
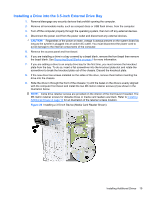
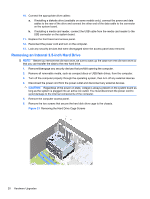
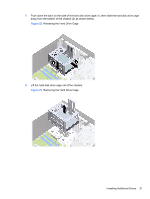
Installing an Internal 3.5-inch Hard Drive 1. Follow the steps in Removing an Internal 3.5-inch Hard Drive on page 20 to remove the hard drive cage and, if necessary, the existing hard drive. 2. Slide the new drive into the hard disk drive cage (1), aligning the drive with the four screw holes on the cage. Install the four 6-32 standard screws that secure the hard disk drive to the hard disk drive cage (2). Make sure the hard disk drive cables are facing the top of the drive cage. NOTE: If you are replacing an old drive with a new drive, use the four retainer screws from the old drive to install the new drive. NOTE: If you are installing a second hard drive, use four of the extra standard 6-32 screws that are installed on the interior of the front bezel. The 6-32 screws are silver. Refer to Installing Additional Drives on page 14 for an illustration of the retainer screws location. Figure 26 Installing the Hard Drive in the Drive Cage Installing Additional Drives 23
-
 1
1 -
2
-
3
-
4
-
5
-
6
-
7
-
8
-
9
-
10
-
11
-
12
-
13
-
14
-
15
-
16
-
17
-
18
-
19
-
20
-
21
-
22
-
23
-
 24
24 -
 25
25 -
 26
26 -
 27
27 -
 28
28 -
 29
29 -
 30
30 -
 31
31 -
 32
32 -
 33
33 -
 34
34 -
35
-
36
-
37
-
38
-
39
-
40
-
41
-
42
-
43
-
44
 |
 |
