HP Pro 3085 Maintenance & Service Guide: HP Pro 3005/3015/3085 Business PC - Page 66
Removing the Hard Drive Cage Screws, Releasing the Hard Drive Cage
 |
View all HP Pro 3085 manuals
Add to My Manuals
Save this manual to your list of manuals |
Page 66 highlights
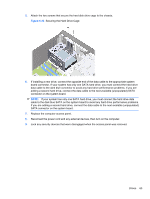
3. Remove the two screws that secure the hard drive cage to the chassis. Figure 6-25 Removing the Hard Drive Cage Screws 4. Push down the latch on the side of the hard drive cage (1), then slide the hard drive cage away from the bottom of the chassis (2) as shown below. Figure 6-26 Releasing the Hard Drive Cage 58 Chapter 6 Removal and Replacement Procedures Microtower (MT) Chassis
-
 1
1 -
2
-
3
-
4
-
5
-
6
-
7
-
8
-
9
-
10
-
11
-
12
-
13
-
14
-
15
-
16
-
17
-
18
-
19
-
20
-
21
-
22
-
23
-
24
-
25
-
26
-
27
-
28
-
29
-
30
-
31
-
32
-
33
-
34
-
35
-
36
-
37
-
38
-
39
-
40
-
41
-
42
-
43
-
44
-
45
-
46
-
47
-
48
-
49
-
50
-
51
-
52
-
53
-
54
-
55
-
56
-
57
-
58
-
59
-
60
-
 61
61 -
 62
62 -
 63
63 -
 64
64 -
 65
65 -
 66
66 -
 67
67 -
 68
68 -
 69
69 -
 70
70 -
 71
71 -
72
-
73
-
74
-
75
-
76
-
77
-
78
-
79
-
80
-
81
-
82
-
83
-
84
-
85
-
86
-
87
-
88
-
89
-
90
-
91
-
92
-
93
-
94
-
95
-
96
-
97
-
98
-
99
-
100
-
101
-
102
-
103
-
104
-
105
-
106
-
107
-
108
-
109
-
110
-
111
-
112
-
113
-
114
-
115
-
116
-
117
-
118
-
119
-
120
-
121
-
122
-
123
-
124
-
125
-
126
-
127
-
128
-
129
-
130
-
131
-
132
-
133
-
134
-
135
-
136
-
137
-
138
-
139
-
140
 |
 |

3.
Remove the two screws that secure the hard drive cage to the chassis.
Figure 6-25
Removing the Hard Drive Cage Screws
4.
Push down the latch on the side of the hard drive cage
(1)
, then slide the hard drive cage away
from the bottom of the chassis
(2)
as shown below.
Figure 6-26
Releasing the Hard Drive Cage
58
Chapter 6
Removal and Replacement Procedures Microtower (MT) Chassis