HP Surestore Tape Library Model 10/180 56 Cartridge Array Installation Instruc - Page 3
the retainer clip lock is snapped into position at the back array wall see
 |
View all HP Surestore Tape Library Model 10/180 manuals
Add to My Manuals
Save this manual to your list of manuals |
Page 3 highlights
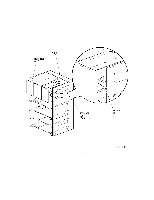
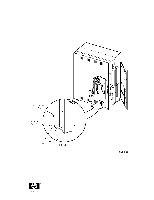
1. With the raised area of one retainer clip facing up, slide the prongs underneath the first cell of the top array in columns 3 and 4. Make sure that the lip on the front of the retainer clip is firmly fixed to the tape library wall by gently pulling the clip towards you to ensure that the retainer clip lock is snapped into position at the back array wall (see Figure 1). Figure 1. Array and Retainer Clips 62213 3
-
 1
1 -
 2
2 -
 3
3 -
 4
4
 |
 |

62213
3
1.
With the raised area of one retainer clip facing up, slide the prongs underneath the first cell
of the top array in columns 3 and 4. Make sure that the lip on the front of the retainer clip
is firmly fixed to the tape library wall by gently pulling the clip towards you to ensure that
the retainer clip lock is snapped into position at the back array wall (see Figure 1).
Figure 1.
Array and Retainer Clips