HP Surestore Tape Library Model 4/40 SAN Solution Installation Guide - Page 31
Tape Libraries
 |
View all HP Surestore Tape Library Model 4/40 manuals
Add to My Manuals
Save this manual to your list of manuals |
Page 31 highlights
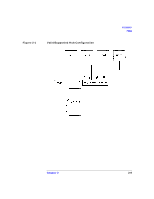
Installation Tape Libraries Tape Libraries HP SureStore E Tape Library Models 2/20, 4/40, 6/60 and 6/140 The HP SureStore E Tape Library Models 2/20, 4/40, 6/60 and 6/140 have the ability to connect to a SAN via internal FC interface cards. These cards serve the same function as an external FC bridge, but require no additional rack space and can be managed and configured via the library's front panel or the Web-based Library Administrator. To install an HP library, you will need to connect the library to the SAN, configure the FC interface card, and set the library's time/date and IP address. Connecting and Powering-On the Library: 1. Ensure that the library is disconnected from the host, and the library is powered-off. 2. On each level of the library, connect a SCSI jumper cable from bus 1 on each FC card to the left connector on the left drive module (see Figure 2-5 on page 2-14). 3. On each level of the library, connect a SCSI jumper cable from bus 2 on each FC card to the left connector on the right drive module (see Figure 2-5 on page 2-14). 4. Connect a SCSI jumper cable from the top connector on the library controller card to the right connector on the left drive module (drive module 1) to daisy chain the library controller to the drive. 5. Terminate the bottom connector on the library controller card and connect the appropriate SCSI terminator to the remaining connectors on the drive modules. Ensure that the interface type of terminator matches your library and tape drives. 6. Connect a FC cable from each GBIC on the FC cards to a host, hub, or switch. 7. Power-on each component one at a time, waiting for each to complete the POST, before going to the next. 8. Power-on the library. Chapter 2 2-13
-
 1
1 -
2
-
3
-
4
-
5
-
6
-
7
-
8
-
9
-
10
-
11
-
12
-
13
-
14
-
15
-
16
-
17
-
18
-
19
-
20
-
21
-
22
-
23
-
24
-
25
-
 26
26 -
 27
27 -
 28
28 -
 29
29 -
 30
30 -
 31
31 -
 32
32 -
 33
33 -
 34
34 -
 35
35 -
 36
36 -
37
-
38
-
39
-
40
-
41
-
42
-
43
-
44
-
45
-
46
-
47
-
48
-
49
-
50
-
51
-
52
-
53
-
54
-
55
-
56
-
57
-
58
-
59
-
60
-
61
-
62
-
63
-
64
-
65
-
66
-
67
-
68
-
69
 |
 |
