HP T1000 IEC-320-C14 HP UPS R/T3000 Installation Instructions
HP T1000 IEC-320-C14 Manual
 |
View all HP T1000 IEC-320-C14 manuals
Add to My Manuals
Save this manual to your list of manuals |
HP T1000 IEC-320-C14 manual content summary:
- HP T1000 IEC-320-C14 | HP UPS R/T3000 Installation Instructions - Page 1
to the equipment, observe local occupational health and safety requirements and guidelines for manual material handling. Kit contents • Important Safety Information guide • This document and/or documentation CD • HP Infrastructure Management Pack CD To download the latest software version, see the - HP T1000 IEC-320-C14 | HP UPS R/T3000 Installation Instructions - Page 2
) • The R/T3000 NA/JPN models ship with a hex-nut driver The following guide. Readying the equipment 1. Check the battery battery if the recharge date has passed. If the date on the battery recharge date label has passed without the battery being recharged, contact an HP authorized service - HP T1000 IEC-320-C14 | HP UPS R/T3000 Installation Instructions - Page 3
NOTE: If preparing the rails for integrated shipping, follow the same instructions as in "Installing the UPS ("Installing the UPS in a rack" on page 3)." NOTE: Mounting hardware for square- and round-holed racks is included in the - HP T1000 IEC-320-C14 | HP UPS R/T3000 Installation Instructions - Page 4
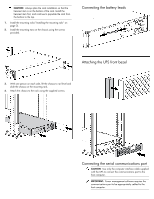
1. Install the mounting rails ("Installing the mounting rails" on page 2). 2. Install the mounting ears on the chassis using the screws provided. Connecting the battery leads Attaching the UPS front bezel 3. With one person on each side, lift the chassis to rail level and slide the chassis on the - HP T1000 IEC-320-C14 | HP UPS R/T3000 Installation Instructions - Page 5
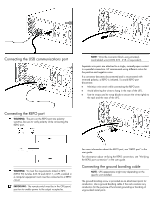
attached to a single, normally-open contact in a parallel connection. HP recommends using different colors for the positive and negative wires. If in the user guide. For information about verifying the REPO connection, see "Verifying the REPO port connection" in the user guide. Connecting the ground - HP T1000 IEC-320-C14 | HP UPS R/T3000 Installation Instructions - Page 6
the number of amps by the selected output voltage to determine the VA. Charging the UPS batteries With the UPS in Standby mode, allow the batteries to charge before putting the UPS into service. IMPORTANT: Charge the batteries for at least 24 hours before supplying backup power to devices. The - HP T1000 IEC-320-C14 | HP UPS R/T3000 Installation Instructions - Page 7
Connecting the battery leads WARNING: To reduce the risk of personal injury or logo badge, rotate it 90 degrees, and then replace it in the bezel. Continuing the installation To continue the UPS installation, follow the instructions starting with "Connecting the serial communications port (on - HP T1000 IEC-320-C14 | HP UPS R/T3000 Installation Instructions - Page 8
Installing the extension bars (if included) Connecting and securing the power cords
-
 1
1 -
 2
2 -
 3
3 -
 4
4 -
 5
5 -
 6
6 -
 7
7 -
8
 |
 |

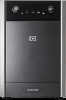
HP UPS R/T3000
Installation Instructions
Overview
The HP UPS R/T3000 features a 2U rack-mount with convertible
tower design and offers power protection for loads up to a maximum
of 3300 VA/3000 W (these numbers might vary by model).
For more information about any of the topics covered in this
document, see the UPS user guide located on the documentation CD
or HP website (http://www.hp.com/go/rackandpower
).
Precautions
WARNING:
To prevent personal injury from earth
conductor leakage current:
•
Do not operate the UPS while disconnected from the
utility power source.
•
Disconnect load devices before disconnecting the UPS
from the utility power source.
37 kg
82 lb
This symbol indicates that the UPS exceeds the
recommended weight for one individual to handle
safely.
WARNING:
To reduce the risk of personal injury
or damage to the equipment, observe local
occupational health and safety requirements and
guidelines for manual material handling.
Kit contents
•
Important Safety Information
guide
•
This document and/or documentation CD
•
HP Infrastructure Management Pack CD
To download the latest software version, see the HP website
).
© Copyright 2009 Hewlett-Packard Development Company, L.P.
The information contained herein is subject to change without notice. The only
warranties for HP products and services are set forth in the express warranty
statements accompanying such products and services. Nothing herein should
be construed as constituting an additional warranty. HP shall not be liable for
technical or editorial errors or omissions contained herein.
Part Number 507933-001
January 2009 (First Edition)