HP T1000 IEC-320-C14 HP UPS R/T3000 Installation Instructions - Page 4
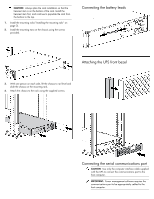
Connecting the battery leads, Attaching the UPS front bezel, Connecting the serial communications port
 |
View all HP T1000 IEC-320-C14 manuals
Add to My Manuals
Save this manual to your list of manuals |
Page 4 highlights
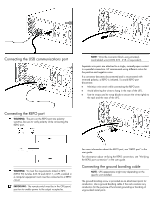
CAUTION: Always plan the rack installation so that the heaviest item is on the bottom of the rack. Install the heaviest item first, and continue to populate the rack from the bottom to the top. 1. Install the mounting rails ("Installing the mounting rails" on page 2). 2. Install the mounting ears on the chassis using the screws provided. Connecting the battery leads Attaching the UPS front bezel 3. With one person on each side, lift the chassis to rail level and slide the chassis on the mounting rails. 4. Attach the chassis to the rack using the supplied screws. Connecting the serial communications port CAUTION: Use only the computer interface cable supplied with the UPS to connect the communications port to the host computer. IMPORTANT: Power management software requires the communications port to be appropriately cabled to the host computer.
-
 1
1 -
 2
2 -
 3
3 -
 4
4 -
 5
5 -
 6
6 -
 7
7 -
 8
8
 |
 |
