HP Vectra VT 6/xxx HP Vectra VT 6/xxx, Familiarization guide - Page 29
Installing a Hard Disk, Drive in a Front-Access, Shelf, For All Types of Drive
 |
View all HP Vectra VT 6/xxx manuals
Add to My Manuals
Save this manual to your list of manuals |
Page 29 highlights
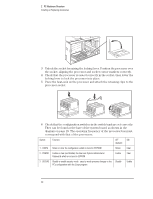
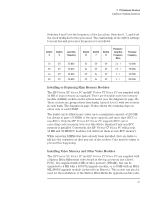
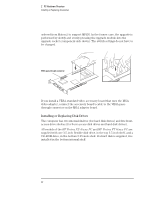
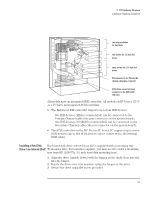
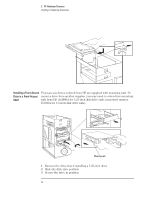
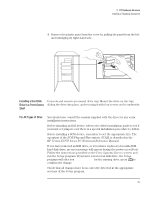
2 PC Hardware Structure Installing or Replacing Accessories 4 Remove the plastic panel from the cover by pulling the panel from the left and unhinging its right-hand side. Installing a Hard Disk Unscrew and remove an unused drive tray. Mount the drive on the tray, Drive in a Front-Access sliding the drive into place, and securing it with four screws on the underside. Shelf For All Types of Drive You should also consult the manual supplied with the drive for any extra installation instructions. Before installing an IDE device, refer to the drive's installation guide to see if you must set jumpers or if there is a special installation procedure to follow. Before installing a SCSI device, remember to set the appropriate IDs. The operation of the SCSI Plug and Play system, SCAM, is described in the HP Vectra XU/VT 6/xxx PC Technical Reference Manual. If you have removed an IDE drive, or if you have replaced a bootable IDE hard disk drive, an error message will appear during the power-on self-test. Follow the instructions provided on the View Systems Errors screen, and run the Setup program. If you have removed an IDE drive, the Setup program will offer you None or SCSI for the missing drive; press to comfirm the change. Check that all changes have been correctly detected in the appropriate sections of the Setup program. 25
-
 1
1 -
2
-
3
-
4
-
5
-
6
-
7
-
8
-
9
-
10
-
11
-
12
-
13
-
14
-
15
-
16
-
17
-
18
-
19
-
20
-
21
-
22
-
23
-
 24
24 -
 25
25 -
 26
26 -
 27
27 -
 28
28 -
 29
29 -
 30
30 -
 31
31 -
 32
32 -
 33
33 -
 34
34 -
35
-
36
-
37
-
38
-
39
-
40
-
41
-
42
-
43
-
44
-
45
-
46
-
47
-
48
-
49
-
50
-
51
-
52
-
53
-
54
-
55
-
56
 |
 |
