HP Vectra VT 6/xxx HP Vectra VT 6/xxx, Familiarization guide - Page 31
Replacing the Power Supply
 |
View all HP Vectra VT 6/xxx manuals
Add to My Manuals
Save this manual to your list of manuals |
Page 31 highlights
2 PC Hardware Structure Replacing the Power Supply Replacing the Power Supply If it is necessary to remove a faulty power supply, and to replace it by a new one, the following steps can be taken: 1 Disconnect the power connectors from all boards and accessories. 2 Undo the four screws that hold the power supply rear bezel on to the power supply box. 3 Pivot the power supply box away from its rear bezel. 4 Take the power supply box out from the inside of the computer chassis. Unscrew Unscrew Unscrew Unscrew To install the new power supply, reverse the steps which were followed when removing the old power supply. 27
-
 1
1 -
2
-
3
-
4
-
5
-
6
-
7
-
8
-
9
-
10
-
11
-
12
-
13
-
14
-
15
-
16
-
17
-
18
-
19
-
20
-
21
-
22
-
23
-
24
-
25
-
 26
26 -
 27
27 -
 28
28 -
 29
29 -
 30
30 -
 31
31 -
 32
32 -
 33
33 -
 34
34 -
 35
35 -
 36
36 -
37
-
38
-
39
-
40
-
41
-
42
-
43
-
44
-
45
-
46
-
47
-
48
-
49
-
50
-
51
-
52
-
53
-
54
-
55
-
56
 |
 |

27
2
PC Hardware Structure
Replacing the Power Supply
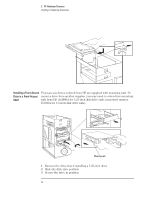
Replacing the Power Supply
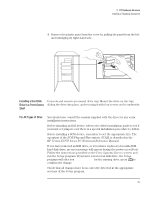
If it is necessary to remove a faulty power supply, and to replace it by a new
one, the following steps can be taken:
1
Disconnect the power connectors from all boards and accessories.
2
Undo the four screws that hold the power supply rear bezel on to the
power supply box.
3
Pivot the power supply box away from its rear bezel.
4
Take the power supply box out from the inside of the computer chassis.
To install the new power supply, reverse the steps which were followed
when removing the old power supply.
Unscrew
Unscrew
Unscrew
Unscrew