HP s520 HP s520 Digital Camera - User Manual - Page 30
Menu Options
 |
View all HP s520 manuals
Add to My Manuals
Save this manual to your list of manuals |
Page 30 highlights
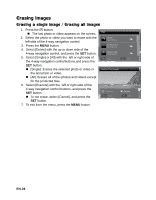
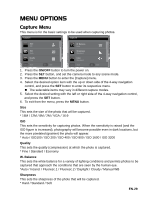
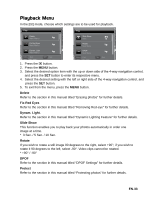
MENU OPTIONS Capture Menu This menu is for the basic settings to be used when capturing photos. 2 MP AUTO MENU ; SET ; MENU ; SET ; 1. Press the ON/OFF button to turn the power on. 2. Press the SET button, and set the camera mode to any scene mode. 3. Press the MENU button to enter the [Capture] menu. 4. Select the desired option item with the up or down side of the 4-way navigation control, and press the SET button to enter its respective menu. „ The selectable items may vary in different capture modes. 5. Select the desired setting with the left or right side of the 4-way navigation control, and press the SET button. 6. To exit from the menu, press the MENU button. Size This sets the size of the photo that will be captured. * 16M / 12M / 8M / 2M / VGA / 16:9 ISO This sets the sensitivity for capturing photos. When the sensitivity is raised (and the ISO figure is increased), photography will become possible even in dark locations, but the more pixelated (grainier) the photo will appear. * Auto / ISO100 / ISO 200 / ISO 400 / ISO 800 / ISO 1600 / ISO 3200 Quality This sets the quality (compression) at which the photo is captured. * Fine / Standard / Economy W. Balance This sets the white balance for a variety of lighting conditions and permits photos to be captured that approach the conditions that are seen by the human eye. *Auto / Incand. / Fluoresc.1 / Fluoresc.2 / Daylight / Cloudy / Manual WB Sharpness This sets the sharpness of the photo that will be captured. * Hard / Standard / Soft EN-29
-
 1
1 -
2
-
3
-
4
-
5
-
6
-
7
-
8
-
9
-
10
-
11
-
12
-
13
-
14
-
15
-
16
-
17
-
18
-
19
-
20
-
21
-
22
-
23
-
24
-
 25
25 -
 26
26 -
 27
27 -
 28
28 -
 29
29 -
 30
30 -
 31
31 -
 32
32 -
 33
33 -
 34
34 -
 35
35 -
36
-
37
-
38
-
39
-
40
-
41
-
42
 |
 |
