Hitachi 32PD7800 Owners Guide
Hitachi 32PD7800 Manual
 |
View all Hitachi 32PD7800 manuals
Add to My Manuals
Save this manual to your list of manuals |
Hitachi 32PD7800 manual content summary:
- Hitachi 32PD7800 | Owners Guide - Page 1
ENGLISH USER'S MANUAL 32PD7800 42PD7800 Thank you very much for purchasing the HITACHI Plasma Display. Before using your monitor, please carefully read the "SAFETY INSTRUCTIONS" and this "USER'S MANUAL" so you will know how to operate the monitor properly. Keep this manual in a safe place. You will - Hitachi 32PD7800 | Owners Guide - Page 2
Troubleshooting guide at the rear of this manual. In the unlikely event of a problem occurring with your plasma or damages to the plasma screen, do not knock or rub the surface with sharp or hard objects. Clean the screen -to-view fashion. Power saving system The International ENERGY STAR® power - Hitachi 32PD7800 | Owners Guide - Page 3
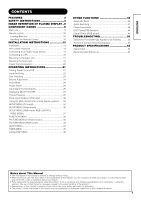
INSTRUCTIONS 4 IMAGE RETENTION OF PLASMA DISPLAY ..8 COMPONENT NAMES 9 Main Unit 9 Remote control 10 Loading Batteries 10 Handling the Remote Control 10 INSTALLATION INSTRUCTIONS Menu Screen (On-screen display system) ......33 SETUP MENU (TV TROUBLESHOOTING Manual • The information in this manual - Hitachi 32PD7800 | Owners Guide - Page 4
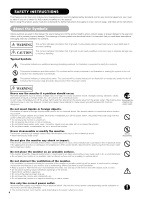
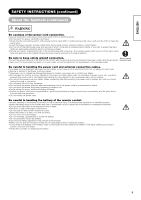
Instructions thoroughly to ensure correct usage, and follow all the instructions. About the Symbols Various symbols are used in this manual, the user's manual the monitor if a problem should occur. Abnormal operations ventilation openings. • Do not put the plasma screen side up. • Do not cover the - Hitachi 32PD7800 | Owners Guide - Page 5
ENGLISH SAFETY INSTRUCTIONS (continued) About the Symbols (continued) WARNING Be solder the battery. • Do not physically impact the battery. • Use only the battery specified in the manual of this monitor. • Make sure the plus and minus terminals are correctly aligned when loading the battery - Hitachi 32PD7800 | Owners Guide - Page 6
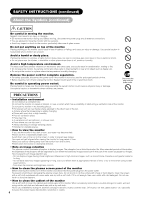
SAFETY INSTRUCTIONS (continued) About the Symbols (continued) CAUTION Be careful in power plug from the power outlet. To prevent scratching or damaging the plasma screen face, do not knock or rub the surface with sharp or hard objects. Clean the screen with a soft cloth moistened with warm water - Hitachi 32PD7800 | Owners Guide - Page 7
this monitor influences Radio receivers by turning off all other equipment other than the monitor. If you find a problem receiving Radio when using the monitor, check the instructions mentioned above. • Precautions for the cable connection - Do ensure that all connections, (including the power plug - Hitachi 32PD7800 | Owners Guide - Page 8
in a two screen display state for a long period of time. * Television broadcasts include images displayed for long periods of time in which the left and About screen defects • High precision technology is used in the making of plasma panels but there may be dark spots (points that do not illuminate) - Hitachi 32PD7800 | Owners Guide - Page 9
ENGLISH COMPONENT NAMES Main Unit Panel Front Cabinet (front frame) AV monitor Control panel • Adjustment buttons are located on the bottom. • The back cover is provided with indications to distinguish the adjustment buttons. MENU button 33 INPUT SELECT button 22 VOLUME ̄ ̆ (OK button) UP/ - Hitachi 32PD7800 | Owners Guide - Page 10
COMPONENT NAMES (continued) Remote control POWER ON/OFF button INPUT SELECT buttons MENU button OK button SOUND MODE button VOLUME UP/DOWN button PROGRAM SELECT buttons (TV) MULTI MODE button T/TEXT button (TV) h h h h h h @@@@@@@@@@ee ee ee ee ee ee ee ee ee ee ee ee ee ee ee ee - Hitachi 32PD7800 | Owners Guide - Page 11
picture. TIME (TV) Pressing this button can indicate the time by On-Screen display when receiving a TV program on the screen including TELETEXT service with the time information. ZOOM Press this button can change Picture size. PHOTO INPUT (37/42 only) Press this button to display the pictures - Hitachi 32PD7800 | Owners Guide - Page 12
and TELETEXT only. INDEX SUB TITLE This selects the P100 (100 page). Use this to access a subtitle service directly rather than through a TELETEXT service (subject to subtitle service broadcasting). CANCEL This allows the screen to return to the TV mode temporarily while searching for a required - Hitachi 32PD7800 | Owners Guide - Page 13
of the stand as shown. 2) Using commercially available wood screws, secure the set firmly in position. Wood screw Two places Read SAFETY INSTRUCTIONS ( 4 to 7 ) carefully to ensure maximum safety before pro- ceeding to these steps: • Choose an appropriate site and install the product on a level - Hitachi 32PD7800 | Owners Guide - Page 14
INSTALLATION INSTRUCTIONS (continued) Connecting to an Audio Visual Device (1) Make sure that the power switch of the monitor is turned off. (2) Make sure that the power switch - Hitachi 32PD7800 | Owners Guide - Page 15
ENGLISH INSTALLATION INSTRUCTIONS (continued) Connecting to an Audio Visual Device (continued) When the "ANT" terminal is connected to outdoor antenna instead of CATV system, please note that a good antenna adaptor is necessary. See the diagram on the right. Precautions when connecting the antenna - Hitachi 32PD7800 | Owners Guide - Page 16
conversion adapter or the adapter provided with the personal computer may be necessary in some cases. For details, refer to the instruction manual of the personal computer or ask the personal computer manufacturer or your local retail dealer. Speaker (R) Monitor (rear panel) Speaker (L) Power - Hitachi 32PD7800 | Owners Guide - Page 17
INSTALLATION INSTRUCTIONS (continued) Mounting the Speaker Unit CAUTION Make sure that the main power swich of the monitor is turned off (standby or indicating lamp: off/red) when removing or connecting the speaker cables. Mounting the Speaker System to the Monitor 1. Mounting the Speaker System - Hitachi 32PD7800 | Owners Guide - Page 18
INSTALLATION INSTRUCTIONS (continued) Mounting the Speaker Unit (continued) 4. Attach the speaker cables to speaker systems. Speaker terminals Connect the copper - colored wire to the Red side. Connect the silver - colored wire to the Black side. How to connect the speaker - Hitachi 32PD7800 | Owners Guide - Page 19
ENGLISH INSTALLATION INSTRUCTIONS (continued) Mounting the Side Input • With the speaker unit 1. Mount the side input into the speaker holder. Hook the clamps (4 pieces) of the speaker holder - Hitachi 32PD7800 | Owners Guide - Page 20
INSTALLATION INSTRUCTIONS (continued) Power Cord Connection Connect the power cord, after completing all other connections. ...42, 32 ᕃ ᕄ Connect the power cord, after completing all other connections. ...37 ᕃ ᕄ ᕃ - Hitachi 32PD7800 | Owners Guide - Page 21
ENGLISH OPERATING INSTRUCTIONS Main power switch Indicating lamp (32) (37) (42) SUB-POWER button POWER ON/OFF button Turning Power On and Off • To turn the monitor power - Hitachi 32PD7800 | Owners Guide - Page 22
OPERATING INSTRUCTIONS (continued) INPUT SELECT buttons RECALL button CHANNEL UP/DOWN buttons INPUT SELECT button Input Switching • Input can be switched by pressing the AV1~6, RGB1 or - Hitachi 32PD7800 | Owners Guide - Page 23
ENGLISH OPERATING INSTRUCTIONS (continued) Size Switching (continude) Vertical picture position can be adjusted for [Panoramic], [Zoom] and [Cinema] mode as follows. 1. Press ZOOM button and SELECT buttons during - Hitachi 32PD7800 | Owners Guide - Page 24
OPERATING INSTRUCTIONS (continued) Volume Adjustment The volume can be adjusted by pressing the will change to magenta: volume ➝ Mute) • When a button is pressed, the volume adjustment status guide (magenta) will be displayed. • The volume setting can be lowered by pressing the button while the - Hitachi 32PD7800 | Owners Guide - Page 25
ENGLISH OPERATING INSTRUCTIONS (continued) Power Swivel • This feature controls the motorized stand. It allows turning the plasma display left not add excess power by hands while using the power swivel function. It could cause troubles. • Do not get on and/or hang down the monitor. Do not swing the - Hitachi 32PD7800 | Owners Guide - Page 26
OPERATING INSTRUCTIONS (continued) Input Signal Screen Display The input signal status can be displayed on the screen by pressing the RECALL button of the remote control. • The - Hitachi 32PD7800 | Owners Guide - Page 27
ENGLISH OPERATING INSTRUCTIONS (continued) INPUT SELECT buttons Displaying MULTI PICTURE If the MULTI PICTURE button on the remote control is pressed, multi pictures will display. And then three - Hitachi 32PD7800 | Owners Guide - Page 28
OPERATING INSTRUCTIONS (continued) Displaying MULTI PICTURE (continued) Activating the Split mode from the video input screen Pressing the MULTI PICTURE button one time will display 2 pictures. • The - Hitachi 32PD7800 | Owners Guide - Page 29
ENGLISH OPERATING INSTRUCTIONS (continued) FREEZE button Picture Freezing [Split] 5 When the FREEZE button on the remote control is pressed, the screen transfers into the freeze mode. • There are - Hitachi 32PD7800 | Owners Guide - Page 30
OPERATING INSTRUCTIONS (continued) ROTATE button PHOTO button SLIDE SHOW button PHOTO the digital camera and its power in reference to the item relating to "connecting to PC" on the user manual of digital camera. *Insert the memory card when use the USB Card Reader. 3. Connect the monitor with - Hitachi 32PD7800 | Owners Guide - Page 31
ENGLISH OPERATING INSTRUCTIONS (continued) Photo Input Display (37/42 only) (continued) Photo Input Function Buttons on Remote Control Function PHOTO Display the pictures in the thumbnail view. Return - Hitachi 32PD7800 | Owners Guide - Page 32
OPERATING INSTRUCTIONS (continued) Photo Input Display (37/42 only) (continued) CAUTION • The picture may not be displayed in case of editing by computers. • Do not connect any - Hitachi 32PD7800 | Owners Guide - Page 33
ENGLISH OPERATING INSTRUCTIONS (continued) MENU button OK button RECALL button RETURN button SELECT/ADJUST buttons (, , , ) Using the Menu Screen (On-screen display system) When the MENU button is pressed, the adjustment menu screen will be displayed; from there, PC signal adjustment and - Hitachi 32PD7800 | Owners Guide - Page 34
Tuning Fine Tuning Sort Teletext Language Auto Off Select OK Set Off Return Setup Manual Tuning Position Frequency Name Sound System Color System Skip NR Antenna Att. Select Return 99 250MHz ABCDE BG Auto Off Off Off Exit Setup Auto Tuning Mode Search Select Set Position Return - Hitachi 32PD7800 | Owners Guide - Page 35
INSTRUCTIONS and it starts the auto tuning. Manual Tuning Position Frequency Name Sound System Color System Skip - - - - ( Decreasing the frequency data for the main tuner Increasing the frequency data for the West Europe when watch in Singapore, Australia, Malaysia, and so on. If this is set - Hitachi 32PD7800 | Owners Guide - Page 36
OPERATING INSTRUCTIONS (continued) SETUP MENU (Video mode) MENU Picture Audio Timer Function Setup Language Select OK Set Setup System Color System Video Input RGB1 RGB2 System 1 DVI-STB Component HDTV Select OK Set Return Setup Color System AV1 Auto AV2 PAL AV3 SECAM AV4 PAL AV5 Auto - Hitachi 32PD7800 | Owners Guide - Page 37
ENGLISH OPERATING INSTRUCTIONS (continued) SETUP MENU (RGB mode: RGB1 (DVI-PC), RGB2 (RGB)) MENU Picture Audio Timer Function Setup Language Select OK Set Setup Auto Adjust Horizontal Position - Hitachi 32PD7800 | Owners Guide - Page 38
OPERATING INSTRUCTIONS (continued) SETUP MENU (RGB mode: RGB1 (DVI-PC), RGB2 (RGB)) (Continued) Selected characters Vertical Filter Off On signal. * Depending on the type of signal displayed, displays may not be optimized through automatic adjustment. Adjust manually to optimize them. 38 - Hitachi 32PD7800 | Owners Guide - Page 39
ENGLISH OPERATING INSTRUCTIONS (continued) FUNCTION MENU MENU Picture Audio Timer Function Setup Language Select OK Set Function Screen Saver Screen Wipe Black Side Panel Video Power Save Freeze - Hitachi 32PD7800 | Owners Guide - Page 40
OPERATING INSTRUCTIONS (continued) PICTURE MENU (TV/Video mode) MENU Picture Audio Timer Function Setup Language Select OK Set Picture Picture Mode Contrast Brightness Color Sharpness Tint Color - Hitachi 32PD7800 | Owners Guide - Page 41
ENGLISH OPERATING INSTRUCTIONS (continued) PICTURE MENU (TV/Video mode) (continued) Selected characters Setup hint Picture Mode Contrast Brightness Color Sharpness Tint Dynamic Natural Cinema Dynamic: This setting is - Hitachi 32PD7800 | Owners Guide - Page 42
OPERATING INSTRUCTIONS (continued) PICTURE MENU (TV/Video mode) (continued) Selected characters Color Management Off On Magenta Magenta is in each of the 4 Color Temperature modes. This does not work for receiving PAL/SECAM signal. Guide display become unavailable to select with gray color. 42 - Hitachi 32PD7800 | Owners Guide - Page 43
ENGLISH OPERATING INSTRUCTIONS (continued) PICTURE MENU (RGB mode) MENU Picture Audio Timer Function Setup Language Select OK Set Picture Contrast Brightness Color Tint Picture Enhancement Color Temperature Color - Hitachi 32PD7800 | Owners Guide - Page 44
OPERATING INSTRUCTIONS (continued) AUDIO MENU MENU Picture Audio Timer Function Setup Language Select OK Set Audio Audio Mode : Movie Treble : + 10 Bass : - 10 Balance : 0L R Dynamic Bass : - Hitachi 32PD7800 | Owners Guide - Page 45
ENGLISH OPERATING INSTRUCTIONS (continued) TIMER MENU MENU Picture Audio Timer Function Setup Language Select OK Set Timer Off Timer On Timer Select Adjust : 30Min. : --:-- Return Selected characters Off - Hitachi 32PD7800 | Owners Guide - Page 46
Mode Default Zoom Panel Life Luminance Manager Slide Interval Mode Display ID Number Inverse Standby White Gamma Setup System 1 setting is registered. Color System - AV1 For every input function, 1 setting AV2 is registered. AV3 AV4 AV5 Video Input - AV1 1 setting is registered - Hitachi 32PD7800 | Owners Guide - Page 47
ENGLISH OTHER FUNCTIONS (continued) Audio Switching A2 / NICAM / Sound Multiplex (TV mode) • The CH I / II button is only useful for NICAM and sound multiplex signals. Otherwise pressing this button will have no effect. BILINGUAL / DUAL sound broadcast When bilingual program is received, sound - Hitachi 32PD7800 | Owners Guide - Page 48
player by pressing the following buttons on the remote control simultaneously. Makers of DVD player HITACHI FUNAI Pioneer Panasonic TOSHIBA Philips JVC SAMSUNG Sony Set Maker 1 2 3 4 5 6 7 8 9 Sharp 2-4-12 Set Type 1~3 1 1~6 1~4 1~4 1~2 1 1 1~4 1~2 Makers - Hitachi 32PD7800 | Owners Guide - Page 49
Player/STB Selection (continued) Set up hint Example) HITACHI DVD ᕃ To operate HITACHI DVD player, press and hold the button, followed the input signal is switched or when the RECALL button is pressed. A guide is displayed for the input terminal and the horizontal and vertical sync frequency. - Hitachi 32PD7800 | Owners Guide - Page 50
TROUBLESHOOTING Symptoms That Seemingly Appear to be Failures Make the checks suggested below depending on the symptoms observed. If the symptoms remain uncorrected, contact your dealer. WARNING Customer servicing display panel surface is high. • The plasma display panel is lighting the phosphors by - Hitachi 32PD7800 | Owners Guide - Page 51
ENGLISH TROUBLESHOOTING (continued) Symptoms That Seemingly Appear to be Failures (continued) Symptom Point to check See page • There are locations on the screen that are different from • High-precision technology is used to manufacture the plasma the periphery (*). display panel, However in - Hitachi 32PD7800 | Owners Guide - Page 52
TROUBLESHOOTING (continued) Actions to Correct Abnormal Displays Depending on the kind of system equipment used, images may not be displayed normally. In this case, make the adjustments suggested below. (only for RGB2) Symptom 1 Example Text displayed across the - Hitachi 32PD7800 | Owners Guide - Page 53
Input signals Sync signals Recommended signal (Video input) Input terminals Input signals Output Signal Recommended signal (RF input) Input terminals RF Video System RGB1 DVI input terminal (DVI-D) RGB1 audio input terminal (3.5mm Stereo Mini Jack) RGB2 analog RGB input terminal (D-sub 15-pin) RGB2 - Hitachi 32PD7800 | Owners Guide - Page 54
Pin Input signal Pin Input signal 1 TMDS Data2+ 11 TMDS Clock Shield 2 TMDS Data2 Shield 12 3 TMDS Data2- 13 TMDS ClockCEC 4 TMDS Data 1+ 14 Reserved(N.C. on device) 5 TMDS Data1 Shield 15 6 TMDS Data1- 16 SCL SDA 7 TMDS Data0+ 17 DDC/CED Ground 8 TMDS Data0 Shield - Hitachi 32PD7800 | Owners Guide - Page 55
PRODUCT SPECIFICATIONS (continued) ENGLISH Recommended Signal List Applicable video signals for input terminal (TV mode) Terminal Signal CVBS RCA/S-video S-video Component DVI HDMI PC STB RGB D-sub Component Remarks AV1 ć ć Refer to Setup Menu 36 AV2 ć ć Refer to Setup Menu 36 - Hitachi 32PD7800 | Owners Guide - Page 56
PRODUCT SPECIFICATIONS (continued) Recommended Signal List (continued) With Digital signal input No. Signal Name 1 VGA 2 3 W-VGA 4 5 6 7 8 9 VESA 10 11 12 13 14 15 480p 16 576p 17 720p/60 18 1080i/60 19 1080i/50 Signal mode Horizontal Dot clock Resolution Vertical - Hitachi 32PD7800 | Owners Guide - Page 57
ENGLISH PRODUCT SPECIFICATIONS (continued) Recommended Signal List (continued) With Analog signal input (RGB2 input) No. Signal Name 1 VGA 2 3 W-VGA 4 5 6 7 8 9 10 11 12 13 VESA 14 15 16 17 18 19 20 21 22 23 24 Macintosh 25 26 27 W-XGA 28 29 W-XGA 30 Signal mode - Hitachi 32PD7800 | Owners Guide - Page 58
NOTE About the Headphone (Refer to page 44.) During PC input (RGB1/RGB2), the audio is not output from the headphone. Only with AV1 and AV6 inputs during the 2 picture mode, even though select "B" from "Audio Menu, Headphone Select," the audio of A(left picture) is always output from the
-
 1
1 -
 2
2 -
 3
3 -
 4
4 -
 5
5 -
 6
6 -
 7
7 -
8
-
9
-
10
-
11
-
12
-
13
-
14
-
15
-
16
-
17
-
18
-
19
-
20
-
21
-
22
-
23
-
24
-
25
-
26
-
27
-
28
-
29
-
30
-
31
-
32
-
33
-
34
-
35
-
36
-
37
-
38
-
39
-
40
-
41
-
42
-
43
-
44
-
45
-
46
-
47
-
48
-
49
-
50
-
51
-
52
-
53
-
54
-
55
-
56
-
57
-
58
 |
 |

1
ENGLISH
USER'S MANUAL
Thank you very much for purchasing the HITACHI Plasma Display.
Before using your monitor, please carefully read the "SAFETY
INSTRUCTIONS" and this "USER'S MANUAL" so you will know how to
operate the monitor properly. Keep this manual in a safe place. You
will find it useful in the future.
Notes on lnstallation Work:
This product is marketed assuming that it is installed by qualifed
personnel with enough skill and competence. Always have an
installation specialist or your dealer install and set up the product.
HITACHI cannot assume liabilities for damage caused by mistake
in installation or mounting, misuse, modification or a natural
disaster.
Note for Dealers:
After installation, be sure to deliver this manual to the customer
and explain to the customer how to handle the product.