Honeywell HE220 Owner's Manual
Honeywell HE220 Manual
 |
View all Honeywell HE220 manuals
Add to My Manuals
Save this manual to your list of manuals |
Honeywell HE220 manual content summary:
- Honeywell HE220 | Owner's Manual - Page 1
HE220, HE260 Humidifier and Installation Kit WELCOME INSTALLATION INSTRUCTIONS/OWNER'S GUIDE Required Accessories (Included) To the comfortable world of humidified air. When you use your Honeywell humidifier, notice that your skin is not as dry, and that your scratchy throat and irritated nasal - Honeywell HE220 | Owner's Manual - Page 2
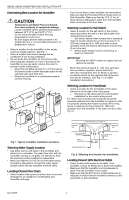
) with the humidifier solenoid valve. Locating Closest Floor Drain • Select location with access to a floor drain to provide drainage for air conditioner condensation and humidifier drainage. • If you do not have a drain available, we recommend that you install the Honeywell Whole House Drum or - Honeywell HE220 | Owner's Manual - Page 3
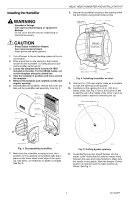
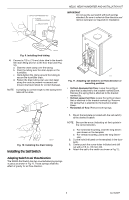
. 3. WATER FEED NOZZLE HUMIDIFIER PAD ASSEMBLY COVER SIDEWALL FRAME HUMIDIFIER HOUSING WATER FEED TUBE OPENING TO AIR DUCT PLASTIC TABS (2) DRAIN TUBING M20171 Fig. 4. Installing humidifier on duct. 9. Use the 6 in. (155 mm) starter collar as a template to mark the opening for the bypass. 10 - Honeywell HE220 | Owner's Manual - Page 4
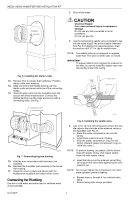
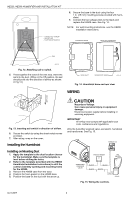
water flow. The valve is either open or closed. IMPORTANT To prevent debris from clogging the solenoid inline filter, be sure to install the saddle valve handle pointing toward the ceiling. SCREW DRIVER WATER LINE HUMIDIFIER PORT PLAIN COLLAR M20175 M20785 Fig. 7. Connecting bypass ducting - Honeywell HE220 | Owner's Manual - Page 5
COMPRESSION RING BRASS INSERT HE220, HE260 HUMIDIFIER AND INSTALLATION KIT IMPORTANT Do not use the sail switch with both springs attached. Be sure to select air flow direction and remove spring(s) not required for installation. M20176 Fig. 9. Installing feed tubing. 4. Connect a 1/2 in. (13 - Honeywell HE220 | Owner's Manual - Page 6
injury or equipment damage. Disconnect power supply before installing or servicing equipment. IMPORTANT All wiring must comply with applicable local code, ordinances and regulations. Wire the humidifier solenoid valve, sail switch, humidistat and transformer. See Fig. 15. HUMIDISTAT Humidity - Honeywell HE220 | Owner's Manual - Page 7
sure that water is flowing out of the drain hose. If water does not flow, see Troubleshooting Your Humidifier section. 4. Check for leaks. 5. Reset the thermostat and H8908 Humidistat to a comfortable setting for automatic operation. OPERATION How Your Humidifier Works Your Honeywell humidifier uses - Honeywell HE220 | Owner's Manual - Page 8
, HE260 HUMIDIFIER AND INSTALLATION KIT MAINTAINING YOUR HUMIDIFIER A regular maintenance program prolongs the life of your humidifier and makes your home more comfortable. The frequency of cleaning depends on the condition of your water. You can use either hard or soft water in your humidifier - Honeywell HE220 | Owner's Manual - Page 9
HE220, HE260 HUMIDIFIER AND INSTALLATION KIT TROUBLESHOOTING YOUR HUMIDIFIER Problem Water leakage No water to drain. Air leakage Low humidity High humidity Table 3. Troubleshooting Humidifier. What to look for What to do Leaking joints. Shut off water. Tighten connections. Brass tubing - Honeywell HE220 | Owner's Manual - Page 10
HE220, HE260 HUMIDIFIER AND INSTALLATION KIT LIMITED ONE-YEAR WARRANTY Honeywell warrants this product, excluding humidifier pad, to be free from defects in the workmanship or materials, under normal use and service, for a period of one (1) year from the date of purchase by the consumer. If, at any - Honeywell HE220 | Owner's Manual - Page 11
HE220, HE260 HUMIDIFIER AND INSTALLATION KIT 11 69-1645EF - Honeywell HE220 | Owner's Manual - Page 12
HE220, HE260 HUMIDIFIER AND INSTALLATION KIT Automation and Control Solutions Honeywell Honeywell Limited-Honeywell Limitée 1985 Douglas Drive North 35 Dynamic Drive Golden Valley, MN 55422 Scarborough, Ontario M1V 4Z9 69-1645EF G.H. 9-02 Printed in U.S.A. on recycled paper containing - Honeywell HE220 | Owner's Manual - Page 13
Humidificateurs HE220 et HE260 et trousse d'installation INSTRUCTIONS D'INSTALLATION/MANUEL DU PROPRIÉTAIRE BIENVENUE... Accessoires nécessaires (fournis) dans un environnement tout confort, où l'air est humidifié. Avec votre humidificateur Honeywell, vous constaterez que votre peau sera moins - Honeywell HE220 | Owner's Manual - Page 14
il est préférable d'installer l'humidificateur central à tambour ou à disque de Honeywell. S'assurer que le tuyau Installer l'interrupteur du côté opposé au flux d'air dans la gaine. (Voir les Fig. 1-3, dans les Instructions d'installation du S688.) Choix de l'emplacement de l'humidistat • Installer - Honeywell HE220 | Owner's Manual - Page 15
HUMIDIFICATEURS HE220 ET HE260 ET TROUSSE D'INSTALLATION AIR REPRIS AUTRE EMPLACEMENT AIR REPRIS plus près • Choisir un endroit près d'une prise. S'il n'y a pas de prise, en faire installer une par un électricien. • S'assurer que le cordon de l'humidificateur est suffisamment long et qu'il - Honeywell HE220 | Owner's Manual - Page 16
HUMIDIFICATEURS HE220 ET HE260 ET TROUSSE D'INSTALLATION 9. Utiliser comme gabarit le collet de raccordement de 155 mm à Été et la position ouverte, à Hiver. Voir la Fig. 6. MF20173 Fig. 6. Installation du collet de raccordement. 12. Enlever la pellicule sur l'adhésif en mousse. Placer le collet - Honeywell HE220 | Owner's Manual - Page 17
HUMIDIFICATEURS HE220 ET HE260 ET TROUSSE D'INSTALLATION Raccordement des tuyaux L'humidificateur fonctionne avec de des débris ne bloquent le filtre sur la canalisation de l'électrovanne, il est important d'installer la poignée du robinetvanne à étrier de sorte qu'elle pointe vers le plafond. a. - Honeywell HE220 | Owner's Manual - Page 18
HE260 ET TROUSSE D'INSTALLATION M20177 Fig. 10. Installation du tuyau de vidange. Installation de l'interrupteur à ailette Installation le haut : Laisser en place le ressort attaché au support marqué «Up». Enlever le support attaché au support marqué «Down». • Courant d'air horizontal : Enlever les - Honeywell HE220 | Owner's Manual - Page 19
les fils basse tension aux conducteurs et remettre le boîtier du H8908. Voir la Fig. 14. REMARQUE : Pour une installation au mur, consulter les instructions d'installation du H8908. FENTE POUR FIL FILS DE L'HUMIDISTAT MF20179 Fig. 14. Socle et vue arrière de l'humidistat. CÂBLAGE MISE - Honeywell HE220 | Owner's Manual - Page 20
HE220 ET HE260 ET TROUSSE D'INSTALLATION 3. À La borne NC ne sert pas.) VÉRIFICATION DU FONCTIONNEMENT DE L'HUMIDIFICATEUR LISTE DE VÉRIFICATION ❑ L'humidificateur est de niveau. ❑ Le câblage pour le faire circuler dans la maison. L'air humidifié est plus chaud et il assure un meilleur confort - Honeywell HE220 | Owner's Manual - Page 21
HUMIDIFICATEURS HE220 ET HE260 ET TROUSSE D'INSTALLATION AVERTISSEMENT Risque de blessures graves. Les pièces mobiles peuvent raccord de vidange. 13. Insérer l'écran évaporateur d'humidificateur dans le cadre. 14. Replacer le gicleur sur le plateau. 15. Remettre le plateau sur le cadre. 16. Mettre - Honeywell HE220 | Owner's Manual - Page 22
HUMIDIFICATEURS HE220 ET HE260 ET TROUSSE D'INSTALLATION DÉPANNAGE DE L'HUMIDIFICATEUR Problème Fuite d'eau L'eau ne facilement dans la gaine; s'il y a lieu, tailler l'ailette en suivant les instructions. Électrovanne Tuyauterie Vérifier les autres éléments de câblage, puis mettre en marche - Honeywell HE220 | Owner's Manual - Page 23
HUMIDIFICATEURS HE220 ET HE260 ET TROUSSE D'INSTALLATION GARANTIE LIMITÉE DE UN AN Honeywell garantit que ce produit, à l'exception de l'écran évaporateur de l'humidificateur, est exempt de tout vice de fabrication ou de matière dans la mesure où il - Honeywell HE220 | Owner's Manual - Page 24
HUMIDIFICATEURS HE220 ET HE260 ET TROUSSE D'INSTALLATION Solutions de régulation et d'automatisation Honeywell Honeywell Limited-Honeywell Limitée 1985 Douglas Drive North 35, Dynamic Drive Golden Valley, MN 55422 Scarborough (Ontario) M1V 4Z9 69-1645EF G.H. 9-02 Imprimé aux États-Unis sur
-
 1
1 -
 2
2 -
 3
3 -
 4
4 -
 5
5 -
 6
6 -
 7
7 -
8
-
9
-
10
-
11
-
12
-
13
-
14
-
15
-
16
-
17
-
18
-
19
-
20
-
21
-
22
-
23
-
24
 |
 |

® U.S. Registered Trademark
Copyright © 2002 Honeywell •
•All Rights Reserved
INSTALLATION INSTRUCTIONS/OWNER’S GUIDE
69-1645EF
HE220, HE260 Humidifier and
Installation Kit
WELCOME
To the comfortable world of humidified air. When you use
your Honeywell humidifier, notice that your skin is not as
dry, and that your scratchy throat and irritated nasal
passages that aggravate allergies and asthma are
steadily improving.
You have also taken the first step in reducing the
zapping
you create when you walk on your carpet and then touch
your TV, computer, metal door knob or your pet. Your
furniture and woodwork are also benefitting from the
difference that humidified air makes.
Congratulations! You have just made a great investment
in improving the comfort of your home.
APPLICATION
This kit contains your new Honeywell HE220 or HE260
Humidifier, H8908 Humidistat and all the accessories
required for installation.
INSTALLATION
Preparing for the Installation
Be sure to identify all the required (Table 1) accessories
(included) and make sure the appropriate tools are
available before beginning the installation.
Required Accessories (Included)
Required Tools
Tools required for installation include:
•
Tin snip.
•
Screwdriver.
•
Adjustable or open-end wrench.
•
Drill, punch or awl.
•
Level.
Table 1. Required Accessories.
Quantity
Accessory
3 ft (0.93m)
Bypass ducting including:
6 in. (155 mm) diameter flexible duct
Starter collar (flanged)
Plain collar
Summer shut-off damper
Connecting straps (2)
20 ft (6.2m)
18 gauge, two-strand thermostat wire
20 ft (6.2m)
1/4 in. (6.35 mm) OD feed water tubing
10 ft (3.1m)
1/2 in (12.7 mm) ID drain tubing
1 bag
Connecting and mounting hardware:
Wire nuts (4)
No. 8 sheet metal screws (18)
Drain tube clamp
Feed tube mounting clamps (6)
Brass inserts (2)
Plastic compression rings (2)
1
Sail switch
1
H8908 Humidistat
1 bag
Saddle Valve Assembly:
Saddle valve and top clamp (1)
Threaded bottom clamp (1)
Bolts (2)
Rubber gasket (1)
Brass insert (1)
Plastic bushing (1)
1
Plug-in transformer