Honeywell IS2500SN Installation Instructions - Page 1
Honeywell IS2500SN Manual
 |
View all Honeywell IS2500SN manuals
Add to My Manuals
Save this manual to your list of manuals |
Page 1 highlights
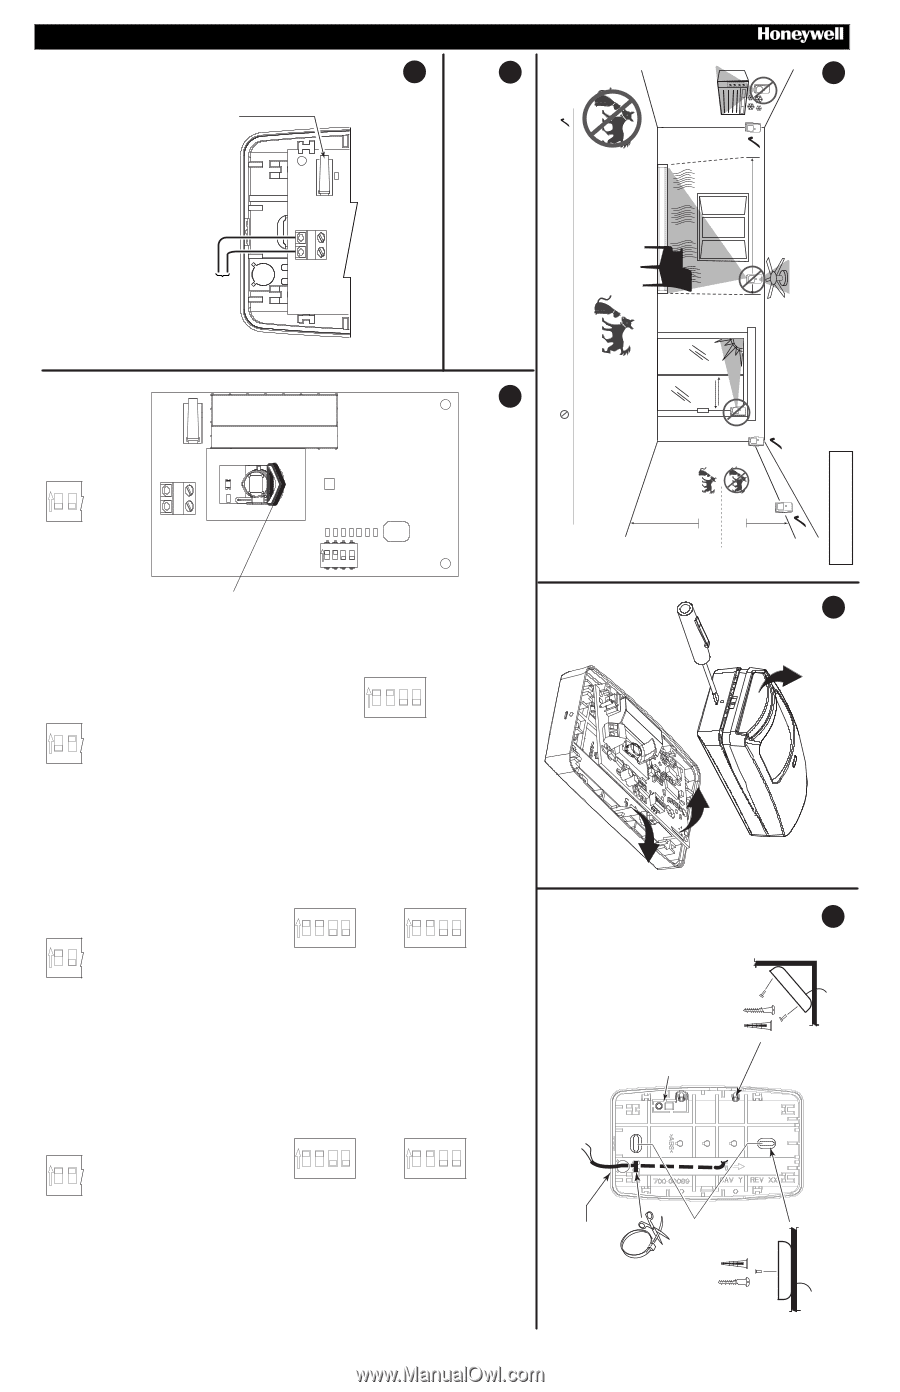
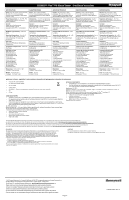
PRELIMINARY DRAFT 9/11/09 1 LOCATION / EMPLACEMENT / POSIZIONAMENTO / UBICACIÓN / LOCAL # See Compliance Notes on page 4 for UL Applications. 2 OPEN / OUVERTURE / APERTURA / APERTURA / ABERTURA 1 1.8 - 2.7 m (6 - 9 ft) # 2.3 - 2.4 m (7.5 - 8 ft) # 3 2 Wide Angle Lens (installed) Objectif grand-angle (installé) Lente grandangolare (installata) Lente de ángulo amplio (instalado) Lente de Ângulo Amplo (instalada) Animal Immune Lens (included) Objectif insensible à la présence d'animaux (inclus) Lente immune agli animali domestici (fornita) Lente inmune a los animales (incluido) Lente Imune a Animais (inclusa) Satisfactory / Satisfaisant / Sufficiente / Satisfactorio / Satisfatório No / Non / No / No / Não 3 MOUNT / INSTALLATION / MONTAGGIO / INSTALACIÓN / MONTAGEM * *Plan View * *Vue en plan *Vista in Pianta *Vista de Plano *Vista de Plano - Rear Tamper Breakaway Tab; DO NOT REMOVE; Do not overtighten the screw; Best if mounted to a stud, solid wood, or with a robust wall anchor. - Languette antisabotage arrière amovible; NE PAS ENLEVER; Ne pas trop serrer la vis ; Le montage est plus fiable s'il est réalisé sur un montant, un morceau de bois solide ou avec une fixation murale robuste. - Linguetta posteriore antimanomissione: NON RIMUOVERE; Non stringere la vite eccessivamente; Meglio se montata su un asse di legno solido o con un solido attacco a muro. - Lengüeta de seguridad trasera desmontable: NO QUITE; No apriete el tornillo demasiado; es mejor si se instala a una viga, madera sólida o con un soporte de pared resistente. - Indicador Traseiro de Rompimento por Violação: NÃO REMOVA; Não overtighten o parafuso; É indicada a montagem em um suporte, madeira maciça ou chumbado numa parede robusta. Use these holes when mounting to a standard U.S. electrical junction box 0.2-1.3mm2 (22-16 AWG) Wiring Knockout Entrée défonçable pour le fil Passaggio Cavi Orificios de montaje Orificios de fixação IS2500SN V-PlexTM PIR Motion Sensor - Installation Instructions 4 REPLACE CIRCUIT BOARD / REMISE EN PLACE DU PCB / RIPOSIZIONARE IL CIRCUITO / REEMPLAZO DE LA PLACA DE CIRCUITOS / SUBSTITUA A PLACA DE CIRCUITO 5 WIRE / CABLAGE / COLLEGAMENTO / CABLE / FIO V- V+ Cover Tamper Switch Contact AP du capot Interruttore tamper sul coperchio Interruptor contra vandalismo de la cubierta Interruptor de Violação da Tampa Polling Loop 9 - 13V PK-PK 6 a IDENTIFY COMPONENTS AND SELECT APPROPRIATE SETTINGS / IDENTIFICATION DES COMPOSANTS ET SÉLECTION DES PARAMÈTRES APPROPRIÉS / IDENTIFICARE I COMPONENTI E SELEZIONARE LE IMPOSTAZIONI APPROPRIATE / IDENTIFICACIÓN COMPONENTES Y SELECCIÓN DE AJUSTES APROPIADOS / IDENTIFIQUE OS COMPONENTES E SELECIONE AS CONFIGURAÇÕES APROPRIADAS LED ON OFF 1 2 3 4 ON OFF 1 2 3 4 High Traffic Inhibit ON * LED Enabled High Sensitivity Pulse Count 1 High Traffic Inhibit OFF * LED Disabled Low Sensitivity Pulse Count 2 ON OFF 1 2 3 4 Inhibition de trafic élevé ACTIF * Témoin lumineux à DEL activé Sensibilité élevée Comptage d'impulsions 1 Inhibition de trafic élevé INACTIF * Témoin lumineux à DEL désactivé Sensibilité faible Comptage d'impulsions 2 * Voir étape 7 - Mode Standard ON OFF 1 2 3 4 Inhibición de Alto Tráfico ACTIVADO * LED habilitado Sensibilidad alta Conteo de pulso 1 Inhibición de Alto Tráfico DESACTIVADO * LED deshabilitado Sensibilidad baja Conteo de pulso 2 * Vea el Paso 7 - Modo Estándar * See Step 7 - Standard Mode # Funzione Inibizione traffico elevato ON * LED abilitato Sensibilità alta Conteggio impulsi 1 Funzione Inibizione traffico elevato OFF * LED disabilitato Sensibilità bassa Conteggio impulsi 2 Inibidor de tráfego alto LIGADO * LED Ativado Alta Sensibilidade Contagem de Pulso 1 Inibidor de tráfego alto DESLIGADO * LED Desativado Baixa Sensibilidade Contagem de Pulso 2 ON OFF 1 2 3 4 ON OFF 1 2 3 4 -+ Look-Down Mask (install as shown when using Animal Immune Lens) Masquage de détection vers le bas (à installer comme indiqué dans le cas de l'utilisation d'un objectif insensible à la présence d'animaux) Inibizione funzione antistriciamento (da installare come da figura quando si utilizza la lente immune agli animali domestici) Máscara de vista inferior (instálela como se muestra al utilizar el Lente inmune a los animales) Máscara de Área Abaixo do Sensor (instale conforme mostrado ao utilizar Lente Imune a Animais) * Vedere il passaggio 7 - Modalità Standard * Consulte a etapa 7 - Modo Padrão Lowest Sensitivity: 3 - 5 Steps; Up to 36 kg (80 lb) Animal Immunity Sensibilité minimale : 3 à 5 paliers; immunité aux animaux jusqu'à 36 kg Sensibilità bassissima: 3 - 5 passi; fino a 36 kg Immunità agli animali Sensibilidad mínima: 3 a 5 pasos; hasta 36 kg de inmunidad animal Sensibilidade Mais Baixa: 3 - 5 Passos; Imunidade Animal até 36 kg Low Sensitivity: 2 - 4 Steps; Up to 18 kg (40 lb) Animal Immunity Sensibilité faible : 2 à 4 paliers; immunité aux animaux jusqu'à 18 kg Sensibilità bassa: 2 - 4 passi; fino a 18 kg Immunità agli animali Sensibilidad baja: 2 a 4 pasos; hasta 18 kg de inmunidad animal Baixa Sensibilidade: 2 - 4 Passos; Imunidade Animal até 18 kg Medium Sensitivity: 1 - 3 Steps; No Animal Immunity Sensibilité moyenne : 1 à 3 paliers; aucune immunité aux animaux Sensibilità media: 1 - 3 passi; senza immunità agli animali Sensibilidad media: 1 a 3 pasos; sin inmunidad animal Sensibilidade Média: 1 - 3 Passos; Sem Imunidade Animal High Sensitivity: 1 - 2 Steps; No Animal Immunity Sensibilité élevée : 1 à 2 paliers; aucune immunité aux animaux Sensibilità alta: 1 - 2 passi; senza immunità agli animali Sensibilidad alta: 1 a 2 pasos; sin inmunidad animal Alta Sensibilidade: 1 - 2 Passos; Sem Imunidade Animal ON OFF 1 2 ON OFF 1 2 ON OFF 1 2 ON OFF 1 2
-
 1
1 -
 2
2 -
 3
3 -
 4
4
 |
 |