Honeywell RCWL8000A1002 User Guide
Honeywell RCWL8000A1002 - VisioCam Wireless Video Door Chime Set Manual
 |
UPC - 085267333979
View all Honeywell RCWL8000A1002 manuals
Add to My Manuals
Save this manual to your list of manuals |
Honeywell RCWL8000A1002 manual content summary:
- Honeywell RCWL8000A1002 | User Guide - Page 1
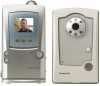
g Portable Visiocam LCD Video Chime System Installation and use d Tragbares LCD-Videoglockenspielsystem Installation und Gebrauch n Mobiel video-deurbelsysteem Installatie en gebruik i Sistema videocitofono portatile a cristalli liquidi Installazione e uso - Honeywell RCWL8000A1002 | User Guide - Page 2
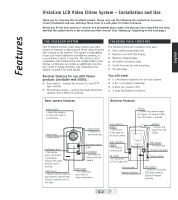
Portable VisioCam LCD Video Chime System Installation and Use Contents Features 3 The VisioCam system 3 Checking pack contents 3 Setting up 4 Pre-installation setup 4 Installing the door camera 6 Door Camera Transformer option 7 Installing the receiver 8 Receiver Operation 8 Door camera 9 - Honeywell RCWL8000A1002 | User Guide - Page 3
location you have chosen! (See 'Setting up', beginning on the next page.) Features English THE VISIOCAM SYSTEM Your Friedland wireless video entry system uses radio signals to transmit a video picture of the caller from the door camera to the receiver. The system is expandable, so you can install - Honeywell RCWL8000A1002 | User Guide - Page 4
Before fixing the door camera in place, set up and test the system as follows: Install the batteries in the door camera Note: The door camera has a 3 Note: there is an option to power the door camera using an 8V door chime transformer. See 'Door Camera Transformer option' at the end of this section - Honeywell RCWL8000A1002 | User Guide - Page 5
are separated by at least 2m (6ft). To program the door camera into the receiver, press and hold the call button on the door camera until the receiver responds with a tune and displays the image captured by the camera. Once the door camera has been programmed into the receiver, the receiver remains - Honeywell RCWL8000A1002 | User Guide - Page 6
is nearby interference on the video channel. Remove the door camera back and change the video channel switch from CH 1 to, for example, CH 3. Test the system again, selecting a different channel if channel 3 is no better. Refer to the troubleshooting section for more information on interference - Honeywell RCWL8000A1002 | User Guide - Page 7
the door Hook the door camera Door system in place, mount the camera onto a wall or door as follows: DOOR CAMERA TRANSFORMER OPTION Transformer Top 8V / 1A 1. Remove the two screws underneath the door the door camera day, the door camera can the door camera the rear of the door camera. To connect - Honeywell RCWL8000A1002 | User Guide - Page 8
camera with the receiver by following the 'program the door camera into the receiver' instructions. RECEIVER OPERATION When the call button is pressed on the door camera, the receiver chimes (provided the volume switch is not set to 0) and the camera image is displayed for about thirty seconds. If - Honeywell RCWL8000A1002 | User Guide - Page 9
by the chime volume switch. Note: The alert is also triggered when you undo the cover to replace batteries in the door camera. system, this button scans through available pictures. Privacy Remember that this product uses the public airwaves, and that the 30-second duration video signal from the door - Honeywell RCWL8000A1002 | User Guide - Page 10
in this mode and you may need to change channels manually. Refer to the TV set instructions for advice. Adding a door chime The door camera can trigger one or more Friedland Evo or Décor chimes in addition to the video receiver. Additional chimes may be useful in large or noisy premises. Note: if - Honeywell RCWL8000A1002 | User Guide - Page 11
- they will become hot to the touch! ■ Do not allow any rain or damp to become trapped inside the door camera, as it may damage the internal parts. ■ Avoid replacing door camera batteries during wet weather. ■ Do not take the products apart; there are precision components inside which are easily - Honeywell RCWL8000A1002 | User Guide - Page 12
can radiate signals and affect the video quality. If this is a likely problem, move the receiver away (at least one metre) from the units. The receiver chimes, followed by a beepbeep This indicates low battery power in the door camera. Replace the door camera batteries. A beep-beep tone sounds - Honeywell RCWL8000A1002 | User Guide - Page 13
video or door push) programmable per receiver Sound output Operating frequency RF output level Antenna type (built in) Camera type Effective resolution Video standard Settable Video channels Video N/A N/A 6 (1, 2 with selectable chime tune; 3-6 with fixed chime tune) 80dBA/1m (position 2) 433MHz and - Honeywell RCWL8000A1002 | User Guide - Page 14
Tragbares LCD- Videoglockenspielsystem Installation und Gebrauch Inhalt Merkmale D-2 Das VisioCam-System D-2 Lieferumfang überprüfen D-2 Einrichtung D-3 Setup vor der Installation D-3 Installation der Türkamera D-4 Türkamera Transformator-Option D-6 Installation des Empfängers D-7 Empfä - Honeywell RCWL8000A1002 | User Guide - Page 15
von Ihnen gewählten Installationsort funktioniert! (Siehe hierzu „Einrichtung", ab der nächsten Seite.) DAS VISIOCAM-SYSTEM LIEFERUMFANG ÜBERPRÜFEN Ihr schnurloses Friedland Video-Eingangsüberwachungssyst em verwendet Funksignale zur Übertragung eines Videobilds des Besuchers von der Türkamera - Honeywell RCWL8000A1002 | User Guide - Page 16
Einrichtung SETUP VOR DER INSTALLATION Vor der Installation der Türkamera sollte das System wie folgt eingerichtet und getestet werden: Die Batterien in die Türkamera installieren Hinweis: Die Türkamera besitzt einen eingebauten Manipulationsschutz zur Diebstahlverhütung. Sobald die Batterien - Honeywell RCWL8000A1002 | User Guide - Page 17
Deutsch Die Türkamera in den Empfänger programmieren Darauf achten, dass eine Entfernung von mindestens 2 Meter zwischen Türkamera und Empfänger besteht. Um die Türkamera in den Empfänger zu programmieren, den Klingelknopf der Türkamera gedrückt halten, bis der Empfänger mit einer Melodie reagiert - Honeywell RCWL8000A1002 | User Guide - Page 18
in ihrer geplanten Position aktiviert werden. Hiermit lässt sich prüfen, ob der Empfänger ein gutes Signal von der Türkamera erhält. VISIOCAM Um das System zu testen, sollte eine Person die Türkamera an der gewünschten Montagestelle an der Wand halten und den Klingelknopf betätigen, während Sie den - Honeywell RCWL8000A1002 | User Guide - Page 19
installieren Die Kamera sollte nicht unter nassen Bedingungen installiert werden, da Feuchtigkeit oder Kondensation die Innenteile beschädigen kann. Sobald das System in seiner gewünschten Position getestet wurde, die Kamera wie folgt an der Wand oder an der Tür installieren: 4. Die Türkamera - Honeywell RCWL8000A1002 | User Guide - Page 20
ca. 30 Sekunden lang angezeigt. Falls der Besucher den Klingelknopf noch einmal drückt, verlängert sich die Anzeigezeit um weitere 30 Sekunden. Die Videoübertragung ist auf 30 Sekunden beschränkt, um die Batterie zu schonen. Die Übertragungszeit kann nicht reguliert werden. Wenn die Batterien wieder - Honeywell RCWL8000A1002 | User Guide - Page 21
Lautstärke eines Mikrofons reguliert. Die optimale Lautstärke einstellen. Scan-Taste [Für zukünftigen Gebrauch] Beim Gebrauch in einem Mehrkamera-System wechselt diese Taste zwischen verfügbaren Bildern. Privatsphäre Denken Sie daran, dass dieses Produkt die öffentlichen Ätherwellen verwendet und - Honeywell RCWL8000A1002 | User Guide - Page 22
Erweiterung Ihres Systems Es gibt viele Möglichkeiten, Ihr Eingangssystem zu erweitern: Sie können es beispielsweise an ein Fernsehgerät anschließen oder weitere Kameras installieren. TV-Anschluss Sie können - Honeywell RCWL8000A1002 | User Guide - Page 23
Wartung und Gebrauch Deutsch PFLEGE UND WARTUNG ■ Fingerabdrücke oder Schmutz auf der Linse der Türkamera können ein trübes oder verwischtes Bild verursachen. Die Linsenoberfläche gelegentlich mit einem weichen, feuchten Tuch reinigen. Keine Reinigungsprodukte verwenden. Übereifriges oder zu hä - Honeywell RCWL8000A1002 | User Guide - Page 24
FEHLERSUCHE Das System funktioniert nicht ■ Sicherstellen, dass die Türkamera mit Strom versorgt ist - siehe IT-Geräte können Signale ausstrahlen und die Videoqualität beeinflussen. Falls dies ein mögliches Problem ist, den Empfänger mit mindestens einem Meter Abstand von solchen Geräten platzieren. - Honeywell RCWL8000A1002 | User Guide - Page 25
Effektive Auflösung 628 x 582 Pixel TFT LCD True Color-Farbdisplay Videostandard PAL PAL Festlegbare Videokanäle 4 4, mit Auto Detection Video-Ausgang k. A. 1 Vpp 75 W SCART-Trigger (zu Stift 8) k. A. 12 V (4:3 Seitenverhältnis) Umschaltung Farbe zu Schwarzweiß Ca. 100 Lux Helligkeit - Honeywell RCWL8000A1002 | User Guide - Page 26
Mobiel video-deurbelsysteem Installatie en gebruik Inhoudsopgave Eigenschappen N-2 Het Visiocam-systeem N-2 Inhoud van kit controleren N-2 Installatie N-3 Systeemtest N-3 Deurcamera installeren N-4 Deurcamera trafo optie N-6 Huisstation installeren N-7 Werking van huisstation N-7 - Honeywell RCWL8000A1002 | User Guide - Page 27
twee systemen eerst testen en verifiëren of het systeem op de door u gekozen plaats werkt! (Zie 'Installatie' op de volgende pagina.) Eigenschappen Nederlands HET VISIOCAM-SYSTEEM Uw Friedland draadloos video-deurbelsysteem maakt gebruik van radiosignalen om een videobeeld van de bezoeker van de - Honeywell RCWL8000A1002 | User Guide - Page 28
Installatie SYSTEEMTEST Installeer en test het systeem als volgt voordat u de deurcamera monteert: Leg de batterijen in de deurcamera N.B.: De deurcamera is voorzien van een ingebouwd antidiefstalalarm. Na het installeren van de batterijen gaat het statuslampje knipperen en laat het huisstation een - Honeywell RCWL8000A1002 | User Guide - Page 29
te kunnen programmeren, moet u op de bel van de deurcamera drukken en ingedrukt houden totdat het huisstation een gongtoon laat horen en het door de camera vastgelegde beeld weergeeft. Nadat de deurcamera in het huisstation is geprogrammeerd, blijft het huisstation ongeveer twee minuten actief in de - Honeywell RCWL8000A1002 | User Guide - Page 30
camera over naar de zwart/wit stand. ■ Als de deurcamera door een beltrafo van stroom wordt voorzien, dan moet u tevens rekening en te controleren of het huisstation een duidelijk signaal van de deurcamera ontvangt. VISIOCAM Vraag iemand om de deurcamera op de gekozen montageplaats tegen de muur te - Honeywell RCWL8000A1002 | User Guide - Page 31
op zijn plaats blijft zitten. Steek de twee schroeven in de gaten en draai ze vast. Controleer of het systeem na het installeren werkt door op de belknop te drukken. Het statuslampje moet gaan branden. DEURCAMERA TRAFO OPTIE Top 1. Verwijder de twee schroeven onder de deurcamera. Maak de frontplaat - Honeywell RCWL8000A1002 | User Guide - Page 32
van de trafo op een altijd ingeschakelde netvoeding aan. Test de deurcamera door op de bel te drukken: het statuslampje moet gaan branden. N.B.: Als getest, dan moet u de deurcamera in het huisstation programmeren door de 'deurcamera in huisstation programmeren' instructies op te volgen. WERKING - Honeywell RCWL8000A1002 | User Guide - Page 33
in stand 0 of 2* staat. Helderheidsregeling van scherm Activeer de deurcamera door op de bel te drukken en verstel hierna het scherm van het batterijen in de deurcamera bijna leeg zijn, dan geeft het huisstation dit aan door een dubbele pieptoon na de gongtoon als een bezoeker of de bel drukt. - Honeywell RCWL8000A1002 | User Guide - Page 34
op het TV-scherm weer. N.B.: het automatische beeld verschijnt op het scherm door het gebruik van de TV SCART schakelstand. Sommige SCARTcontacten en sommige TV's kan deze gebruikt worden als een extra beldrukker om het video-deurbelsysteem te activeren - zie hieronder. Beldrukker toevoegen Het - Honeywell RCWL8000A1002 | User Guide - Page 35
huisstation als dit niet in het laadstation staat. Vervang de batterijen door de schroef van het batterijdeksel op de achterkant van het huisstation los te draaien. Verwijder de oude batterijen en vervang ze door drie NiMh type AA-batterijen met een minimale capaciteit van 1200 mAH - Honeywell RCWL8000A1002 | User Guide - Page 36
zijn en of het alkalinebatterijen zijn. ■ de trafo op het spanningsnet is aangesloten en ingeschakeld is, als het systeem van stroom wordt voorzien door een trafo. ■ de aansluitkabel van de trafo beschadigd is. ■ de twee draden van de aansluitkabel van de trafo contact maken met de aansluitklemmen - Honeywell RCWL8000A1002 | User Guide - Page 37
Nederlands Vereiste voeding Type batterij Levensduur van batterijen Bereik van bewegingssensor Aanvullende voeding Maximaal aantal zenders (video of beldrukker) programmeerbaar per huisstation Geluidsuitgang Werkfrequentie RF-uitgangsniveau Type antenne (ingebouwd) Type camera Effectieve resolutie - Honeywell RCWL8000A1002 | User Guide - Page 38
Sistema videocitofono portatile a cristalli liquidi Installazione e uso Sommario Caratteristiche I-2 Sistema VisioCam I-2 Controllare il contenuto del pacco I-2 Impostazioni I-3 Impostazioni di preinstallazione I-3 Installare la videocamera I-4 Opzione trasformatore per la videocamera .....I-6 - Honeywell RCWL8000A1002 | User Guide - Page 39
luogo scelto (vedere "Impostazioni", all'inizio della pagina successiva). Caratteristiche Italiano SISTEMA VISIOCAM Il sistema videocitofono wireless Friedland usa i segnali radio per trasmettere un'immagine video del chiamante dalla videocamera sulla porta al ricevitore. Il sistema è espandibile - Honeywell RCWL8000A1002 | User Guide - Page 40
Impostazioni IMPOSTAZIONI DI PREINSTALLAZIONE Prima di installare la videocamera, impostare e testare il sistema come segue: Installare le batterie nella videocamera Nota: la videocamera ha un interruttore antimanomissione incorporato a protezione da eventuali furti. Una volta inserite le batterie, - Honeywell RCWL8000A1002 | User Guide - Page 41
Programmare la videocamera nel ricevitore Lasciare almeno 2 m di distanza tra la videocamera e il ricevitore. Per programmare la videocamera nel ricevitore, premere e tenere premuto il tasto chiamata sulla videocamera finché il ricevitore non risponde con una suoneria e trasmette l'immagine - Honeywell RCWL8000A1002 | User Guide - Page 42
di sensore oscurato la videocamera passa alla modalità bianco e nero. VISIOCAM Per testare il sistema, farsi aiutare da qualcuno che tenga la videocamera 2. C'è una vicina fonte di interferenza sul canale video. Rimuovere la videocamera e cambiare il canale video, per esempio, da CH 2 a CH 3. - Honeywell RCWL8000A1002 | User Guide - Page 43
Regolare l'angolo di ripresa Con la videocamera nella posizione prevista, potrebbe essere necessario regolare la lente della videocamera per coprire l'area di osservazione desiderata. 3. Fissare in posizione la base della videocamera usando le viti e i supporti da muro forniti. Aprire la parte - Honeywell RCWL8000A1002 | User Guide - Page 44
secondi. Se il chiamante preme ancora il tasto chiamata, il tempo di visualizzazione si prolunga di ulteriori 30 secondi. La trasmissione video è limitata a 30 secondi per preservare la durata della batteria e non è regolabile. Quando la carica delle batterie è bassa, non viene più visualizzata - Honeywell RCWL8000A1002 | User Guide - Page 45
Privacy Tenere presente che questo prodotto usa le onde aeree pubbliche e che il segnale video di 30 secondi trasmesso dalla videocamera (o dalle videocamere), può essere intercettato da vicini dispositivi video riceventi da 2.4GHz. VIDEOCAMERA Sensore di moto Il sensore PIR ("ad infrarosso passivo - Honeywell RCWL8000A1002 | User Guide - Page 46
ma non all'interruttore antimanomissione. Nota: se il pulsante wireless fornito con il campanello non è necessario, è possibile utilizzarlo Premere il pulsante finché il ricevitore non suona. Nota: il ricevitore video non risponde al campanello quando lo schermo è attivo. Videocamere aggiuntive Il - Honeywell RCWL8000A1002 | User Guide - Page 47
Uso e manutenzione Italiano CURA E MANUTENZIONE ■ In presenza di impronte o sporco sulla lente della videocamera, le immagini possono risultare opache o indistinte. Pulire regolarmente la superficie con un panno morbido e umido. Non usare detergenti. Una pulizia eccessiva o troppo frequente può - Honeywell RCWL8000A1002 | User Guide - Page 48
forno a microonde. Spostare il forno a microonde o spegnerlo. ■ I computer e altre apparecchiature informatiche possono emettere segnali che influenzano la qualità video. Se questo è un possibile problema, allontanare il ricevitore (di almeno un metro) dalle unità. Il ricevitore suona e poi emette - Honeywell RCWL8000A1002 | User Guide - Page 49
Tipo antenna (incorporata) omnidirezionale Tipo videocamera sensore CMOS Risoluzione effettiva 628 x 582 pixel Standard video PAL Canali video settabili 4 Uscita video N.A. Modalità di commutazione N.A. automatica SCART (al pin 8) Passaggio da colore a bianco e nero Luminosità circa - Honeywell RCWL8000A1002 | User Guide - Page 50
- Honeywell RCWL8000A1002 | User Guide - Page 51
- Honeywell RCWL8000A1002 | User Guide - Page 52
-
 1
1 -
 2
2 -
 3
3 -
 4
4 -
 5
5 -
 6
6 -
 7
7 -
8
-
9
-
10
-
11
-
12
-
13
-
14
-
15
-
16
-
17
-
18
-
19
-
20
-
21
-
22
-
23
-
24
-
25
-
26
-
27
-
28
-
29
-
30
-
31
-
32
-
33
-
34
-
35
-
36
-
37
-
38
-
39
-
40
-
41
-
42
-
43
-
44
-
45
-
46
-
47
-
48
-
49
-
50
-
51
-
52
 |
 |
g
d
n
Portable Visiocam LCD Video Chime System
Installation and use
Tragbares LCD-Videoglockenspielsystem
Installation und Gebrauch
Mobiel video-deurbelsysteem
Installatie en gebruik
Sistema videocitofono portatile
a cristalli liquidi
Installazione e uso
i