Husqvarna R 322T AWD Owners Manual - Page 26
Replacing the light bulbs: 322T AWD, Main fuse, Checking the tyre pressure
 |
View all Husqvarna R 322T AWD manuals
Add to My Manuals
Save this manual to your list of manuals |
Page 26 highlights
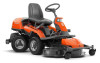
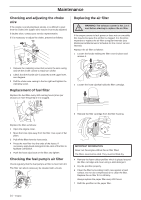
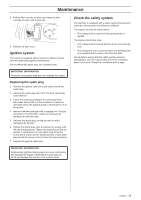
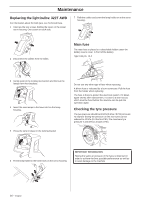
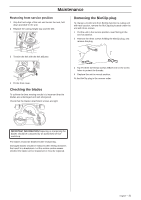
Maintenance Replacing the light bulbs: 322T AWD For information about the bulb type, see Technical Data. 1 Unscrew the two screws holding the cover on the power servo housing. One screw on each side. 7 Refit the cables and screw the lamp holder on to the servo housing. 2 Disconnect the cables from the bulbs. Main fuse The main fuse is placed in a detachable holder under the battery case's cover, in front of the battery. Type: Flat pin, 15 A. 3 Gently push in the locking mechanism and fold out the lamps from their brackets. 4 Insert the new lamps in the lower slot on the lamp housing. 5 Press the lamp in place in the locking bracket Do not use any other type of fuse when replacing. A blown fuse is indicated by a burnt connector. Pull the fuse from the holder when replacing. The fuse is there to protect the electrical system. If it blows again shortly after replacement, it is due to a short circuit, which must be fixed before the machine can be put into operation again. Checking the tyre pressure The tyre pressure should be 60 kPa (0.6 bar / 9 PSI) all round. To improve driving the pressure on the rear tyres can be reduced to 40 kPa (0.4 bar/5.6 PSI). The maximum tyre pressure is 100 kPa (1,0 bar/14 PSI). 6 Fit the lamp holder in the lower slots on the servo housing. IMPORTANT INFORMATION Having the same air pressure in the tyres is important in order to achieve the best possible performance as well as to avoid damage to the machine 26 - English
-
 1
1 -
2
-
3
-
4
-
5
-
6
-
7
-
8
-
9
-
10
-
11
-
12
-
13
-
14
-
15
-
16
-
17
-
18
-
19
-
20
-
 21
21 -
 22
22 -
 23
23 -
 24
24 -
 25
25 -
 26
26 -
 27
27 -
 28
28 -
 29
29 -
 30
30 -
 31
31 -
32
-
33
-
34
-
35
-
36
-
37
-
38
-
39
-
40
 |
 |
