InSinkErator Model Hot1 Owners Manual - Page 3
How To Use This Instruction Manual
 |
View all InSinkErator Model Hot1 manuals
Add to My Manuals
Save this manual to your list of manuals |
Page 3 highlights
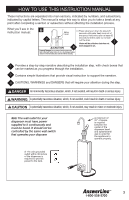
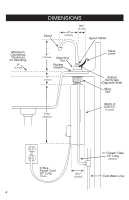
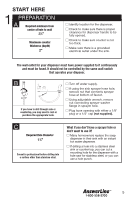
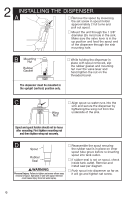
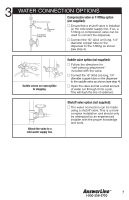
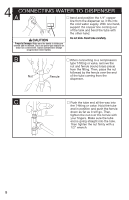
HOW TO USE THIS INSTRUCTION MANUAL These instructions are separated into main sections, indicated by numbers, and subsections, indicated by capital letters. The manual is setup this way to allow you to take a break at any point after completing a section or subsection without affecting the installation process. What you'll see in the instruction manual: B 2 Valve Lever Press valve lever down for about 20 seconds until water freely runs out of the spout. Hold valve open at lease 60 seconds to let the water run to flush out the lines. 1 3 ■ Water will be cold since been plugged in yet. tank has not Property Damage: Do not connect electric power until tank is filled with water. Failure to do so my damage heating element or thermal safety fuse and will void the warranty. 1 Provides a step-by-step narrative describing the installation step, with check boxes that can be marked as you progress through the installation. 2 Contains simple illustrations that provide visual instruction to support the narrative. 3 CAUTIONS, WARNINGS and DANGERS that will require your attention during the step. An imminently hazardous situation, which, if not avoided, will result in death or serious injury. A potentially hazardous situation, which, if not avoided, could result in death or serious injury. A potentially hazardous situation, which, if not avoided, may result in minor or moderate injury. Note: The wall outlet for your dispenser must have power supplied to it continuously and must be fused. It should not be controlled by the same wall switch that operates your disposer. A minimum of 33⁄4" of space is required between the center of the dispenser head and splashboard/ wall in order for the appliance to operate properly. A 115-volt grounded outlet within 30 inches of the dispenser is required to provide power to the tank. 3
-
 1
1 -
 2
2 -
 3
3 -
 4
4 -
 5
5 -
 6
6 -
 7
7 -
 8
8 -
 9
9 -
10
-
11
-
12
-
13
-
14
-
15
-
16
-
17
-
18
-
19
-
20
-
21
-
22
-
23
-
24
-
25
-
26
-
27
-
28
-
29
-
30
-
31
-
32
-
33
-
34
-
35
-
36
 |
 |
