Intel S5500BCR Service Guide - Page 32
Recovering the BIOS - downloads
 |
View all Intel S5500BCR manuals
Add to My Manuals
Save this manual to your list of manuals |
Page 32 highlights
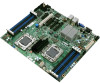
System Utilities / NOTE You may encounter a CMOS Checksum error or other problem after reboot. If this happens, shut down the system and boot it again. CMOS checksum errors require that you enter Setup, check your settings, save your settings, and exit Setup. Recovering the BIOS In the rare event the BIOS becomes damaged, you may need to follow a recovery process to return the system to service. To place the baseboard into recovery mode, move the BIOS Recover jumper (J1E5) located on the baseboard to the recovery position. The BIOS can then execute the recovery instead of the normal BIOS. / NOTE The BIOS recovery is the mode of last resort; it is used only when the main system BIOS will not come up. BIOS Recovery Procedure 1. Download the BIOS image file to a temporary folder on your hard drive. See "Additional Information and Software" for a link to the update software. 2. Copy all the files in the BIOS recovery package to the root directory of a USB disk-on-key device. 3. Power off the system. 4. Switch the BIOS recovery jumper (J1E5) to the "enabled" position (ping 2-3). Figure 9. BIOS Recover Jumper 20 Intel® Server Board S5520HC, S5520HCT and S5500HCV Service Guide
-
 1
1 -
2
-
3
-
4
-
5
-
6
-
7
-
8
-
9
-
10
-
11
-
12
-
13
-
14
-
15
-
16
-
17
-
18
-
19
-
20
-
21
-
22
-
23
-
24
-
25
-
26
-
 27
27 -
 28
28 -
 29
29 -
 30
30 -
 31
31 -
 32
32 -
 33
33 -
 34
34 -
 35
35 -
 36
36 -
 37
37 -
38
-
39
-
40
-
41
-
42
-
43
-
44
-
45
-
46
-
47
-
48
-
49
-
50
-
51
-
52
-
53
-
54
-
55
-
56
-
57
-
58
-
59
-
60
-
61
-
62
-
63
-
64
-
65
-
66
 |
 |
