Invacare 4V66FLR Owners Manual - Page 35
Adjusting the Anti-Tippers, Changing Seat-to-Floor Height
 |
View all Invacare 4V66FLR manuals
Add to My Manuals
Save this manual to your list of manuals |
Page 35 highlights
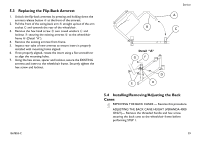
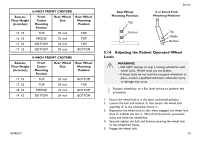
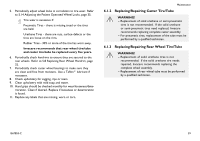
Invacare ® Veranda™ 3000/4000 5.12 Adjusting the Anti-Tippers A 1 1/2 to 2 inch clearance between the bottom of the anti-tipper wheels and the ground/floor MUST be maintained at all times. 1. Place the wheelchair on a flat surface. If adjusting anti-tippers on recliner models, ensure back canes are in the upright position before making adjustments. 2. Press the release buttons A on the wheeled portion of the anti-tipper B and slide it up or down to the desired adjustment hole. 3. Check to make sure that the release buttons are fully engaged in adjustment holes. 4. Ensure both anti-tippers are adjusted to the same height. 5. Measure the distance between the bottom of the anti-tipper wheels and the ground/floor. 6. If the distance between the bottom of anti-tipper wheels and the ground/floor is not 1 1/2 to 2 inches, repeat STEPS 2-4 until the distance is 1 1/2 to 2 inches. 7. If the 1 1/2 to 2 inch distance cannot be achieved, a different model anti-tipper may be required. Contact an Invacare dealer or qualified technician. B A 1 1/2 to 2 inch Clearanc e 34 5.13 Changing Seat-to-Floor Height WARNING! - The seat depth, size/position of the front casters, size/position of the rear wheels, use of an anti-tipper model, as well as the user condition directly relate to the stability of the wheelchair. Any change to one or any combination of the seven may cause the wheelchair to decrease in stability. These adjustments MUST be performed by a qualified technician. - Seat-to-floor heights have specific positions depending on rear wheel size, rear wheel position, front caster size and front caster position. These adjustments MUST be performed by a qualified technician. - If changing the seat-to-floor height the correct anti-tippers MUST be ordered to maintain a 1 1/2 to 2 inch ground clearance. 1. Refer to one of the following chart to determine the mounting positions for front casters/forks and rear wheels for the desired obtainable seat-to-floor height. 2. Remove the rear wheels from the wheelchair. Refer to STEPS 1-2 of 5.7 Removing/Installing the Rear Wheels, page 31. 3. If necessary, replace the front casters and forks with the casters and forks indicated in the chart. Refer to 5.9 Replacing Front Fork/Caster, page 32. 4. Reinstall the rear wheels onto the wheelchair in the mounting position indicated in the chart. Refer to STEP 3 of 5.7 Removing/Installing the Rear Wheels, page 31. 5. Adjust anti-tippers according to new seat-to-floor height. Refer to 5.12 Adjusting the Anti-Tippers, page 34. 1567855-C
-
 1
1 -
2
-
3
-
4
-
5
-
6
-
7
-
8
-
9
-
10
-
11
-
12
-
13
-
14
-
15
-
16
-
17
-
18
-
19
-
20
-
21
-
22
-
23
-
24
-
25
-
26
-
27
-
28
-
29
-
 30
30 -
 31
31 -
 32
32 -
 33
33 -
 34
34 -
 35
35 -
 36
36 -
 37
37 -
 38
38 -
 39
39 -
 40
40 -
41
-
42
-
43
-
44
-
45
-
46
-
47
-
48
-
49
 |
 |
