JVC A805 Instructions
JVC A805 - KD Radio / CD Manual
 |
UPC - 046838037351
View all JVC A805 manuals
Add to My Manuals
Save this manual to your list of manuals |
JVC A805 manual content summary:
- JVC A805 | Instructions - Page 1
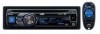
having trouble?? USA ONLY Call 1-800-252-5722 http://www.jvc.com We can help you! EN, SP, FR © 2009 Victor Company of Japan, Limited 0209DTSMDTJEIN KD-A805/KD-R800 CD RECEIVER Instructions CD RECEIVER RECEPTOR CON CD RÉCEPTEUR CD KD-A805/KD-R800 KD-A805/KD-R800 KD-A805/KD-R800 For canceling - JVC A805 | Instructions - Page 2
an outlet on a circuit different from that to which the receiver is connected. - Consult the dealer or an experienced radio/TV technician for help. Caution: Changes or modifications not approved by JVC could void the user's authority to operate the equipment. IMPORTANT FOR LASER PRODUCTS 1. CLASS - JVC A805 | Instructions - Page 3
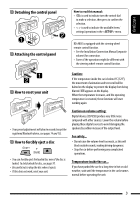
KD-A805 is equipped with the steering wheel remote control function. • See the Installation/Connection Manual except the registered Bluetooth device, see CD/USB) produce very little noise compared car before performing any complicated operations. Temperature inside the car... If you have parked the car - JVC A805 | Instructions - Page 4
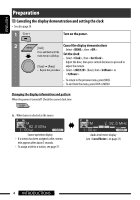
Cancel the display demonstrations Select , then . Press and hold until the main menu is called up. Set the clock • Select , then . Adjust the hour, then a title to a station, see page 37. Audio level meter display (see on page 31) 4 INTRODUCTIONS - JVC A805 | Instructions - Page 5
• Using the Bluetooth audio player 18 REFERENCES More about this unit 38 Troubleshooting 43 Maintenance 49 Specifications 50 EXTERNAL DEVICES Listening to the HD Radio™ Broadcast 19 Listening to the CD changer 20 Listening to the satellite radio 21 Listening to the iPod/iPhone 24 • When - JVC A805 | Instructions - Page 6
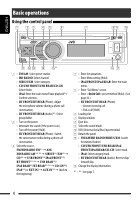
. • HD RADIO: Select channel. • SIRIUS/XM: Select category. • CD/USB FRONT/USB REAR/CD-CH: Select folder. • iPod: Enter the main menu/Pause playback*2/ Confirm selection. • BT FRONT/BT REAR (Phone): Adjust the microphone volume (during a phone call conversation). • BT FRONT/BT REAR (Audio)*3: Select - JVC A805 | Instructions - Page 7
]. • BT FRONT/BT REAR (Audio): Resume playback*2 [Press]. • CD/USB FRONT/USB REAR/iPod FRONT/iPod REAR/BT FRONT (Audio)*3/ BT REAR (Audio)*3/CD-CH: Enter playback mode [Hold]. y Remote sensor u AUX (auxiliary) input jack *1 Also known as "Control dial" in this manual. *2 You can still adjust the - JVC A805 | Instructions - Page 8
at a time if pressed and held. • Reverse skip/forward skip for Bluetooth audio player. Warning (to prevent accidents and damage): • Do not install any battery other than CR2025 or its equivalent. • Do not leave the remote controller in a place (such as dashboards) exposed to direct sunlight for - JVC A805 | Instructions - Page 9
, press the same button again. • You can also search for a station manually-Manual Search. Hold either one of the buttons until "M" appears on the display, then press it repeatedly. • When receiving an FM stereo broadcast with sufficient signal strength, the indicator lights up on the display - JVC A805 | Instructions - Page 10
ENGLISH Manual presetting (FM/AM) 3 You can preset up to 18 stations for FM and 6 stations for AM. Ex.: Storing FM station of 92.5 MHz into preset - JVC A805 | Instructions - Page 11
playback Selecting the playback modes You can use only one of the following playback modes at a time. 1 Enter "PLAYBACK MENU" screen. MP3/WMA: Select folder 2 [Press] Select track [Hold] Reverse/fast-forward track Selecting a track/folder 3 [Turn] = [Press] Repeat Random [Turn] = [Press] [Turn - JVC A805 | Instructions - Page 12
Adapter (KS-UBT1) and/or an Apple iPod/iPhone to the USB input terminal(s). For details of the operations, see pages 13 - 18 and 24 - 26. This unit can play MP3/WMA/WAV tracks stored in a USB mass storage class device (such as a USB memory, Digital Audio Player, portable HDD, etc.). 1 Turn - JVC A805 | Instructions - Page 13
a USB device in the car, expose to direct sunlight Audio Distribution Profile) 1.2 AVRCP (Audio/Video Remote Control Profile) 1.3 Features You can operate Bluetooth devices through the unit as follows: • Receiving a call • Making a call-from phone book, from call history (dialed number/received call - JVC A805 | Instructions - Page 14
USB Bluetooth Adapter can be detected at a time. or USB cable from the rear of the unit You can perform the following operations from the menu. • Pairing and delete pairing • Connect and disconnect a registered Bluetooth device (Phone/Audio) [Turn] = [Press] Pairing and PIN code When - JVC A805 | Instructions - Page 15
is deleted. • To return to the previous menu, press BACK. 3 Use the Bluetooth device to search and connect. On the device to be connected, enter the same PIN code you have just entered for this unit. "Wait Pair" appears, then "Pairing OK" or "Connected [Device Name]" appears on the display when the - JVC A805 | Instructions - Page 16
is disconnected. Using the Bluetooth cellular phone Making a call 1 Enter "Call Menu" screen. 2 Select the method to make a call. • "Dialed Calls"*: Shows the list of the phone numbers you have dialed. Go to the following step. • "Received Calls"*: Shows the list of the received calls. Go to the - JVC A805 | Instructions - Page 17
. Receiving/ending a phone call When a call comes in.... The source is automatically changed to "BT FRONT/ BT REAR." • The display will flash in blue (see on page 30 for setting). How to delete phone number • Only when is selected for in Bluetooth - JVC A805 | Instructions - Page 18
skip [Hold] Reverse search/forward search * Operation maybe different according to the connected device. Bluetooth Information: If you wish to receive more information about Bluetooth, visit the following JVC web site: (English website only). 18 OPERATIONS - JVC A805 | Instructions - Page 19
will have FM-like quality (in stereo) and FM digital will have CD-like quality-with staticfree and clear reception. Furthermore, stations can offer text and data, such as artist names and song titles. • When the HD Radio tuner box is connected, it can also receive conventional analog broadcasts - JVC A805 | Instructions - Page 20
FM/AM stations. • If the radio station forces the reception mode to digital or analog, the or indicator lights up. Listening to the CD changer It is recommended to use a JVC MP3-compatible CD changer (not supplied) with your unit. You can connect a CD changer to the CD changer jack on the rear of - JVC A805 | Instructions - Page 21
following (not supplied) to the CD changer jack on the rear of this unit. • JVC SIRIUS satellite radio System, SC-C1 and KS-SRA100, PnP, SC-VDOC1 and KS-SRA100, for listening to the SIRIUS Satellite radio. • XM satellite radio System, JVC Smart Digital Adapter-XMDJVC100, CNP2000UC and CNPJVC1 for - JVC A805 | Instructions - Page 22
completed, SIRIUS Satellite radio tunes in to the preset channel, CH184. 3 Check your Sirius ID, see page 33. 4 Contact SIRIUS on the internet at to activate your subscription, or you can call SIRIUS toll-free at 1-888-539-SIRIUS (7474). "Sub Updated Press Any Key - JVC A805 | Instructions - Page 23
ID While selecting "XM," select "Channel 0." Listening to a user channel 1 Enter "LIST" screen. The display alternately shows "RADIO ID" and the 8-digit (alphanumeric) ID number. 2 Select "Preset" list. To cancel the ID number display, select any channel other than "Channel 0." Storing channels - JVC A805 | Instructions - Page 24
or adapter: Cable/adapter To operate USB 2.0 cable (accessory of the iPod/iPhone) to the USB input terminal See "When connected with the USB input on the control panel or USB cable from the rear of the unit terminal" below. Interface adapter for iPod, KS-PD100 (not supplied) to the CD changer - JVC A805 | Instructions - Page 25
Selecting the playback modes 1 Enter "PLAYBACK MENU" screen. 2 [Turn] = [Press] Repeat Random 3 [Turn] = [Press] When connected with the interface adapter Preparation: Make sure is selected in the = setting, see page 33. 1 Select "iPod." Playback starts - JVC A805 | Instructions - Page 26
can connect an external component to: • EXT IN: CD changer jack on the rear of this unit using the following adapters (not supplied): - KS-U57: For connecting the component component to the AUX input jack 3.5 mm (3/16") stereo mini plug (not supplied) 26 EXTERNAL DEVICES Portable audio player, etc. - JVC A805 | Instructions - Page 27
Adjust> settings. Selecting from menu. or PURE = USER = ROCK = CLASSIC = POPS = HIP HOP = JAZZ = (back to the beginning) [Turn] = [Press Preset value Sound mode Low Mid High Freq. Level Q Freq. Level Q Freq. Level Q User 50 Hz 00 Q1.0 1.0 kHz 00 Q1.0 10.0 kHz 00 Q1.0 Rock 100 Hz - JVC A805 | Instructions - Page 28
ENGLISH Storing your own sound mode You can store your own adjustments in memory. 1 Select . [Turn] = [Press] 2 Enter setting mode. 3 Select a frequency range. [Turn] = [Press] Ô Ô 4 Adjust the sound elements of the selected frequency range. 1 Press 4 / ¢ to adjust - JVC A805 | Instructions - Page 29
ENGLISH Menu operations 1 Call up the 2 Select the desired item. menu. [Turn] = [Press] off the ignition key of your car, it is recommended to select to save the car's battery. *2 Displayed only when SIRIUS Satellite radio or XM Satellite radio is connected. *3 Displayed only when - JVC A805 | Instructions - Page 30
compared to the FM volume level. The volume level will automatically increase or decrease when you change the source. • Before making an adjustment, select the source you want to adjust. • "FIX" appears on the display if "FM" is selected as the source. *4 Displayed only when USB Bluetooth Adapter - JVC A805 | Instructions - Page 31
subwoofer output level. Level 00 to Level 08 (Initial: Level 04) Audio HPF High pass filter Select the cutoff frequency to the front/rear speakers. ." *8 Only for KD-A805. *9 The illumination control lead connection is required. (See "Installation/Connection Manual.") Continued on the next - JVC A805 | Instructions - Page 32
information while playing MP3/WMA/ WAV tracks 14 - 16 for settings.) Bluetooth Settings (See pages 35 and quality will not be degraded and the stereo effect will remain. *10 Some characters or symbols will not be shown correctly (or will be blanked) on the display. *11 Not applicable to HD Radio - JVC A805 | Instructions - Page 33
monaural mode to improve FM reception, but stereo effect will be lost, [9]. Ext Input*16, *17 External input • Changer • Ext In : To use a JVC CD changer, [20], or an Apple iPod/iPhone, [24]. : To listen to a portable audio player (connected to the CD changer jack), [26]. Source Select AM - JVC A805 | Instructions - Page 34
ENGLISH Creating your own color -User Color You can create your own colors- or - JVC A805 | Instructions - Page 35
Bluetooth Adapter (KS-UBT1) to one of the USB input terminals of the unit. 1 [Turn] = [Press] 2 Select a setting item. [Turn] = [Press] - JVC A805 | Instructions - Page 36
method. Hold to enter the selected method. • Appears only when a Bluetooth phone is connected. Dialed Calls: Show the list of the numbers you have dialed. Received Calls: Show the list of the numbers you have received. Missed Calls: Show the list of the numbers you have missed. Phonebook: Show the - JVC A805 | Instructions - Page 37
Shows the unit name. JVC Address: Shows address of USB Bluetooth Adapter. JVC Software Ver.: Shows the software version. Connected Phone*: Shows connected phone name. Connected Audio*: Shows connected audio device name. * Displayed only when a Bluetooth phone/audio player is connected. Title - JVC A805 | Instructions - Page 38
-RWs (Rewritable) in audio CD (CD-DA), MP3 and WMA formats. • When a disc is inserted upside down, "Please Eject" appears on the display. Press 0 to eject the disc. • In this manual, words "track" and "file" are interchangeably used. • While fast-forwarding or reversing on an MP3/WMA/ WAV file, you - JVC A805 | Instructions - Page 39
code or (regardless of the letter case-upper/lower). • This unit can show the names of albums, artists (performer), and Tag (Version 1.0, 1.1, 2.2, 2.3, or 2.4) for MP3 files and show WMA Tag. • This unit can play back MP3/WMA files meeting the conditions below: Bit rate of MP3 - JVC A805 | Instructions - Page 40
MP3 files recorded in VBR (variable bit rate). • The maximum number of characters for folder and file names is 25 characters (including , , ); 128 characters for MP3 or unplug the USB Bluetooth Adapter during a phone call conversation, the Bluetooth connection is disconnected. - JVC A805 | Instructions - Page 41
nearest JVC car audio dealers. HD Radio reception • HD Radio broadcasting can normally be received in the USA, and it may also be received in - iPhone/iPhone 3G*1,*2 (B) Connected with the interface adapter: - iPod with Click Wheel (4th Generation) - iPod mini - iPod photo - iPod with video (5th - JVC A805 | Instructions - Page 42
JVC web site: Radio, Inc. • "Made for iPod" means that an electronic accessory has been designed to connect specifically to iPod and has been certified by the developer to meet Apple performance standards. • "Works with iPhone" means that an electronic accessory - JVC A805 | Instructions - Page 43
ENGLISH Troubleshooting What appears to be trouble is not always serious. Check the following points before calling a service center. • SSM automatic presetting does not work. Store stations manually. • Static noise while listening to the radio. Connect the antenna firmly. • "AM" cannot be - JVC A805 | Instructions - Page 44
of the CD. MP3/WMA playback rate). • "Please Eject" appears on the display. Insert a disc that contains MP3 MP3/WMA tracks. • "Not Support MP3/WMA/WAV track. Skip to another file. (Do not add the extension code , , or to non-MP3 USB device or the iPod/iPhone • "No USB" appears - JVC A805 | Instructions - Page 45
does not make pairing with the Enter the same PIN code for both the unit and target Bluetooth device. device. • Echo or noise occurs. Adjust the microphone unit's position. • Phone sound quality is poor. • Reduce the distance between the unit and the Bluetooth cellular phone. • Move the car to - JVC A805 | Instructions - Page 46
Symptoms Remedies/Causes CD changer • Sound quality changes when receiving Fix the reception mode either to or HD Radio stations. (see pages 19, 20 and 33). • No sound can be heard. • is selected when receiving all digital broadcast of HD Radio station. Select - JVC A805 | Instructions - Page 47
audio. listening to the XM Satellite radio. radio correctly and reset this unit. • The iPod/iPhone does not turn on or does not work. • Check the connecting cable and its connection. • Update the firmware version of the iPod/iPhone. • Charge the battery of the iPod/iPhone. • Reset the iPod/iPhone - JVC A805 | Instructions - Page 48
nano. nano. • Update the firmware version of the iPod nano. • "Reset 01" - "Reset 07" appears on the Disconnect the adapter from both this unit Check the connection between the adapter and this unit. JVC bears no responsibility for any loss of data in an iPod/iPhone and/or USB mass storage - JVC A805 | Instructions - Page 49
the following cases: • After starting the heater in the car. • If it becomes very humid inside the car. Should this occur, the unit may malfunction. In this or ball-point pen, etc. Do not use the following discs: Single CD -8 cm (3-3/16") disc Warped disc Sticker and sticker residue Stick-on - JVC A805 | Instructions - Page 50
-Out Level/ KD-A805: Impedance: KD-R800: 5.0 V/20 kΩ load (full scale) 2.5 V/20 kΩ load (full scale) Output Impedance: 1 kΩ Other Terminal: USB input terminal, USB cable, AUX (auxiliary) input jack, CD changer jack, Steering wheel remote input (only for KD-A805) TUNER SECTION Frequency - JVC A805 | Instructions - Page 51
File System: Playable Audio Format: Max. Current: Full Speed: Low Speed: USB 1.1, USB 2.0 Maximum 12 Mbps Maximum 1.5 Mbps Mass storage class FAT 32/16/12 MP3/WMA/WAV DC 5 V 500 mA BLUETOOTH Version: Power Class: Service Area: Profile: Bluetooth 2.0 certified Class 2 Radio (possible distance 10 - JVC A805 | Instructions - Page 52
Muchas gracias por la compra de un producto JVC. Como primer paso, por favor lea detenidamente este manual para comprender a fondo todas las instrucciones o a un técnico experto en radio/televisión. Precaución: Los cambios o modificaciones no aprobados por JVC pueden anular la autoridad del usuario - JVC A805 | Instructions - Page 53
de control El KD-A805 está equipado con la función de control remoto en el volante de dirección. • Para la conexión, consulte el Manual de instalación/conexi dispositivo Bluetooth registrado, consulte las páginas 14 y 15). Precaución sobre el ajuste de volumen: Los dispositivos digitales (CD/USB) - JVC A805 | Instructions - Page 54
, el título de la emisora aparece durante aproximadamente 5 segundos. • Para asignar un título a una emisora, consulte la página 37. Visualización del medidor de nivel de audio (véase en la página 31) 4 INTRODUCCIÓN - JVC A805 | Instructions - Page 55
Bluetooth 16 • Uso del reproductor de audio Bluetooth ........ 18 AJUSTES Selección de un modo de sonido preajustado 27 Operaciones de los menús 29 • Creando sus propios colores-User HD Radio™... 19 Escuchando el cambiador de CD 20 Para escuchar la radio satelital 21 Escuchando el iPod/iPhone - JVC A805 | Instructions - Page 56
. 5 • Ingresa en la pantalla "Call Menu". • Ingrese al método de preajuste [Sostener] (consulte la página 36 RADIO/SIRIUS/XM: Busca la emisora/canal. • CD/USB FRONT/USB REAR/iPod FRONT/iPod REAR/CD-CH: Seleccionar la pista. • iPod: Selecciona la categoría/pista. • BT FRONT/BT REAR (Audio - JVC A805 | Instructions - Page 57
/USB FRONT/USB REAR/iPod FRONT/iPod REAR/BT FRONT (Audio)*3/ BT REAR (Audio)*3/CD-CH: Ingresar en el modo de reproducción [Sostener]. y Sensor remoto u Toma de entrada AUX (auxiliar) *1 Se denomina también "Control giratorio" en este manual. *2 Incluso es posible ajustar el volumen durante la pausa - JVC A805 | Instructions - Page 58
Radio. • Cambia la carpeta de MP3/WMA (y WAV para operaciones USB). • Mientras se reproduce un disco MP3 en un cambiador de CD compatible con MP3: salto hacia adelante para reproductor de audio Bluetooth. Advertencia (para evitar accidentes y daños): • No instale ninguna otra pila distinta de CR2025 - JVC A805 | Instructions - Page 59
radio 1 Seleccione "FM" o "AM". 2 Efectúa la búsqueda de una emisora-Búsqueda automática. Cuando se sintoniza una emisora, la búsqueda se detiene. Para detener la búsqueda, pulse nuevamente el mismo botón. • También es posible efectuar la búsqueda manual para seleccionar . 2 - JVC A805 | Instructions - Page 60
ESPAÑOL Preajuste manual (FM/AM) 3 Es posible preajustar hasta 18 emisoras para FM y 6 emisoras para AM. Ej.: Almacenando la emisora FM de 92,5 MHz en el número de - JVC A805 | Instructions - Page 61
MENU". [Pulse] Seleccionar la pista [Sostener] Retroceso/avance rápido de pista Selección de una pista/carpeta [Gire] = [Pulse] • Para los discos MP3/WMA, seleccione la carpeta deseada y luego la pista que desea repitiendo los procedimientos del control giratorio. • Para volver al menú anterior - JVC A805 | Instructions - Page 62
iPod/iPhone al(los) terminal(es) de entrada USB. Para obtener detalles de las operaciones, consulte las páginas 13 - 18 y 24 - 26. Esta unidad puede reproducir pistas de MP3/WMA/WAV almacenadas en un dispositivo de clase de almacenamiento masivo USB (como por ejemplo, memoria USB, Digital Audio - JVC A805 | Instructions - Page 63
libres) 1.5 OPP (Perfil de carga de objetos) 1.1 A2DP (Perfil Avanzado de Distribución de Audio) 1.2 AVRCP (Perfil de Control Remoto de Audio/Video) 1.3 Características Puede accionar los dispositivos Bluetooth a través de la unidad, de la manera siguiente: • Recibiendo una llamada • Realizando una - JVC A805 | Instructions - Page 64
operaciones desde el menú . • Apareamiento y eliminación de apareamiento • Conecte y desconecte un dispositivo Bluetooth registrado (Teléfono/Audio) [Gire] = [Pulse] = Realice las siguientes operaciones. Apareamiento y código PIN Cuando se conecta por primera vez un - JVC A805 | Instructions - Page 65
volver al menú anterior, pulse BACK. 3 Utilice el dispositivo Bluetooth para efectuar la búsqueda y conexión. En el dispositivo que se desea conectar, ingrese el mismo código PIN que el ingresado para esta unidad. Aparece "Wait Pair", luego "Pairing OK" o "Connected [Nombre del dispositivo]" en la - JVC A805 | Instructions - Page 66
registrado 1 Seleccione o . [Gire] = [Pulse] 2 Seleccione un Bluetooth Cómo hacer una llamada 1 Ingresa en la pantalla "Call Menu". • "Dialed Calls"*: Muestra la lista de los números telefónicos a los que ha llamado. Vaya al paso siguiente. • "Received Calls - JVC A805 | Instructions - Page 67
gina 30). ESPAÑOL Cómo borrar un número telefónico • Sólo cuando se selecciona para en el menú de ajuste Bluetooth (consulte la página 36). 1 Ingresa en la pantalla "Call Menu". Nombre (o número de teléfono, si está disponible) Cuando está activado - JVC A805 | Instructions - Page 68
para informarle que ha llegado un mensaje. • Aparece "Received Message" en la pantalla, la cual se ilumina en opere el reproductor de audio Bluetooth para comenzar la Bluetooth: Si desea obtener más información sobre Bluetooth, visite el siguiente sitio web de JVC: - JVC A805 | Instructions - Page 69
ÑOL Para escuchar la transmisión de HD Radio™ Antes de hacer funcionar, conecte el sintonizador HD Radio, KT-HD300 (no suministrado) al jack del cambiador de CD en la parte posterior de la unidad. ¿Qué es la tecnología HD Radio? La tecnología HD Radio puede brindar sonido digital de alta calidad - JVC A805 | Instructions - Page 70
las emisoras FM/AM convencionales. • Si la emisora de radio ajusta el modo de recepción a digital o analógico, se enciende el indicador o . Escuchando el cambiador de CD Se recomienda usar, con esta unidad, un cambiador de CD compatible con MP3 JVC (no suministrado). Puede conectar un cambiador de - JVC A805 | Instructions - Page 71
) al jack del cambiador de CD de la parte trasera de esta unidad. • Sistema de radio satelital JVC SIRIUS, SC-C1 y KS-SRA100, PnP, SC-VDOC1 y KS-SRA100, para escuchar la radio satelital SIRIUS. • Sistema XM satellite radio, JVC Smart Digital Adapter-XMDJVC100, CNP2000UC y CNPJVC1 para escuchar - JVC A805 | Instructions - Page 72
888-539-SIRIUS (7474). Una vez que haya finalizado su suscripción, "Sub Updated Press Any Key" se desplaza en la pantalla. 2 Seleccione "XM". sintoniza automáticamente. 3 Consulte el número de identificación de la radio satelital XM que aparece en la etiqueta de la carcasa del Sintonizador XMDirect - JVC A805 | Instructions - Page 73
selecciona "XM", seleccione "Channel 0". Cómo escuchar un canal de usuario 1 Ingresa en la pantalla "LIST". La pantalla muestra alternativamente "RADIO ID" y el número de identificación de 8-caracteres alfanuméricos. Para cancelar la visualización del número de identificación seleccione un canal - JVC A805 | Instructions - Page 74
del cambiador de CD en la parte trasera de la unidad adaptador de interfaz" en la página 25. • Cuando hay dispositivos iPod/iPhone conectados a ambos más información, consulte también el manual entregado con su iPod/iPhone. Precaución: • Evite utilizar el iPod/iPhone si esto puede poner en peligro - JVC A805 | Instructions - Page 75
Random Repeat ESPAÑOL Pulsando (o sosteniendo) los siguientes botones usted podrá... [Pulse] Pausar / reanudar la reproducción. [Pulse] Seleccionar la pista [Sostener] Retroceso/avance rápido de pista Cómo seleccionar los modos de reproducción 1 Ingresa en la pantalla "PLAYBACK MENU". 2 [Gire] = [ - JVC A805 | Instructions - Page 76
componentes externos Podrá conectar un componente externo a: • EXT IN: Jack del cambiador de CD de la parte trasera de esta unidad utilizando los siguientes adaptadores (no suministrado): - KS de 3,5 mm (3/16 pulgada) (no suministrado) Reproductor de audio portátil, etc. 26 DISPOSITIVOS EXTERNOS - JVC A805 | Instructions - Page 77
página 28. Configuración del valor preajustado para cada modo de sonido Valor preajustado Modo de sonido Low Mid High Frec. Nivel Q Frec. Nivel Q Frec. Nivel Q User 50 Hz 00 Q1.0 1.0 kHz 00 Q1.0 10.0 kHz 00 Q1.0 Rock 100 Hz +03 Q1.0 1.0 kHz 00 Q1.0 10.0 kHz +02 Q1.4 Classic 100 - JVC A805 | Instructions - Page 78
para ajustar el nivel. 3 Haga girar el control giratorio para ajustar la pendiente de calidad. [Gire] = [Pulse] 2 Ingrese al modo de ajuste de . 3 Seleccione una gama de frecuencias. Elementos de sonido Frecuencia Nivel Q Gama/Ítems seleccionables Low Mid High 50 Hz 100 Hz 200 Hz 0.5 kHz - JVC A805 | Instructions - Page 79
Clock Clock Adjust*2 • Auto • Off : El reloj incorporado se ajustará automáticamente gracias a los datos de reloj suministrados mediante el canal de radio satelital. : Se cancela. Time Zone*2,*3 : Para el ajuste del reloj, seleccione su zona residencial entre una de las zonas horarias. Eastern - JVC A805 | Instructions - Page 80
bien balanceado a bajos niveles de volumen. • Off : Se cancela. Audio Volume Adjust Level -5 - Level +5 (Inicial: Level 0) : Preajuste "FM" como fuente. *4 Se visualiza solamente cuando se ha conectado un adaptador Bluetooth USB (KS-UBT1). *5 Si está utilizando un sistema de dos altavoces, - JVC A805 | Instructions - Page 81
Off : Todas las señales se envían a los altavoces delanteros/traseros. Audio Beep • On Tono de • Off pulsación de teclas : Activa el tono a "Vol 30". *8 Sólo para KD-A805. *9 Se requiere la conexión del conductor de control. (Consulte el "Manual de Instalación/Conexión".) Continúa en la - JVC A805 | Instructions - Page 82
On : Muestra la información de etiqueta mientras se reproducen pistas MP3/WMA/WAV. • Off : Se cancela. • Negative • 05) (Para los ajustes, consulte las páginas 14 - 16). Bluetooth Settings (Para los ajustes, consulte las páginas 35 y 36). Area Radio. *12 Depende del ajuste de . 32 - JVC A805 | Instructions - Page 83
Para usar un cambiador de CD JVC, [20] o un iPod/ iPhone Apple [24]. : Para escuchar un reproductor de audio portátil (conectado al jack del cambiador de CD), [26]. : Se activa distinta de "CD-CH/iPod/EXT IN". *17 No es necesario para sintonizadores de emisiones HD Radio/SIRIUS/XM y Bluetooth. *18 - JVC A805 | Instructions - Page 84
, no aparecerá nada en la pantalla. 5 Confirme los ajustes. 2 Ingrese al modo de ajuste de . 6 Salga del ajuste. o 3 Seleccione o . [Gire] = [Pulse] Seleccione para mostrar sus propios colores para los botones y la pantalla. Ej - JVC A805 | Instructions - Page 85
Gire] = [Pulse] [Gire] = [Pulse] 2 Seleccione una opción de ajuste. 2 Ajuste la hora de inicio del [Gire] = [Pulse] 4 Salga del ajuste. o [Gire] = [Pulse] Ô Ô Ô * Ô Ô - JVC A805 | Instructions - Page 86
Bluetooth. Dialed Calls: Muestra la lista de los números a los que ha llamado. Received Calls: Muestra la lista de los números que ha recibido. Missed Calls tarjeta SIM. Manual Trans: Seleccione manualmente la fuente que desea transferir. Initialize Yes: Inicialice todos los ajustes Bluetooth. No: Se - JVC A805 | Instructions - Page 87
se ha conectado un teléfono/reproductor de audio Bluetooth. Asignación de título Puede asignar títulos a 30 frecuencias de emisoras (FM y AM), con un máximo de 8 carácteres para cada título. • Cuando el sintonizador de HD Radio esté conectado, esta característica se deshabilitará. 1 Seleccione - JVC A805 | Instructions - Page 88
/CD Texts, y CD-Rs (Grabables)/CD-RWs (Reescribibles) en formato de audio CD (CD-DA), MP3 y WMA. • Cuando se inserta un disco al revés, aparecerá "Please Eject" en la pantalla. Pulse 0 para sacar el disco. • En este manual, las palabras "pista" y "archivo" se utilizan indistintamente. • Durante el - JVC A805 | Instructions - Page 89
codificados con formato MP3i y MP3 PRO. - Archivos MP3 codificados en un formato inapropiado. - Archivos MP3 codificados con Layer 1/2. - Archivos WMA codificados con formatos sin pérdida, profesional, y de voz. - Archivos WMA no basados en Windows Media® Audio. - Archivos formateados WMA protegidos - JVC A805 | Instructions - Page 90
kHz - Canal: 1 ch/2 ch • Esta unidad puede reproducir archivos MP3 grabados en VBR (velocidad de bit variable). • El número máximo de los tipos de dispositivos USB. Operaciones Bluetooth General • Absténgase de realizar actividades de audio conectados : Teléfono celular : Sólo Teléfono : Tel - JVC A805 | Instructions - Page 91
car audio JVC más cercano. Recepción de HD Radio • La transmisión HD Radio Radio satelital • También puede conectar la radio SIRIUS PnP (Plug and Play) de JVC con el adaptador de radio SIRIUS KS-U100K de JVC (no suministrado) a la toma del cambiador de CD generación)*1,*2 - iPhone/iPhone 3G*1, *2 (B) - JVC A805 | Instructions - Page 92
siguiente sitio web de JVC: (Sitio web só Bluetooth SIG, Inc., y cualquier uso de los mismos por Victor Company of Japan, Limited (JVC) se realiza bajo licencia. Otras marcas y nombres comerciales son de sus respectivos propietarios. • HD Radio™ y el logo HD Radio - JVC A805 | Instructions - Page 93
• Ruidos estáticos mientras se escucha la radio. Conecte firmemente la antena. • "AM" CD-R/CD-RW. • Inserte un CD-R/CD-RW finalizado. • No se pueden saltar las pistas del CD-R/CD- • Finalice el CD-R/CD el disco. • Utilice un disco con pistas MP3/WMA grabadas en un formato compatible con ISO - JVC A805 | Instructions - Page 94
File" en la pantalla. • Aparece "Not Support" en la pantalla y se omiten las el sistema de archivos del CD. Esto sucede a veces durante MP3/WMA/WAV. Salte a otro archivo. (No añada el código de extensión , o a pistas que no sean MP3 USB o el iPod/iPhone conectado sea compatible - JVC A805 | Instructions - Page 95
Aparece "Not Support" en la Bluetooth. • Reinicialice la unidad. Cuando aparezca "Wait Pair" en la pantalla, vuelva a efectuar la búsqueda desde el dispositivo Bluetooth reproductor de audio de audio Bluetooth. Bluetooth. • Desconecte el dispositivo conectado para el teléfono Bluetooth. • - JVC A805 | Instructions - Page 96
la Pulse el botón de reinicialización del cambiador de CD. pantalla. • El cambiador de CD no funciona en Reinicialice el receptor (consulte la página 3). absoluto. • El texto "CALL 1-888-539-SIRIUS TO Se inicia la suscripción a la radio satelital SIRIUS (consulte SUBSCRIBE" (llame al 1-888-539 - JVC A805 | Instructions - Page 97
unidad y la radio por satélite y, a continuación, reinicialice la unidad. • El iPod/iPhone no se enciende o no funciona. • Verifique el cable de conexión y su conexión. • Actualice la versión de firmware del iPod/iPhone. • Cargue la pila del iPod/iPhone. • Reinicialice el iPod/iPhone. • Verifique - JVC A805 | Instructions - Page 98
los auriculares del iPod nano. un iPod nano. • Actualice la versión de firmware del iPod nano. • Aparece "Reset 01" - "Reset 07" en la Desconecte el adaptador y esta unidad. JVC no se hará responsable de ninguna pérdida de datos en un iPod/iPhone y/o dispositivo de clase de almacenamiento - JVC A805 | Instructions - Page 99
el disco. Para eliminar estos puntos ásperos, frote los bordes con un lápiz o bolígrafo, etc. No utilice los siguientes discos: CD simple -disco de 8 cm (3-3/16 pulgada) Disco alabeado Pegatinas y restos de pegatina Rótulo autoadhesivo Forma irregular C-thru Disc (disco semitransparente - JVC A805 | Instructions - Page 100
DE AUDIO Especificaciones Salida KD-A805: del subwoofer/Impedancia: KD-R800: 5,0 V/20 kΩ de carga (plena escala) 2,5 V/20 kΩ de carga (plena escala) Impedancia de salida: 1 kΩ Otro terminal: Terminal de entrada USB, Cable USB, Toma de entrada AUX (auxiliar), Jack del cambiador de CD - JVC A805 | Instructions - Page 101
CD audio reproducible: Corriente máx.: Toda velocidad: Baja velocidad: USB 1.1, USB 2.0 Máximo 12 Mbps Máximo 1,5 Mbps Clase de almacenamiento masivo FAT 32/16/12 MP3/WMA/WAV 5 V CC 500 mA BLUETOOTH Versión: Clase de potencia: Área de servicio: Perfil: Bluetooth 2.0 certified Radio un kit para - JVC A805 | Instructions - Page 102
JVC. Veuillez lire attentivement toutes les instructions avant d'utiliser l'appareil afin de bien comprendre son fonctionnement et d'obtenir les meilleures performances possibles. FRANÇAIS Précautions: Tout changement ou modification non approuvé par JVC . (Pour le Canada) Rayonnement laser visible - JVC A805 | Instructions - Page 103
Le KD-A805 est muni d'une fonction de télécommande de volant. • Référez-vous au Manuel d'installation/ réglage du volume: Les appareils numériques (CD/USB) produisent très peut de bruit par rapport sécurité... • N'augmentez pas trop le volume car cela bloquerait les sons de l'extérieur rendant - JVC A805 | Instructions - Page 104
FRANÇAIS Préparation Annulation de la démonstration des affichages et réglage de l'horloge • Référez-vous aussi à la page 29. 1 Mise sous tension de l'appareil. 2 Annulez de la démonstration des affichages Choisissez , puis . Maintenez la touche pressée jusqu'à ce que le menu - JVC A805 | Instructions - Page 105
Bluetooth 35 Affectation d'un titre 37 RÉFÉRENCES Pour en savoir plus à propos de cet autoradio 38 Guide de dépannage 43 Entretien 49 Spécifications 50 APPAREILS EXTÉRIEURS Écoute d'une émission HD Radio 19 Écoute du changeur de CD 20 Écoute de la radio satellite 21 Écoute de iPod/iPhone - JVC A805 | Instructions - Page 106
de l'appareil [Maintenez pressée]. • BT FRONT/BT REAR (Téléphone): Commutez le support de conversation pendant une conversation téléphonique. 3 Choisissez la source. FM/HD RADIO FM*4 = AM/ HD RADIO AM*4, *5 = SIRIUS*6/XM*6 = CD*6 = USB FRONT*6/iPod FRONT*6/ BT FRONT*5, *6 = USB REAR*6/ iPod REAR - JVC A805 | Instructions - Page 107
le niveau de volume. *3 Pour les périphériques Bluetooth compatibles avec AVRCP 1.3. *4 Quand le tuner HD Radio est connecté le tuner intégré de cet appareil est mis hors service. Pour écouter une émission HD Radio, référez-vous à "Écoute de la radio" aux pages 9 et 10. Pour plus de détails - JVC A805 | Instructions - Page 108
le support de conversation pendant une conversation téléphonique si vous appuyez brièvement sur la touche. 2 • Change les stations préréglées du tuner/HD Radio. • Change le dossier de MP3/WMA (et WAV pour les opérations USB). • Lors de la lecture d'un disque MP3 sur un changeur de CD compatible MP3 - JVC A805 | Instructions - Page 109
est difficile à recevoir, mettez en service le mode monaural pour améliorer la tablir l'effet stéréo, répétez la même procédure et choisissez . 2 Choisissez la plage de numéros de préréglage où sur 4 /¢ . • Si un tuner HD Radio est connecté, vous pouvez aussi rechercher et mémoriser les - JVC A805 | Instructions - Page 110
FRANÇAIS Préglage manuel (FM/AM) 3 Vous pouvez prérégler un maximum de 18 stations pour FM et de 6 stations pour AM. Ex.: Mémorisation de la station FM de fréquence 92,5 MHz sur le numéro de préréglage "4". 1 2 Choisissez le numéro de préréglage "4". Sélection d'une station préréglée ou [ - JVC A805 | Instructions - Page 111
touche] Repeat Random [Tournez] = [Appuyez sur la touche] Track : Répète la plage actuelle Repeat [Tournez] = [Appuyez sur la touche] • Pour les disques MP3/WMA, choisissez le dossier souhaité, puis la plage souhaitée en utilisant de façon répétée la molette de commande. • Pour revenir au menu pr - JVC A805 | Instructions - Page 112
Bluetooth (KS-UBT1) et/ou un iPod/iPhone Apple aux prises d'entrée USB. Pour en savoir plus, référez-vous aux pages 13 - 18 et 24 - 26. Cet appareil peut reproduire les plages MP3/WMA/WAV mémorisées dans un périphérique USB à mémoire de grande capacité (tel qu'une mémoire USB, un lecteur audio - JVC A805 | Instructions - Page 113
-Profile de poussée d'objet) 1.1 A2DP (Advanced Audio Distribution Profile-Profile de distribution audio avancé) 1.2 AVRCP (Audio/Video Remote Control Profile-Profile de télécommande audio/vidéo) 1.3 Caractéristiques Vous pouvez commander les périphériques Bluetooth à travers cet appareil de la fa - JVC A805 | Instructions - Page 114
pairage • Connexion et déconnexion d'un périphérique Bluetooth enregistré (Téléphone/Audio) [Tournez] = [Appuyez sur la touche] = Réalisez les opérations suivantes. Pairage et code PIN Quand vous connecter un périphérique Bluetooth à l'appareil pour la première fois, faites les - JVC A805 | Instructions - Page 115
apparaît sur l'affichage. 3 Répétez les étapes 1 et 2 jusqu'à ce que le code PIN soit entré complètement. 4 Vérifiez l'entrée. 3 Supprimez la sélection. "Wait Pair" apparaît sur l'affichage. 3 Utilisez le périphérique Bluetooth pour faire la recherche et réaliser la connexion. Sur le périphérique - JVC A805 | Instructions - Page 116
ou . [Tournez] = [Appuyez Bluetooth Pour faire un appel 1 Affichez l'écran "Call Menu". 2 Choisissez la méthode pour faire un appel. • "Dialed Calls"*: Affiche la liste des numéros de téléphone que vous avez composés. Passez à l'étape suivante. • "Received Calls - JVC A805 | Instructions - Page 117
30 pour le réglage). FRANÇAIS Comment supprimer un numéro de téléphone • Uniquement quand est choisi pour dans le menu de réglage Bluetooth (voir page 36). 1 Affichez l'écran "Call Menu". Nom (ou numéro de téléphone (s'il est obtenu)) Quand est en - JVC A805 | Instructions - Page 118
informer de l'arrivée d'un message. • "Received Message" apparaît sur l'affichage et l'affichage lecteur audio Bluetooth • Les opérations et Bluetooth: Si vous souhaitez recevoir plus d'informations sur le système Bluetooth, consultez le site web de JVC suivant: - JVC A805 | Instructions - Page 119
des artistes et les titres des morceaux. • Quand le tuner HD Radio est connecté, il peut aussi recevoir les émissions analogiques conventionnelles. • Beaucoup de stations HD Radio offrent aussi plus d'un canal de programmes. Ce service est appelé multiplex. • Pour en savoir plus sur les stations HD - JVC A805 | Instructions - Page 120
les stations FM/AM conventionnelles. • Si la station radio force le mode de réception sur le mode numérique ou analogique, l'indicateur ou s'allume. Écoute du changeur de CD Il est recommandé d'utiliser un changeur de CD JVC compatible MP3 (non fournie) avec votre autoradio. Vous pouvez connecter - JVC A805 | Instructions - Page 121
radio satellite Avant de commencer, connectez un des appareils suivants (non fournie) à la prise du changeur de CD à l'arrière de l'appareil. • Système de radio satellite JVC est entendu: - Pour la radio satellite SIRIUS: "Updating XX%* Completed" - Pour la radio satellite XM: "UPDATING" • La mise à - JVC A805 | Instructions - Page 122
le numéro vert SIRIUS au 1-888-539-SIRIUS (7474). "Sub Updated Press Any Key" défile sur l'affichage une fois la suscription est "Channel 1" est accordé automatiquement. 3 Vérifiez le numéro d'identification de votre radio satellite XM sur le boîte de XMDirect™ Tuner Box ou de XMDirect2 Tuner System - JVC A805 | Instructions - Page 123
ÇAIS Vérification du numéro Écoute d'un canal de l'utilisateur d'identification de la radio satellite XM 1 Affichez l'écran "LIST". Quand "XM" est choisi, choisissez "Channel 0". "RADIO ID" et le numéro d'identification à 8- chiffres (alphanumérique) apparaissent alternativement sur l'affichage - JVC A805 | Instructions - Page 124
pour iPod, KS-PD100 (non fourni) à la prise Voir "Lors de la connexion avec du changeur de CD à l'arrière de l'appareil l'adaptateur d'interface" à la page 25. • Quand des périphériques iPod/iPhone sont connectés à la fois aux prises d'entrée USB avant et arrière, l'appareil détecte et charge - JVC A805 | Instructions - Page 125
FRANÇAIS Appuyer ou (maintenir pressées) les touches suivantes vous permet de... [Appuyez sur la touche]: Mettez en pause/reprenez la lecture. [Appuyez sur la touche]: Sélection d'une plage [Maintenez pressée] Recherche rapide de plage vers l'arrière/vers l'avant Sélection des modes de lecture 1 - JVC A805 | Instructions - Page 126
appareil extérieur Vous pouvez connecter un appareil extérieur à: • EXT IN: la prise de changeur de CD à l'arrière de cet appareil en utilisant les adaptateurs suivants (non fourni): - KS-U57: Pour connecter 3,5 mm (3/16 pouces) (non fournie) 26 APPAREILS EXTÉRIEURS Lecteur audio portable, etc. - JVC A805 | Instructions - Page 127
préréglé Vous pouvez sélectionner un mode sonore préréglé adapté à votre genre de musique. • Référez-vous à la page 30 pour les réglages . Sélection à partir du menu . ou PURE = USER = ROCK = CLASSIC = POPS = HIP HOP = JAZZ = (retour au début - JVC A805 | Instructions - Page 128
propre mode sonore Vous pouvez mémoriser vos propres ajustements en mémoire. 1 Choisissez . [Tournez] = [Appuyez sur la touche] 2 Entrez en mode réglage . 3 Choisissez une plage de fréquences. [Tournez] = [Appuyez sur la touche] Ô Ô 4 Ajustez les éléments du son de la - JVC A805 | Instructions - Page 129
en service l'heure d'été si votre zone d'habitation y est soumise. : Annulation. *1 Si l'alimentation de l'appareil n'est pas coupée quand vous coupez le contact de la voiture, il est recommandé de choisir pour ne pas user la batterie de la voiture. *2 Est affiché uniquement quand la radio - JVC A805 | Instructions - Page 130
préréglé adapté à votre genre de musique, [27]. Off, User, Rock, Classic, Pops, Hip Hop, Jazz Color Select Color 01 - Color 29, User : Choisissez un son plus équilibré aux faibles niveaux de volume. • Off : Annulation. Audio Volume Adjust Level -5 - Level +5 (Réglage initial: Level 0) : Pr - JVC A805 | Instructions - Page 131
Level 08 (Réglage initial: Level 04) Audio HPF Filtre passe haut Choisissez la fré touches : Met en service la tonalité sonore des touches. : Met hors service la tonalité sonore des KD-A805. *9 La connexion du fil de commande de l'éclairage est requise. (Référez-vous au "Manuel d'installation - JVC A805 | Instructions - Page 132
les informations des balises lors de la lecture d'une plage MP3/WMA/WAV. : Annulation. Display LCD Type • Negative • Level 05) Device (Voir pages 14 - 16 pour les réglages.) Bluetooth Settings (Voir pages 35 et 36 pour les réglages.) Area Change • Radio. *12 Dépend du réglage . 32 - JVC A805 | Instructions - Page 133
CD JVC, [20], ou un iPod/ iPhone Apple, [24]. : Pour écouter un lecteur audio portable (connecté à la prise de changeur de CD), [26]. AM Source*18 • Show • Hide : Met en service que "CD-CH/iPod/EXT IN" est choisie. *17 N'est pas requis pour les émissions HD Radio/tuners SIRIUS/XM et Bluetooth. *18 - JVC A805 | Instructions - Page 134
les couleurs primaires, rien n'apparaît sur l'affichage. [Tournez] = [Appuyez sur la touche] 5 Validez les réglages. 2 Entrez en mode réglage . 3 Choisissez ou . [Tournez] = [Appuyez sur la touche] 6 Quittez le réglage. ou Choisissez - JVC A805 | Instructions - Page 135
de mise en/hors service du gradateur. 1 [Tournez] = [Appuyez sur la touche] Modification du réglage Bluetooth Vous pouvez changer les ] = [Appuyez sur la touche] 2 Choisissez une option de réglage. [Tournez] = [Appuyez sur la touche] Ô Ô - JVC A805 | Instructions - Page 136
Bluetooth est connecté. Dialed Calls: Affiche la liste des numéros que vous avez composés. Received Calls: Affiche la liste des numéros que vous avez reçus. Missed Calls REAR". Ajustez le volume du microphone connecté à l'appareil. Level appareil. Entrez le code PIN sur l'appareil SIM. Manual Trans - JVC A805 | Instructions - Page 137
Affiche le nom de l'appareil. JVC Address: Affiche l'adresse de l'adaptateur USB Bluetooth. JVC Software Ver.: Affiche la version du logiciel. Connected Phone*: Affiche le nom du téléphone connecté. Connected Audio*: Affiche le nom du périphérique audio connecté. * Affiché uniquement quand un - JVC A805 | Instructions - Page 138
La prochaine fois que vous choisissez "CD" comme source de lecture, la lecture CD/CD Text et les CD-R (enregistrables)/CD-RW (réinscriptibles) au format CD audio (CD-DA), MP3 des fichiers CD audio (CD-DA) et des fichiers MP3/WMA. • sale. - Les fichiers sur les CD-R/CD-RW ont été gravés en utilisant - JVC A805 | Instructions - Page 139
plus faible que celui des CD ordinaires. • N'utilisez pas les CD-R ou CD-RW suivants: - Disques MP3/WMA • Cet autoradio peut reproduire les fichiers MP3/WMA portant le code d'extension - JVC A805 | Instructions - Page 140
: 1 ca./2 ca. • Cet appareil peut reproduire les fichiers MP3 enregistrés au mode VBR (débit binaire variable). • Le nombre maximum de périphériques USB. Opérations Bluetooth Généralités • Pendant que vous conduisez érique audio connecté : Téléphone uniquement : Téléphone/Audio : Audio uniquement : - JVC A805 | Instructions - Page 141
sont recherchées et mémorisées pour la bande choisie. Radio satellite • Vous pouvez aussi connecter la radio JVC SIRIUS PnP ("Plug and Play"), en utilisant l'adaptateur de radio SIRIUS JVC, KS-U100K (non fourni) sur la prise de changeur de CD à l'arrière de l'appareil. En mettant sous/hors tension - JVC A805 | Instructions - Page 142
Web JVC suivant: ( Bluetooth SIG, Inc. et toute utilisation de ces marques par Victor Company of Japan, Limited (JVC) est faite sous licence. Les autres marques et noms de commerce sont la propriété de leur propriétaire respectif. • HD Radio™ et le logo HD Radio - JVC A805 | Instructions - Page 143
Guide de dépannage Ce qui apparaît être un problème n'est pas toujours sérieux. Vérifiez les points suivants avant d'appeler un centre de service des plages MP3/WMA enregistrées dans un format compatible avec ISO 9660 Niveau 1, Niveau 2, Romeo ou Joliet. • Ajoutez le code d'extension ou - JVC A805 | Instructions - Page 144
" apparaît sur l'affichage. • "Not Support" apparaît sur l'affichage et la plage de fichier du CD. Cela se produit MP3/WMA/ WAV. Passez à un autre fichier. (N'ajoutez pas le code d'extension , ou à des plages non MP3 rique USB ou le iPod/iPhone connecté est compatible avec cet appareil - JVC A805 | Instructions - Page 145
Wait Pair" apparaît sur l'affichage, recherchez de nouveau un périphérique Bluetooth. • L'appareil ne réalise pas le pairage avec le Entrez le même code PIN pour cet appareil et le périphérique Bluetooth. périphérique cible. • Il y a un écho ou du bruit. Ajustez la position du microphone. • Le - JVC A805 | Instructions - Page 146
de CD ne fonctionne pas du Réinitialisez l'autoradio (voir page 3). tout. • "CALL 1-888-539-SIRIUS TO SUBSCRIBE" Démarrez la suscription pour la radio satellite SIRIUS (voir défile sur l'affichage lors de l'écoute de la page 22). radio satellite SIRIUS. • Aucun son n'est entendu. "Updating XX - JVC A805 | Instructions - Page 147
coute de la radio satellite XM. L'appareil est en train de changer les informations du canal et audio. Le texte iPhone. • Chargez la batterie du iPod/iPhone. • Réinitialisez le iPod/iPhone. • Vérifiez si le réglage est correct (voir page 33). • Le son est déformé. Mettez hors service - JVC A805 | Instructions - Page 148
, connectez-le à nouveau. • "Reset 08" apparaît sur l'affichage. Vérifiez la connexion entre l'adaptateur et cet appareil. JVC ne peut être tenu responsable pour toute perte de données dans un iPod/iPhone et/ou un périphérique USB à mémoire de grande capacité lors de l'utilisation de ce système - JVC A805 | Instructions - Page 149
Pour remettre un disque dans sa boîte, insérez-le délicatement sur le support central (avec la surface imprimée dirigée vers le haut). • Conservez les disques dans crayon, un stylo, etc. N'utilisez pas les disques suivants: CD Single -disque de 8 cm (3-3/16 pouces) Disque gondolé Autocollant - JVC A805 | Instructions - Page 150
L'AMPLIFICATEUR AUDIO Spé KD-A805: sortie du caisson de grave/Impédance: KD-R800: 5,0 V/20 kΩ en charge (pleine échelle) 2,5 V/20 kΩ en charge (pleine échelle) Impédance de sortie: 1 kΩ Autre prise: Prise d'entrée USB, Câble USB, Prise d'entrée AUX (auxiliaire), Prise du changeur de CD - JVC A805 | Instructions - Page 151
Mbps Maximum 1,5 Mbps à mémoire de grande capacité FAT 32/16/12 MP3/WMA/WAV CC 5 V 500 mA BLUETOOTH Version: Classe d'alimentation: Zone de fonctionnement: Profile: Bluetooth 2.0 certifié Classe 2 Radio (distance possible: 10 m) 10 m HFP 1.5, OPP 1.1, A2DP 1.2, AVRCP 1.3 Alimentation: Tension
-
 1
1 -
 2
2 -
 3
3 -
 4
4 -
 5
5 -
 6
6 -
 7
7 -
8
-
9
-
10
-
11
-
12
-
13
-
14
-
15
-
16
-
17
-
18
-
19
-
20
-
21
-
22
-
23
-
24
-
25
-
26
-
27
-
28
-
29
-
30
-
31
-
32
-
33
-
34
-
35
-
36
-
37
-
38
-
39
-
40
-
41
-
42
-
43
-
44
-
45
-
46
-
47
-
48
-
49
-
50
-
51
-
52
-
53
-
54
-
55
-
56
-
57
-
58
-
59
-
60
-
61
-
62
-
63
-
64
-
65
-
66
-
67
-
68
-
69
-
70
-
71
-
72
-
73
-
74
-
75
-
76
-
77
-
78
-
79
-
80
-
81
-
82
-
83
-
84
-
85
-
86
-
87
-
88
-
89
-
90
-
91
-
92
-
93
-
94
-
95
-
96
-
97
-
98
-
99
-
100
-
101
-
102
-
103
-
104
-
105
-
106
-
107
-
108
-
109
-
110
-
111
-
112
-
113
-
114
-
115
-
116
-
117
-
118
-
119
-
120
-
121
-
122
-
123
-
124
-
125
-
126
-
127
-
128
-
129
-
130
-
131
-
132
-
133
-
134
-
135
-
136
-
137
-
138
-
139
-
140
-
141
-
142
-
143
-
144
-
145
-
146
-
147
-
148
-
149
-
150
-
151
 |
 |
ENGLISH
ESPAÑOL
FRANÇAIS
Instructions
CD RECEIVER
KD-A805/KD-R800
CD RECEIVER
RECEPTOR CON CD
RÉCEPTEUR CD
For canceling the display demonstration, see page 4.
Para cancelar la demostración en pantalla, consulte la página 4.
Pour annuler la démonstration des affichages, référez-vous à la page 4.
For installation and connections, refer to the separate manual.
Para la instalación y las conexiones, refiérase al manual separado.
Pour l’installation et les raccordements, se référer au manuel séparé.
GET0598-001A
[J]
For customer Use:
Enter below the Model
No. and Serial No. which
are located on the top or
bottom of the cabinet. Retain
this information for future
reference.
Model No.
Serial No.
KD-A805/KD-R800
Having TROUBLE with operation?
Please reset your unit
Refer to page of How to reset your unit
Still having trouble??
USA ONLY
Call 1-800-252-5722
We can help you!
EN, SP, FR
0209DTSMDTJEIN
© 2009 Victor Company of Japan, Limited
INSTRUCTIONS
MANUAL DE INSTRUCCIONES
MANUEL D’INSTRUCTIONS
KD-A805/KD-R800
KD-A805/KD-R800