JVC CW-DRA8 Operation Manual
JVC CW-DRA8 Manual
 |
View all JVC CW-DRA8 manuals
Add to My Manuals
Save this manual to your list of manuals |
JVC CW-DRA8 manual content summary:
- JVC CW-DRA8 | Operation Manual - Page 1
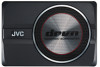
CW-DRA8 ACTIVE SUBWOOFER SYSTEM INSTRUCTION MANUAL SYSTÈME DE CAISSON DE GRAVE ACTIF MODE D'EMPLOI AKTIVES SUBWOOFER-SYSTEM BEDIENUNGSANLEITUNG ACTIEVE SUBWOOFER SYSTEEM GEBRUIKSAANWIJZING SISTEMA SUBWOOFER ATTIVO ISTRUZIONI PER L'USO SISTEMA DE SUBWOOFER ACTIVO MANUAL DE INSTRUCCIONES SISTEMA DE - JVC CW-DRA8 | Operation Manual - Page 2
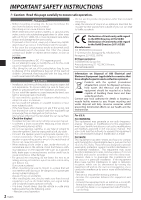
this, please contact your dealer or nearest service station as soon as possible. POWER OFF! hazard of suffocation. CAUTION • Installation and wiring of the product replace the fuse, refer to the vehicle instruction manual. • To prevent a short circuit /65/EU Manufacturer: JVC KENWOOD Corporation 3-12 - JVC CW-DRA8 | Operation Manual - Page 3
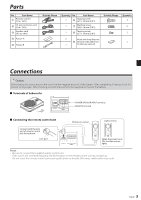
Parts No. Part Name ᶃ Remote control (5 m / 16 ft) ᶄ 10-pin connector cord (5 m / 16 ft) ᶅ Speaker cord (4.3 m/ 14 ft) ᶆ Fixture A ᶇ Fixture B Outside Shape Quantity No. Part Name 1 ᶈ Tapping screw (ø 5 × 16 mm (5/8")) 1 ᶉ Machine screw (M4 × 16 mm (5/8")) 1 ᶊ Tapping screw (ø - JVC CW-DRA8 | Operation Manual - Page 4
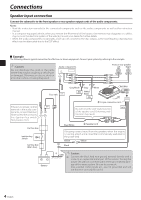
Notes: • Read the instruction manuals for the connected components such as the audio components as well as this instruction manual. • In a computer- Fuse 10A Gray/Black SP.R INPUT Gray White/ Black SP.L INPUT White CW-DRA8 ᶄ 10-pin connector cord LINE IN Do not bend the vinyl-coated section - JVC CW-DRA8 | Operation Manual - Page 5
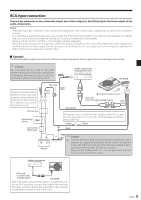
Notes: • Read the instruction manuals for the connected components such as the audio components as well as this instruction manual. • In a computer- result. Fuse 10A Audio components (SUB WOOFER OUT, Non-fader output) CW-DRA8 If there is no power control terminal in the audio components, connect - JVC CW-DRA8 | Operation Manual - Page 6
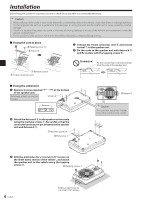
nothing hazardous on the opposite side such as a gasoline tank, brake pipe; or wiring harness, and be careful not to cause scratches or other damage. • Install in a location that does not come in the way of driving, getting in or out of the vehicle and movement inside the vehicle compartment. • Fix - JVC CW-DRA8 | Operation Manual - Page 7
or direct hot wind from the heater. Otherwise, the product may be degraded and a fire hazard may result. Remove dirt from the installation position before attaching the hook-and-loop fastener. Exchange with the specified capacity fuse. Caution: Be sure to replace with same capacity (amperage - JVC CW-DRA8 | Operation Manual - Page 8
Troubleshooting Often, what appears to be a malfunction is due to user error. Before calling for service, please consult the following table. Problem Power cannot be turned on (illumination does not light). No sound Sound is small. Sound quality is bad (sound is distorted). Sound is unnatural. - JVC CW-DRA8 | Operation Manual - Page 9
Contacter ensuite votre concessionnaire ou centre de service plus proche le plus rapidement possible. COUPER de sécurité. (Risque d'accident). • Pour l'installation, choisissez un emplacement qui ne présente aucune directive RoHS 2011/65/UE Fabricant: JVC KENWOOD Corporation 3-12 Moriya-cho, Kanagawa - JVC CW-DRA8 | Operation Manual - Page 10
16 mm) 1 ᶉ Vis à métaux (M4 × 16 mm) 1 ᶊ Vis auto taraudeuse (ø 3 × 10 mm) Forme extérieure Quantité 4 4 2 ᶆ Support A ᶇ Support B 2 Bandes autoagrippantes ᶋ (Ruban adhésif double 1 1 face/Pour Télécommande) Raccordements Attention: Avant d'effectuer le câblage, détachez le câble de - JVC CW-DRA8 | Operation Manual - Page 11
èce du véhicule ou endommagés. Sinon, cela peut provoquer un choc électrique ou un incendie à cause d'un court-circuit. Gris/Noir Gris Blanc CW-DRA8 Si les composants audio ne comporte pas de borne de commande d'alimentation, connectez les fils bleu et blanc à la ligne pour accessoires (aliment - JVC CW-DRA8 | Operation Manual - Page 12
à la masse et d'empêcher le fonctionnement correct de l'appareil. Prenez les précautions appropriées. Composants audio Câble RCA (disponible dans le commerce) CW-DRA8 Lorsque la sortie de les composants audio est une prise RCA, utilisez un cordon RCA divisant la sortie sur deux prises RCA, comme - JVC CW-DRA8 | Operation Manual - Page 13
Installation Avant de fixer le haut-parleur à endroit donné, faire une attention de ne pas coincer les câbles raccordés entre le haut-parleur et les supports A ᶆ. ᶉ Vis à métaux x 4 ᶆ Support A x 2 ᶆ Support A Attention: Cette partie devient plus chaude que d'autres parties. Soyez prudent. Percez - JVC CW-DRA8 | Operation Manual - Page 14
commande dans un endroit tel qu'il ne gêne en rien la conduite. Evitez d'installer le boîtier de télécommande dans un endroit où il serait exposé à la lumi et tirez. Fonctionnement ⁞ Insérez avec précautions le fusible dans son support et appuyez avec le doigt pour qu'il soit introduit à fond. - JVC CW-DRA8 | Operation Manual - Page 15
cordons puis reliez le câble ⾚ à la batterie. • Vérifiez les raccordements de tous les cordons puis reliez le câble ⾚ à la batterie. • Mettez hors service l'atténuateur. • Augmentez le niveau de sortie jusqu'à la valeur optimale (page 14). • Branchez les cordons comme il convient en vous reportant - JVC CW-DRA8 | Operation Manual - Page 16
Betrieb zu gewährleisten. WARNUNG • Trennen Sie vor der Installation oder Verdrahtung etc. unbedingt den Draht von der Minus-Klemme der Konformitätserklärung in Bezug auf die RoHS-Richtlinie 2011/65/EU Hersteller: JVC KENWOOD Corporation 3-12 Moriya-cho, Kanagawa-ku, Yokohama-shi, Kanagawa, 221- - JVC CW-DRA8 | Operation Manual - Page 17
Teile Nr. Bezeichnung der Teile ᶃ Fernbedienungsgeber (5 m) ᶄ 10-pin-Steckverbindungskabel (5 m) ᶅ Lautsprecherkabel (4,3 m) ᶆ Halterung A ᶇ Halterung B Außenform Menge 1 1 1 Nr. Bezeichnung der Teile ᶈ Blechschraube (ø 5 × 16 mm) ᶉ Maschinenschraube (M4 × 16 mm) ᶊ Blechschraube (ø - JVC CW-DRA8 | Operation Manual - Page 18
oder beschädigt werden können. Andernfalls können elektrische Schläge oder Brände durch Kurzschluss verursacht werden. Grau/Schwarz Grau Weiß CW-DRA8 Sicherung 10A SP.R INPUT Weiß/ Schwarz SP.L INPUT Wenn das Hauptgerät nicht mit einer Leistungsregelungsbuchse ausgestattet ist, schließen Sie - JVC CW-DRA8 | Operation Manual - Page 19
können. Andernfalls können elektrische Schläge oder Brände durch Kurzschluss verursacht werden. Audio-Komponenten (SUB WOOFER OUT, Ausgang ohne Fader) CW-DRA8 Wenn das Hauptgerät nicht mit einer Leistungsregelungsbuchse ausgestattet ist, schließen Sie bitte den blauen und den weißen Draht an die - JVC CW-DRA8 | Operation Manual - Page 20
Einbau Vor dem Einbau des Lautsprechers sollte der Klang mit einem provisorischen Anschluß überprüft werden. Achtung: • Wenn unter der Sitzbank, im Innern des Kofferraums oder an einer anderen Stelle des Fahrzeugs eine Kabelöffnung angebracht werden muß, ist es unbedingt erforderlich, vorher den - JVC CW-DRA8 | Operation Manual - Page 21
Anbringen der Fernbedienungseinheit Installieren Sie die Fernbedienungseinheit im Fahrzeug mit dem mitgelieferten Klettenbandbefestiger. ᶃ Fernbedienungsgeber (Rückseite) Fahrzeug ᶋ Klettenbandbefestiger (harte Oberfläche) ᶋ Klettenbandbefestiger (weiche Oberfläche) Achtung: Die - JVC CW-DRA8 | Operation Manual - Page 22
zurückzuführen sein. Bevor Sie das Gerät zur Wartung einreichen, prüfen Sie bitte anhand dieser Tabelle, ob sich das Problem vielleicht ganz leicht beheben läßt. Störung Stromversorgung läßt sich nicht einschalten (Beleuchtung leuchtet nicht). Kein Ton Der Klang ist klein. Schlechte Klangqualit - JVC CW-DRA8 | Operation Manual - Page 23
een hierin gespecialiseerde installateur de installatie en bedrading laten uitvoeren. • Installeer de luidspreker niet op een plek die bloot staat aan direct Conformiteitsverklaring met betrekking tot RoHS-richtlijn 2011/65/EU Fabrikant: JVC KENWOOD Corporation 3-12 Moriya-cho, Kanagawa-ku, Yokohama- - JVC CW-DRA8 | Operation Manual - Page 24
Onderdelen nr. Naam van onderdeel ᶃ Afstandsbediening (5 m) ᶄ 10 pens stekkersnoer (5 m) ᶅ Luidsprekerdraad (4,3 m) ᶆ Bevestigingsdeel A ᶇ Bevestigingsdeel B Buitenprofiel Aantal 1 1 1 nr. Naam van onderdeel ᶈ Zelftappende schroef (ø 5 × 16 mm) ᶉ Machineschroef (M4 × 16 mm) ᶊ - JVC CW-DRA8 | Operation Manual - Page 25
brand. Geluid bestanddelen Voor of achter luidspreker Links Rechts Zekering 10A Grijs/Zwart Grijs Wit SP.R INPUT Wit/ Zwart SP.L INPUT CW-DRA8 Als geen spanningsaansluiting is voorzien op het centrale toestel, moet u de blauw/witte draden aansluiten op het accessoirecircuit (circuit van de - JVC CW-DRA8 | Operation Manual - Page 26
niet, dan kan er kortsluiting optreden met als gevolg elektrische schokken of brand. Geluid bestanddelen (SUB WOOFER OUT, Non-fader uitgang) CW-DRA8 Als geen spanningsaansluiting is voorzien op het centrale toestel, moet u de blauw/witte draden aansluiten op het accessoirecircuit (circuit van de - JVC CW-DRA8 | Operation Manual - Page 27
die u zou kunnen beschadigen, zoals de benzinetank, remleidingen, of de bedradingsbundel en wees voorzichtig dat u geen krassen of andere beschadigingen maakt. • Installeer het toestel op een plek waar het de besturing van het voertuig, het betreden of verlaten van het voertuig en de beweging in het - JVC CW-DRA8 | Operation Manual - Page 28
van het meegeleverde lus-en-haaksluiting. ᶃ Afstandsbediening (Achterpaneel) Voertuig ᶋ Lus-en-haaksluiting (harder oppervlak) ᶋ Lus-en-haaksluiting (zachter oppervlak) Let op: Installeer de afstandsbediening zodat deze niet in de weg zit bij het besturen van de auto. Vermijd plekken waar de - JVC CW-DRA8 | Operation Manual - Page 29
Oplossen van problemen Problemen worden vaak veroorzaakt door een onjuiste bediening. Zie daarom de onderstaande tabel alvorens de luidspreker voor reparatie weg te brengen indien er iets mis lijkt te zijn. Probleem Oorzaak • De zekering is doorgebrand. Oplossing • C o n t r o l e e r d e ⾜/⾚ p - JVC CW-DRA8 | Operation Manual - Page 30
. • Non installate I diffusori in posizioni esposte ad acqua ed umidità. • Non Installate I diffusori in Per sostituire il fusibile, fate riferimento al manuale delle istruzioni dei veicolo. • Per prevenire alla direttiva RoHS 2011/65/UE Produttore: JVC KENWOOD Corporation 3-12 Moriya-cho, Kanagawa- - JVC CW-DRA8 | Operation Manual - Page 31
Parti No. Nome della parte ᶃ Telecomando (5 m) ᶄ 10-Cavo di collegamento (5 m) ᶅ Cavo del diffusore (4,3 m) ᶆ Montaggio A ᶇ Montaggio B Forma esterna Quantità No. Nome della parte 1 ᶈ Vite filettante (ø 5 × 16 mm) 1 ᶉ Vite per macchina (M4 × 16 mm) 1 ᶊ Vite filettante (ø 3 × 10 - JVC CW-DRA8 | Operation Manual - Page 32
: • Leggere i manuali di istruzioni dei componenti collegati oltre a questo manuale di istruzioni. • In un veicolo dotato di computer, quando si rimuove Grigio/Nero SP.R INPUT Grigio Bianco/ Nero SP.L INPUT Bianco CW-DRA8 Se non c'è nessun terminale di controllo dell'alimentazione nei componenti - JVC CW-DRA8 | Operation Manual - Page 33
di istruzioni dei componenti collegati, come il componenti audio, oltre a questo manuale di istruzioni. • In un veicolo dotato di computer, quando si attenzione a questo. Componenti audio Cavo RCA (disponibile in commercio) CW-DRA8 Quando l'uscita dei Componenti audio è una singola presa RCA, - JVC CW-DRA8 | Operation Manual - Page 34
Installazione Prima di fissare il diffusore in posizione, controllarne il suono. Attenzione: • Quando si apre un foro sotto il sedile, all'interno del bagagliaio o in un altro punto del veicolo, controllare che con vi sia alcun oggetto pericoloso dall'altra parte, ad esempio il serbatoio di benzina, - JVC CW-DRA8 | Operation Manual - Page 35
10A. Installazione Fusibile di sostituzione 10 A Coperchio ⁞ Aprire il coperchio. Porta fusibile Prenderlo il fusibile e tirare. Funzionamento ⁞ Installate il fusibile delicatamente nel porta fusibile e premetelo completamente verso l'interno con il dito. Chiudere il coperchio. Nomenclatura - JVC CW-DRA8 | Operation Manual - Page 36
Risoluzione dei problemi Spesso, apparenti malfunzionamenti sono dovuti a un errore dell'utilizzatore. Prima di richiedere riparazioni, consultare le seguenti tabelle. Problema Causa Rimedio • Un fusibile è saltato. • Controllare che le polarità ⾜ e ⾚ del cavo di alimentazione e degli altri - JVC CW-DRA8 | Operation Manual - Page 37
excesivo. • No instale los altavoces en lugares sometieses al agua o a la humedad. • No instale los altavoces en lugares Para cambiar el fusible, remítase al manual de instrucciones del vehículo. • Para la Directiva RoHS 2011/65/UE Fabricante: JVC KENWOOD Corporation 3-12 Moriya-cho, Kanagawa-ku - JVC CW-DRA8 | Operation Manual - Page 38
Piezas Nº Nombre de pieza ᶃ Mando a distancia (5 m) ᶄ Cable conector de 10 contactos (5 m) ᶅ Cable del altvoz (4,3 m) ᶆ Soporte A ᶇ Soporte B Forma externa Cantidad Nº Nombre de pieza 1 ᶈ Tornillo de cubierta (ø 5 × 16 mm) 1 ᶉ Tornillo para metales (M4 × 16 mm) 1 ᶊ Tornillo de - JVC CW-DRA8 | Operation Manual - Page 39
manuales de instrucciones de los componentes conectados como, por ejemplo, los componentes de audio, y también este manual de audio Izquierdo Derecho No instale los cables donde puedan quedar de contacto Fusible 10A Ceniza/Negro Ceniza Blanco CW-DRA8 SP.R INPUT Blanco/ Negro SP.L INPUT - JVC CW-DRA8 | Operation Manual - Page 40
. Precaución: No instale los cables donde puedan quedar agarrados por una parte de un vehículo o puedan ser dañados. De lo contrario, podrían producirse descargas eléctricas o incendios debidos a cortocircuitos. Componentes de audio (SUB WOOFER OUT, Salida non-fader) CW-DRA8 Fusible 10A Si - JVC CW-DRA8 | Operation Manual - Page 41
lado como, por ejemplo, un deposito de gasolina, tubería de frenos o conjuntos de cables, y tenga cuidado para no dejar marcas y hacer otros daños. • Instale el producto en un lugar donde no interfiera con la conducción, la entrada en el vehículo y la salida del mismo, y el movimiento dentro del - JVC CW-DRA8 | Operation Manual - Page 42
(Panel trasero) Vehículo ᶋ Fijador de gancho y bucle (Superficie más dura) ᶋ Fijador de gancho y bucle (Superficie más suave) Cambio de fusibles Precaución: Instale la unidad de mando a distancia en una posición que no obstruya las operaciones de conducción. Evite instalarla en un lugar sujeto a la - JVC CW-DRA8 | Operation Manual - Page 43
Solución de problemas A menudo, lo que parece una avería se debe a un error del usuario. Antes de llamar al servicio de reparaciones, consulte la tabla siguiente. Problema La alimentación no puede encenderse (la iluminación no se enciende). No hay sonido El sonido es bajo. La calidad del sonido es - JVC CW-DRA8 | Operation Manual - Page 44
instale o altifalante num local exposto à luz solar directa ou calor ou humidade excessivo. • Não instale Verifique o esquema! Para substituir o fusível, consulte o manual de instruções do veículo. • Para evitar a Diretiva RoHS 2011/65/UE Fabricante: JVC KENWOOD Corporation 3-12 Moriya-cho, Kanagawa - JVC CW-DRA8 | Operation Manual - Page 45
Peças Não. Nome de parte ᶃ Controlo remoto (5 m) ᶄ 10-pino cabo do conector (5 m) ᶅ Cabo do altifalante (4,3 m) ᶆ Suporte A Forma exterior ᶇ Suporte B Quantidade Não. Nome de parte 1 ᶈ Torneira parafusos (ø 5 × 16 mm) 1 ᶉ Parafuso para máquina (M4 × 16 mm) 1 ᶊ Torneira parafusos - JVC CW-DRA8 | Operation Manual - Page 46
ligados, tais como os componentes de áudio, assim como o presente manual de instruções. • Num veículo equipado com computador, quando é vel 10A Cinza/Preto Cinza SP.R INPUT Branco/ Preto SP.L INPUT Branco CW-DRA8 Se não existir um terminal de controlo de alimentação nos componentes de - JVC CW-DRA8 | Operation Manual - Page 47
componentes ligados, tais como os componentes de áudio, assim como o presente manual de instruções. • Num veículo equipado com computador, quando é de áudio (SUB WOOFER OUT, Saída sem atenuador variável) CW-DRA8 Se não existir um terminal de controlo de alimentação nos componentes de áudio - JVC CW-DRA8 | Operation Manual - Page 48
perigo no lado oposto, tal como o depósito de gasolina, tubo dos travões ou cablagem e tenha cuidado para não provocar riscos ou outros danos. • Instale num local onde não condicione a condução, a saída do veículo e o movimento no interior do habitáculo do veículo. • Fixe firmemente o produto de - JVC CW-DRA8 | Operation Manual - Page 49
) Veículo ᶋ Fixador de encaixe (Superfície mais rígida) ᶋ Fixador de encaixe (Superfície mais suave) Substituição do fusível Precaução: Instale a unidade do controlo remoto numa posição que não condicione as operações de condução. Evite instalar num local sujeito a luz solar directa ou vento - JVC CW-DRA8 | Operation Manual - Page 50
Resolução de problemas Normalmente o que parece ser uma avaria está relacionado com um erro por parte do utilizador. Antes de solicitar assistência técnica, consulte a seguinte tabela. Problema A alimentação não consegue ser ligada (a iluminação não acende). Sem som O sonoro é baixo. A qualidade - JVC CW-DRA8 | Operation Manual - Page 51
-ku, Yokohama-shi, Kanagawa, 221-0022 JVCKENWOOD Europe B.V. Amsterdamseweg 37, 1422 AC Uithoorn 7 2 JVC 30°C до +85°C 0% до 90% 3-12 221-0022 CW-DRA8 RU C-JP.AГ21.B.03389 22.08.2018 21.08.2023 020/2011 Toptone Acoustics - JVC CW-DRA8 | Operation Manual - Page 52
ᶃ 5 м) 1 ᶈ 5 × 16 мм) 4 ᶄ 10 5 м) 1 ᶉ M4 × 16 мм) 4 ᶅ 4,3 м) 1 ᶊ 3 × 10 мм) 2 A B 2 1 1 POWER/SPEAKER INPUT REMOTE 52 - JVC CW-DRA8 | Operation Manual - Page 53
DSP DSP. Пример CW-DRA8 10А SP.R INPUT SP.L INPUT ᶄ 10 LINE IN Желтый Желтый ˞ GND ON 53 - JVC CW-DRA8 | Operation Manual - Page 54
RCA RCA RCA DSP RCA RCA DSP Пример SUB WOOFER OUT CW-DRA8 10А ᶄ 10 RCA LINE IN Желтый Желтый ˞ GND ON RCA CW-DRA8 RCA RCA RCA 54 - JVC CW-DRA8 | Operation Manual - Page 55
x 2 B 10 10 B 4 Винт x 4 A A x 4 A x 2 A 3,6 x 4 3,6 55 - JVC CW-DRA8 | Operation Manual - Page 56
10A. 10 А VOLUME FREQUENCY PHASE MIN 125 0 FREQUENCY FREQUENCY 50 Гц 125 Гц Низкая Низкая PHASE - JVC CW-DRA8 | Operation Manual - Page 57
10 10 10 10 ON. VOLUME MIN. 10 53, 54). 53, 54). OFF. 56). 53). VOLUME REMOTE RCA MIN VOLUME 53, 54). REMOTE 250 35 Гц-150 50 Гц-125 0˚, 180 LINE - JVC CW-DRA8 | Operation Manual - Page 58
0,75 мм2 (AWG 18 12 УВАГА 58 EMC 2014/30/ЄC 2011/65/ЄC JVC KENWOOD Corporation 3-12 Moriya-cho, Kanagawa-ku, Yokohama-shi, Kanagawa, 221-0022, JAPAN JVCKENWOOD Europe B.V. Amsterdamseweg 37, 1422 AC Uithoorn, THE - JVC CW-DRA8 | Operation Manual - Page 59
№ ᶃ 5 м) 1 № ᶈ 5 × 16 мм) 4 ᶄ 10 5 м) 1 ᶉ M4 × 16 мм) 4 ᶅ 4,3 м) 1 ᶊ 3 × 10 мм) 2 A B 2 1 1 POWER/SPEAKER INPUT REMOTE 59 - JVC CW-DRA8 | Operation Manual - Page 60
DSP DSP. Увага: CW-DRA8 ACC). 10А SP.R INPUT SP.L INPUT ᶄ 10 LINE IN ності. A Жовтий Жовтий Чорний ˞ GND його. 60 - JVC CW-DRA8 | Operation Manual - Page 61
RCA RCA RCA DSP RCA RCA DSP. Увага: (SUB WOOFER OUT CW-DRA8 10А ACC). A ᶄ 10 RCA LINE IN Жовтий Жовтий Чорний ˞ GND RCA CW-DRA8 RCA RCA RCA 61 - JVC CW-DRA8 | Operation Manual - Page 62
x 2 B 10 B 10 4 ) у ниж- Гвинт x 4 A нями A ᶆ. x 4 A x 2 A 3,6 x 4 62 3,6 мм. - JVC CW-DRA8 | Operation Manual - Page 63
Увага: 10 А. Кришка 10 А VOLUME FREQUENCY PHASE MIN 125 0 FREQUENCY FREQUENCY 50 Гц 125 Гц 0 180 VOLUME ження. 63 - JVC CW-DRA8 | Operation Manual - Page 64
10 10 10 • 10 ON. VOLUME N. 10 60, 61). 60, 61). 63). 60). VOLUME REMOTE RCA належ- MIN. VOLUME 60, 61). REMOTE 250 35 Гц - 150 50 Гц - 125 0˚, 180 - JVC CW-DRA8 | Operation Manual - Page 65
CW-DRA8 - JVC CW-DRA8 | Operation Manual - Page 66
X עם For Turkey Bu ürün 28300 sayılı Resmi Gazete'de yayımlanan Atik Elektrikli ve Elektronik Eşyalarin Kontrolü Yönetmeliğe uygun olarak üretilmiştir. Eski Elektrik ve Elektronik Ekipmanların İmha Edilmesi Hakkında Bilgi (ayrı atık toplama sistemlerini kullanan ülkeleri için - JVC CW-DRA8 | Operation Manual - Page 67
AWG 18 - JVC CW-DRA8 | Operation Manual - Page 68
M٤ A B POWER/SPEAKER INPUT REMOTE - JVC CW-DRA8 | Operation Manual - Page 69
DSP DSP SP.R INPUT SP.L INPUT CW-DRA8 .(ACC LINE IN GND - JVC CW-DRA8 | Operation Manual - Page 70
RCA RCA RCA DSP RCA RCA DSP SUB WOOFER OUT CW-DRA8 .(ACC RCA LINE IN GND RCA CW-DRA8 RCA RCA RCA - JVC CW-DRA8 | Operation Manual - Page 71
B B A A A A - JVC CW-DRA8 | Operation Manual - Page 72
FREQUENCY FREQUENCY PHASE 0 180 VOLUME VOLUME FREQUENCY PHASE MIN - JVC CW-DRA8 | Operation Manual - Page 73
VOLUME MIN VOLUME REMOTE RCA MIN VOLUME REMOTE LINE IN - JVC CW-DRA8 | Operation Manual - Page 74
AWG 18 - JVC CW-DRA8 | Operation Manual - Page 75
M A B POWER/SPEAKER INPUT REMOTE - JVC CW-DRA8 | Operation Manual - Page 76
DSP DSP ﭼپ ACC SP.R INPUT SP.L INPUT CW-DRA8 LINE IN زرد زرد GND - JVC CW-DRA8 | Operation Manual - Page 77
RCA RCA RCA DSP RCA RCA DSP SUB WOOFER OUT CW-DRA8 ACC RCA LINE IN زرد زرد GND RCA CW-DRA8 RCA RCA RCA - JVC CW-DRA8 | Operation Manual - Page 78
B B A A A A - JVC CW-DRA8 | Operation Manual - Page 79
0 180 VOLUME FREQUENCY PHASE MIN - JVC CW-DRA8 | Operation Manual - Page 80
RCA MIN LINE IN
-
 1
1 -
 2
2 -
 3
3 -
 4
4 -
 5
5 -
 6
6 -
 7
7 -
8
-
9
-
10
-
11
-
12
-
13
-
14
-
15
-
16
-
17
-
18
-
19
-
20
-
21
-
22
-
23
-
24
-
25
-
26
-
27
-
28
-
29
-
30
-
31
-
32
-
33
-
34
-
35
-
36
-
37
-
38
-
39
-
40
-
41
-
42
-
43
-
44
-
45
-
46
-
47
-
48
-
49
-
50
-
51
-
52
-
53
-
54
-
55
-
56
-
57
-
58
-
59
-
60
-
61
-
62
-
63
-
64
-
65
-
66
-
67
-
68
-
69
-
70
-
71
-
72
-
73
-
74
-
75
-
76
-
77
-
78
-
79
-
80
 |
 |
CW-DRA8
ACTIVE SUBWOOFER SYSTEM
INSTRUCTION MANUAL
SYSTÈME DE CAISSON DE GRAVE ACTIF
MODE D’EMPLOI
AKTIVES SUBWOOFER-SYSTEM
BEDIENUNGSANLEITUNG
ACTIEVE SUBWOOFER SYSTEEM
GEBRUIKSAANWIJZING
SISTEMA SUBWOOFER ATTIVO
ISTRUZIONI PER L’USO
SISTEMA DE SUBWOOFER ACTIVO
MANUAL DE INSTRUCCIONES
SISTEMA DE SUBWOOFER ATIVO
MANUAL DE INSTRUÇÕES
АКТИВНАЯ САБВУФЕРНАЯ СИСТЕМА
ИНСТРУКЦИЯ ПO ЭKCПЛУATAЦИИ
АКТИВНА НИЗЬКОЧАСТОТНА АКУСТИЧНА СИСТЕМА
ІНСТРУКЦІЯ З ЕКСПЛУАТАЦІЇ
©
B5A-2451-10/01 (W)
English
Français
Deutsch
Nederlands
Italiano
Español
Português
Русский
Українська