JVC FS-GD7 Instruction Manual
JVC FS-GD7 Manual
 |
View all JVC FS-GD7 manuals
Add to My Manuals
Save this manual to your list of manuals |
JVC FS-GD7 manual content summary:
- JVC FS-GD7 | Instruction Manual - Page 1
COMPACT COMPONENT SYSTEM FS-GD7-Consists of CA-FSGD7 and SP-FSGD7 DIGITAL INSTRUCTIONS For Customer Use: Enter below the Model No. and Serial No. which are located either on the rear, bottom or side of the cabinet. Retain - JVC FS-GD7 | Instruction Manual - Page 2
user to the presence of important operating and maintenance (servicing) instructions in the literature accompanying the appliance. WARNING: TO REDUCE à ce que sa ventilation correcte puisse se faire en le plaçant sur un support d'au moins dix centimètres de hauteur.. Front Face 15 cm 15 cm 1 cm - JVC FS-GD7 | Instruction Manual - Page 3
and used in accordance with the instructions, may cause harmful interference to radio of Conformity Model Number: FS-GD7 Trade Name: JVC Responsible Party: JVC Americas Corp. Address: that the cable ground shall be connected to the grounding system of the building, as close to the point of - JVC FS-GD7 | Instruction Manual - Page 4
G-3 - JVC FS-GD7 | Instruction Manual - Page 5
Manual 2 Getting Started 3 Step 1: Unpack 3 Step 2: Prepare the Remote Control 3 Step 3: Hook Up 4 Changing the Scanning Mode 6 Before Operating the System the Power Automatically 18 Unique DVD/VCD Operations 19 Selecting about This System 37 Maintenance 39 Troubleshooting 40 Language Code - JVC FS-GD7 | Instruction Manual - Page 6
the remote control is mainly explained; however, you can use the buttons and controls on the main unit if they have the same (or similar) name and marks. • Some related tips and notes are explained later in the sections "Learning More about This System" (on pages 37 to 38) and "Troubleshooting" (on - JVC FS-GD7 | Instruction Manual - Page 7
Insert the batteries into the remote control by matching the polarity (+ and -) correctly. 1 2 Step 3: Hook up the components such as AM/FM antennas, speakers, etc. (see pages 4 to 6). 3 R6(SUM-3)/AA(15F) Finally plug the AC power cord. Now you can operate the System. • DO NOT use an old battery - JVC FS-GD7 | Instruction Manual - Page 8
Step 3: Hook Up If you need more detailed information, see page 6. Illustrations of the input/output terminals below are typical examples. When you connect other components, refer also to their manuals since the terminal names actually printed on the rear may vary. Turn the power off to all - JVC FS-GD7 | Instruction Manual - Page 9
it so that you can obtain the best reception. SUBWOOFER OUT ANTENNA FM 75Ω AM LOOP AM EXT OPTICAL DIGITAL OUT VIDEO OUT S-VIDEO VIDEO COMPONENT Y Pb Pr SPEAKERS L R IMPEDANCE 6-16Ω Gray cord (+) connect to red (+) terminal Gray cord with black stripe (-) connect to black (-) terminal - JVC FS-GD7 | Instruction Manual - Page 10
To assemble the AM loop antenna Changing the Scanning Mode Remote ONLY This System supports progressive scanning. If you connect a progressive TV through the COMPONENT jacks, you can enjoy a high quality picture from the built-in DVD player by selecting progressive mode. To connect the AM loop - JVC FS-GD7 | Instruction Manual - Page 11
following discs: Disc Type Mark (Logo) Video Format Region Code* Number DVD Video DVD Audio Video CD (VCD) DIGITAL VIDEO 1 or ALL NTSC Super Video CD (SVCD) SUPER VIDEO Audio CD COMPACT DIGITAL AUDIO CD-R CD-RW DVD-R DVD-RW The System can play back CD-R or CD-RW recorded in the Audio - JVC FS-GD7 | Instruction Manual - Page 12
display teach you a lot of things while you are operating the System. Before operating the System, be familiar with when and how the indicator illuminates on the the current disc is DVD Audio with browsable still picture (see page 21). w BONUS indicator • Lights when a DVD Audio with a bonus - JVC FS-GD7 | Instruction Manual - Page 13
: Total title no. • By pressing SHIFT+DISPLAY, you can show the current title and chapter numbers for a few seconds. • DVD Audio: Track no. Elapsed playing time • DVD Audio: Group no. Track no. • By pressing SHIFT+DISPLAY, you can show the current group and track numbers for a few seconds - JVC FS-GD7 | Instruction Manual - Page 14
playback on the external component. 3 Adjust the volume. 4 Operate the target source as explained later. To turn off (standby) the System The STANDBY lamp on when you turn on the System or start playback. Remote To turn off the clock indication ONLY While the System is turned off... • Press - JVC FS-GD7 | Instruction Manual - Page 15
entry mode. To tune in to a station While FM or AM is selected... Remote control: Main unit: 1 sec. 1 sec. Frequency starts changing on the display. , the frequency changes step by step. To stop searching manually, press either button. Remote If the received FM station is hard to listen ONLY - JVC FS-GD7 | Instruction Manual - Page 16
CD/SVCD/VCD comprise of only "Tracks." • For JPEG playback, see "Operations on the CONTROL Screen" on page 28. To insert a disc You can insert a disc while playing another source. Main Unit: On-screen guide icons • During DVD Video playback, the following icons may appear on the TV screen: At the - JVC FS-GD7 | Instruction Manual - Page 17
mood. THEATER Enjoy sound effects like in a major theater. • 3D PHONIC indicator also lights up. Remote To play back using the disc menu ONLY You can operate a disc-DVD and SVCD/VCD with Playback Control (PBC)-using the disc menu shown on the TV screen. • You cannot use this function while - JVC FS-GD7 | Instruction Manual - Page 18
. • Remember you cannot send any signal or data to your PC from this System. IMPORTANT • Always set volume to "VOL MIN" when connecting or disconnecting the to the corresponding plug of the audio output. • Refer to the manuals supplied with the other equipment. IMPORTANT • Always set volume to "VOL - JVC FS-GD7 | Instruction Manual - Page 19
the volume level from level 0 (VOL MIN) to level 31 (VOL MAX). Remote control: Main unit: DISPLAY DIMMER CLOCK/ TIMER FADE MUTING AUDIO VOL +/- 2,3,5,∞ (CLEAR VOICE)/ DVD LEVEL AHB PRO SOUND TURBO SOUND TURBO VOLUME +/DIMMER Remote To drop the volume in a moment ONLY To restore the volume, press - JVC FS-GD7 | Instruction Manual - Page 20
HIGH Output level is increased (more than "MIDDLE"). • Once the current DVD is ejected, this setting is canceled and set automatically to "NORMAL." Changing the Display Brightness-DIMMER You can dim the display window. Remote Control: DIM 1 DIM 2 (at the same time) Main Unit: DIM OFF AUTO - JVC FS-GD7 | Instruction Manual - Page 21
steps 1 and 2 explained on page 16. 2 Select a parameter you want to adjust. Setting the Clock Remote ONLY Without setting the built-in clock, you cannot use the Daily Timer (see page 30) and Sleep same time) • While playing a DVD or MP3, you cannot check the current clock time (see page 9). 17 - JVC FS-GD7 | Instruction Manual - Page 22
Turning Off the Power Automatically Remote ONLY To turn off the System after playback is over- Auto Standby not work while you are listening to radio (FM/AM) and the external component (AUX and USB). To turn off the System after a certain period of time-Sleep Timer 1 Specify the time (in minutes - JVC FS-GD7 | Instruction Manual - Page 23
Unique DVD/VCD Operations Remote control PAGE -/+ DVD/CD 3 8 Numeric buttons SLOW -/+ Selecting the Sound Track Remote ONLY For DVD Video: While playing back a chapter containing audio languages, you can select the language to listen to. For DVD Audio: While playing back a track containing - JVC FS-GD7 | Instruction Manual - Page 24
2 3/4 3 20 Playing Back a Bonus Group Remote ONLY • This function is only used while playing DVD Audio. Some DVD Audios have a special group called "bonus group" whose Enter the key number. 3 Follow the interactive instructions shown on the TV screen. To cancel the key number entry, press 7. - JVC FS-GD7 | Instruction Manual - Page 25
ONLY Still picture playback To replay the previous scenes (One touch replay function) Remote ONLY • This function is only used while playing DVD Video. The playback position moves back about 10 seconds before the current position (only within the same title). To start still picture playback - JVC FS-GD7 | Instruction Manual - Page 26
Remote control CANCEL Numeric buttons DVD/CD 3 8 Advanced Disc Operations Programming the Playing Order- Program Play Remote the disc is not in current tray, the System may prompt for the group number entry as well, however, during playback, the System will ignore these entries. To enter the - JVC FS-GD7 | Instruction Manual - Page 27
programmed. To skip a step: To pause: To stop: Playing at Random-Random Play Remote ONLY You can play the chapters or tracks of all loaded discs at random. • Random Play cannot be used for some DVDs. 1 Before starting playback, activate Random Play. PROGRAM RANDOM Canceled To release, press - JVC FS-GD7 | Instruction Manual - Page 28
Remote ONLY • You can also select the repeat mode using the on-screen bar (see page 26). Repeat Play You can repeat playback. • For DVD Video: During playing... 1 Canceled GROUP ALL* Before playback... ALL* Canceled • For DVD DVD Video, DVD Audio or SVCD/VCD with PBC is loaded in the System, - JVC FS-GD7 | Instruction Manual - Page 29
Disc Operations Remote control Numeric buttons DVD/CD 3 8 ENTER 4,¢ REPEAT 2,3,5,∞ ON SCREEN 7 ZOOM On-screen bars DVD Video 1 2 3 DVD-VIDEO 8.5Mbps DISC T2ITTLIETL1E4 2CHCAHPAP233 TTOIMTAEL 1:2015::5588 TTIIMMEE OOFFFF CHAP. 11/3/3 11/ /33 11/1/3 DVD Audio 4 1 2 3 DVD-AUDIO TIME - JVC FS-GD7 | Instruction Manual - Page 30
Using the On-screen Bar Remote ONLY Ex.: Selecting a subtitle (French) for DVD Video: While a disc is selected as the source... 1 Display the on-screen bar with the pull-down menu. DVD-VIDEO 8.5Mbps DISC 3 TITLE 2 CHAP 3 TOTAL 1:01:58 DVD-VIDEO 8.5Mbps DISCT3ITTLIETL1E4 2CHCAHPAP233 TTOOTTAALL1 - JVC FS-GD7 | Instruction Manual - Page 31
• To correct a misentry, press cursor 2 to erase the last entry. 5 Finish the setting. The System starts playing the disc from the selected playing time. 5 Select the start point (A). DVD-VIDEO 8.5Mbps DISC T2ITTLIETL1E4 2CHC TTIIMMEE AO-FF CHAP. 11/3/3 6 Select the end point (B). A-B Repeat - JVC FS-GD7 | Instruction Manual - Page 32
Select CHAP. or TRACK . 3 Display the pop-up window. DVD-VIDEO 8.5Mbps TTIIMMEE OOFFFF DISC T2ITTLIETL1E4 2CHCAHPAP233 TTOOTTAALL1:12:051:5:588 CHAP setting. The System starts playing the searched chapter or track. Operations on the CONTROL Screen Remote ONLY The CONTROL screen automatically - JVC FS-GD7 | Instruction Manual - Page 33
playback For MP3: Playback starts with the selected track. • Pressing DVD/CD 3 also starts playback. 2 Change the magnification. For JPEG one after another. • Once you start playing back a JPEG track, the CONTROL screen goes off. • To cancel slide-show and display the current still picture - JVC FS-GD7 | Instruction Manual - Page 34
Remote control CANCEL 2,3 30 Timer Operations AUDIO SET CLOCK/ TIMER Setting the Daily Timer Remote ONLY Using Daily Timer, is selected • When the clock has not been adjusted, pressing CLOCK/TIMER makes the System enter the clock setting mode. 2 Make the timer setting as you want. Repeat the - JVC FS-GD7 | Instruction Manual - Page 35
timer is turned off manually (see the next column) or another timer is activated. When the on-time comes The System turns on, tunes in cannot start the specified title/chapter/track of DVD-Video/SVCD/VCD, though you can select it at the timer setting. DVD-Video/SVCD/VCD starts playback from the - JVC FS-GD7 | Instruction Manual - Page 36
Setup Menu Operations Remote control ENTER SET UP 2,3,5,∞ Setup Menu Icons The icon for 1 LANGUAGE Setup Menu 2 PICTURE Setup Menu 3 AUDIO Setup Menu 4 OTHERS Setup Menu . Operating Procedure Remote ONLY You can use the Setup Menus only when a disc is selected as the source and its playback - JVC FS-GD7 | Instruction Manual - Page 37
the language shown on the TV screen while operating this System. LANGUAGE MENU LANGUAGE AUDIO LANGUAGE SUBTITLE ON SCREEN LANGUAGE ENGLISH on page 41). MONITOR TYPE Select the monitor type of your TV to play DVD Video recorded with aspect ratio of 16:9. Select one of the following: 16:9: Select - JVC FS-GD7 | Instruction Manual - Page 38
Signals" on page 42. DOWN MIX When using the digital output on the rear, set this correctly according to the connected component. When playing a multi-channel DVD, the System converts the signals into 2 channels properly. Select one of the following: DOLBY To connect an amplifier with the Dolby - JVC FS-GD7 | Instruction Manual - Page 39
Digital software. Loud sound will become low and vice versa. 7 OTHERS Setup Menu You can change some other convenient functions. OTHERS RESUME ON SCREEN GUIDE AV COMPULINK MODE ON ON DVD2 SELECT ENTER USE TO SELECT. USE ENTER TO CONFIRM TO EXIT, PRESS [SET UP]. RESUME You can activate or - JVC FS-GD7 | Instruction Manual - Page 40
CH+/- SHIFT Operating the TV TV/VIDEO Operating TV Remote ONLY You can operate the JVC's TV using this remote control. To operate the TV To turn on or off To select the input mode (either TV the TV: or VIDEO): TV VOL+/- (at the same - JVC FS-GD7 | Instruction Manual - Page 41
on the inner circle of the disc tray. • On some DVD, SVCD, or VCD discs, the actual operations may be different from what is explained in this manual, due to the programming and disc structure; such differences are not malfunction of this System. • When discs* in more than one tray are loaded on - JVC FS-GD7 | Instruction Manual - Page 42
select another file. MP3/JPEG groups/tracks configuration This System plays back the tracks as follows. Timer Operations screen size may become 4:3 letter box with some DVD Video discs. This depends on how the discs back. OTHERS Setup Menu-ON SCREEN GUIDE: Setup Menus and on-screen bar will - JVC FS-GD7 | Instruction Manual - Page 43
is heavily stained, wipe it with a cloth soaked in waterdiluted neutral detergent and wrung well, then wipe clean with a dry cloth. • Since the System may deteriorate in quality, become damaged or get its paint peeled off, be careful about the following: - DO NOT wipe it with a hard cloth. - DO - JVC FS-GD7 | Instruction Manual - Page 44
Troubleshooting If you are having a problem with your System, check this list for a possible solution before calling for service. General: Adjustments or settings are suddenly canceled before you finish. ] There is a time limit. Repeat the procedure again. Operations are disabled. ] The built-in - JVC FS-GD7 | Instruction Manual - Page 45
Language Code List AA Afar AB Abkhazian AF Afrikaans AM Ameharic AR Arabic AS Assamese AY Aymara AZ Azerbaijani BA Bashkir BE Byelorussian BG Bulgarian BH Bihari BI Bislama BN Bengali, Bangla BO Tibetan BR Breton CA Catalan CO Corsican CS Czech CY Welsh DA Danish DZ Bhutani EL - JVC FS-GD7 | Instruction Manual - Page 46
24 bit Linear PCM with 96 kHz, Linear PCM with Dolby Digital with DTS DVD Audio with 48/96/192 kHz, 16/20/24 bit Linear PCM with kHz, 16 bit Linear PCM 32/44.1/48 kHz, 16 bit Linear PCM *1 While playing some DVDs, digital signals may be emitted at 20 bits or 24 bits (at their original bit rate) - JVC FS-GD7 | Instruction Manual - Page 47
Parts Index Refer to the pages to see how to use the buttons and controls. Remote control 36 23, 31, 36 11, 13, 16 - 18, 20 - 22, 27, 28 10, 11 10, 12, 13, 21, 23, 29 unit 10, 14 STANDBY lamp 10 10, 14 10, 11 12, 24 10, 12 12, 24 12, 23 10 8 Remote sensor 15 10, 15 16 11 - 13, 23 12 14 14 43 - JVC FS-GD7 | Instruction Manual - Page 48
Color system: NTSC VIDEO (composite): 1 V(p-p)/75 Ω S-VIDEO: Y (luminance) 1 V(p-p)/75 Ω C (chrominance, burst) 0.286 V(p-p)/75 Ω COMPONENT:(Y) OF 525 OR 625 PROGRESSIVE SCAN PICTURE PROBLEMS, IT IS RECOMMENDED THAT THE USER SWITCH DVD PLAYER, PLEASE CONTACT OUR CUSTOMER SERVICE CENTER." Design - JVC FS-GD7 | Instruction Manual - Page 49
- JVC FS-GD7 | Instruction Manual - Page 50
- JVC FS-GD7 | Instruction Manual - Page 51
EN © 2005 Victor Company of Japan, Limited 0205MWMMDWBET FS-GD7 COMPACT COMPONENT SYSTEM
-
 1
1 -
 2
2 -
 3
3 -
 4
4 -
 5
5 -
 6
6 -
 7
7 -
8
-
9
-
10
-
11
-
12
-
13
-
14
-
15
-
16
-
17
-
18
-
19
-
20
-
21
-
22
-
23
-
24
-
25
-
26
-
27
-
28
-
29
-
30
-
31
-
32
-
33
-
34
-
35
-
36
-
37
-
38
-
39
-
40
-
41
-
42
-
43
-
44
-
45
-
46
-
47
-
48
-
49
-
50
-
51
 |
 |
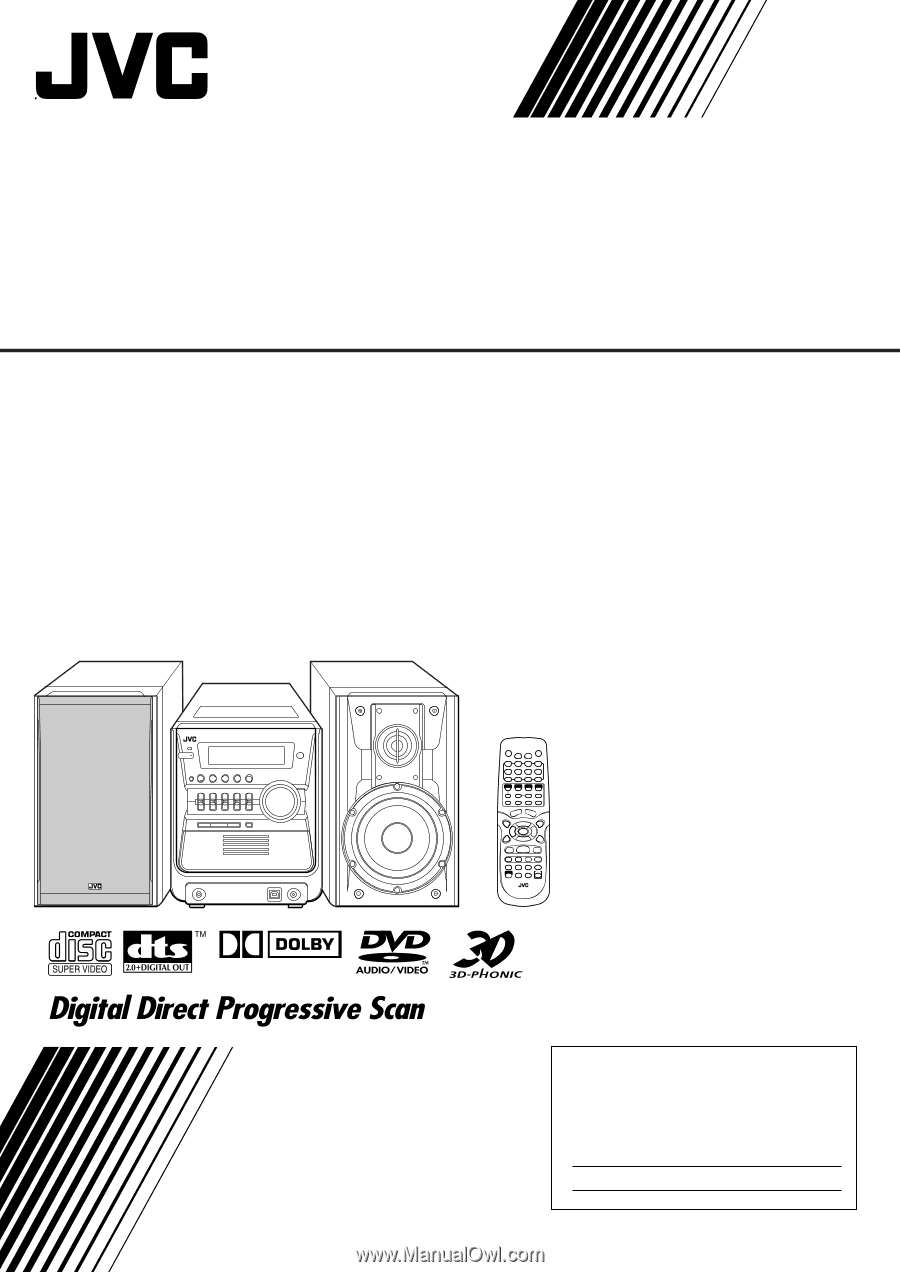
COMPACT COMPONENT SYSTEM
INSTRUCTIONS
LVT1348-001D
[J]
DIGITAL
FS-GD7
—Consists of CA-FSGD7 and SP-FSGD7
For Customer Use:
Enter below the Model No. and Serial No.
which are located either on the rear, bot-
tom or side of the cabinet. Retain this
information for future reference.
Model No.
Serial No.