JVC GR-AXM18US Instructions - Page 10
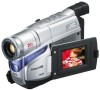
Basic Features - camcorder review
 |
UPC - 046838024108
View all JVC GR-AXM18US manuals
Add to My Manuals
Save this manual to your list of manuals |
Page 10 highlights
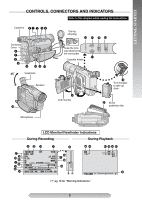
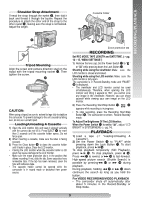
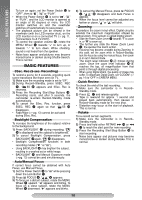
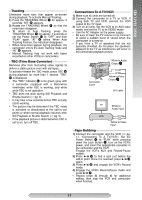
BASIC FEATURES To turn on again, set the Power Switch # to "OFF", then to " ", " " or "PLAY". • When the Power Switch # is set to " ", " " or "PLAY", and the LCD monitor is opened at an angle of 60 degrees or more, the LCD monitor switches on and the viewfinder switches off automatically to save power. • The playback picture can be viewed in the viewfinder (with the LCD monitor shut), on the LCD monitor or on a connected TV (੬ pg. 11, "Connections To A TV/VCR"). • To control the speaker volume 6, rotate the MENU Wheel 1 towards "+" to turn up, or towards "-" to turn down. While shooting, sound is not heard from the speaker. • Noise bars appear and pictures may become monochrome or darken during Shuttle Search. This is normal. BASIC FEATURES 5Sec. Rec (5-sec. Recording) To record a scene for 5 seconds, providing quick scene transitions like those seen on TV. 1) Make sure the recording mode is set to "SP". 2) During Record-Standby, press 5SEC. REC 2. 5S \ appears and 5Sec. Rec is reserved. 3) Press the Recording Start/Stop Buttons !. Recording starts, and after 5 seconds, the camcorder re-enters Record-Standby mode automatically. 4) To cancel the 5Sec. Rec. function, press 5SEC. REC 2 again so that 5S \ disappears. • Fade/Wipe (੬ pg. 13) cannot be activated during 5Sec. Rec. Backlight Compensation To increase the brightness of the subject relative to the background. 1) Press BACKLIGHT & during recording. " " : is displayed and the subject is brightened. 2) To cancel Backlight Compensation, press BACKLIGHT &again. " " : disappears. • Backlight Compensation functions in both recording modes (" " or " "). • Using BACKLIGHT & may brighten the subject, resulting in a washed out or white image. • BACKLIGHT & and Manual Exposure mode (੬pg. 13) cannot be used simultaneously. Auto/Manual Focus If correct focus cannot be obtained with Auto Focus, use Manual Focus. 1) Set the Power Switch # to " " while pressing down the Lock Button ". 2) Press FOCUS 4. " " { appears. 3) To focus on a distant subject, rotate the MENU Wheel 1 upward. "2" appears and blinks. To focus on a close subject, rotate the MENU Wheel 1 downward. "3" appears and blinks. 4) To cancel the Manual Focus, press FOCUS 4. " " { disappears and Auto Focus is applied. • When the focus level cannot be adjusted any farther or closer, " " or " " will blink. Zooming To produce the zoom in/out effect. Digital circuitry extends the maximum magnification offered by optical zoom. This system is called Digital Zoom. • Slide the Power Zoom Lever 3 towards "T" to zoom in, or "W" to zoom out. • The further you slide the Power Zoom Lever 3, the quicker the zoom action. • Focusing may become unstable during Zooming. In this case, set the zoom while in Record-Standby, lock the focus by using the manual focus, then zoom in or out in Record mode. • The zoom level indicator
-
 1
1 -
2
-
3
-
4
-
 5
5 -
 6
6 -
 7
7 -
 8
8 -
 9
9 -
 10
10 -
 11
11 -
 12
12 -
 13
13 -
 14
14 -
 15
15 -
16
-
17
-
18
-
19
-
20
-
21
-
22
-
23
-
24
 |
 |
