JVC GR-AXM18US Instructions - Page 15
System Menu 2, Vcr Menu
 |
UPC - 046838024108
View all JVC GR-AXM18US manuals
Add to My Manuals
Save this manual to your list of manuals |
Page 15 highlights
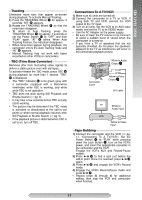
MENU SETTINGS 3) Rotate the BRIGHT Wheel 1 to display the bright level indicator _. 4) Rotate the BRIGHT Wheel 1 until the appropriate brightness is reached. After the BRIGHT Wheel 1 is released, the indicator soon disappears and adjustment is completed. DATE/TIME DISP. The date/time appears in the camcorder or on a connected monitor (set DATE/TIME in SYSTEM MENU first ੬ pg. 8). • The selected display will be recorded. If you do not want to record the display, select "OFF" before shooting. • In the AUTO DATE mode, the camcorder records the date for about 5 seconds when recording is initiated after the date is changed, a cassette is loaded, or AUTO DATE is selected. The date is replaced after 5 seconds with "AUTO DATE" but this is not recorded. DATE/TIME SET Allows you to set the current date and time. (੬ pg. 8) SYSTEM MENU 2 • This function is cancelled when the power is turned off or when the cassette is ejected. • To use this function, it is recommended that SCROLL in TITLE SETUP (੬ pg. 14) be set to "OFF". INT. TIME You can record sequentially at preset time spans. Leaving the camcorder aimed at a specific subject, you can record subtle changes over an extended period of time (Time-Lapse). REC MODE should be set to "SP". (Please note that it is necessary to set the REC TIME (Animation) in the SYSTEM MENU before performing the INT. TIME (Time-Lapse) function.) Select the desired interval time and press the Recording Start/Stop Button !. • Fade- or wipe-in/out cannot be performed. • This function is cancelled when the power is turned off or when the cassette is ejected. • To use this function, it is recommended that SCROLL in TITLE SETUP (੬ pg. 14) be set to "OFF". VCR MENU DEMO MODE Demonstrates certain functions automatically. Available when the Power Switch # is set to " " or " " and "DEMO MODE" is set to "ON" (factorypreset). • To cancel demonstration, set "DEMO MODE" to "OFF". • Pressing MENU Wheel 1 directly accesses DEMO MODE menu while the demo is in progress. • Performing any operation during the demonstration stops the demonstration temporarily. If no operation is performed for more than 1 minute after that, the demonstration will resume. • "DEMO MODE" remains "ON" even if the camcorder power is turned off. • When a cassette is in the camcorder, demonstration is not available. • If you do not detach the Lens Cap, you cannot see the actual changes of the Automatic Demonstration activated on the LCD monitor or viewfinder. REC TIME You can shoot a series of pictures, each slightly different, of the same object for a brief selected period of time (Animation). REC MODE should be set to "SP". Select the desired recording time and press the Recording Start/Stop Button ! after focusing on the subject. • Fade- or wipe-in/out cannot be performed. VCR MENU C OUN T E R ME MO RY OF F C OUN T E R R E S E T Y E S 2EXI T COUNTER MEMORY Makes it easier to locate a specific tape segment. 1) Set the Power Switch # to "PLAY" while pressing down the Lock Button ". 2) Press the MENU Wheel 1 in. The VCR MENU screen appears. 3) Rotate the MENU Wheel 1 to select "COUNTER MEMORY" and press it. Then, rotate the MENU Wheel 1 to "ON" and press it. ("M" appears when you return to normal screen.) 4) Rotate the MENU wheel to select "COUNTER RESET" and press it. Then, rotate the MENU Wheel 1 to "YES" and press it. The counter resets to "0:00:00". 5) To return to normal screen, rotate the MENU Wheel 1 to "3EXIT" and press it. 6) After recording or playback, press 7 (, then 1 ) with Power Switch # set to "PLAY". The tape automatically stops at or close to 0:00:00. 7) Press 3/8 & to start playback. • The counter memory functions in both FastForward and Rewind modes. 15
-
 1
1 -
2
-
3
-
4
-
5
-
6
-
7
-
8
-
9
-
 10
10 -
 11
11 -
 12
12 -
 13
13 -
 14
14 -
 15
15 -
 16
16 -
 17
17 -
 18
18 -
 19
19 -
 20
20 -
21
-
22
-
23
-
24
 |
 |