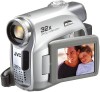
JVC GR-D350 Instruction Manual
JVC GR-D350 - MiniDV Camcorder w/32x Optical Zoom Manual
 |
UPC - 046838023248
View all JVC GR-D350 manuals
Add to My Manuals
Save this manual to your list of manuals |
JVC GR-D350 manual content summary:
- JVC GR-D350 | Instruction Manual - Page 1
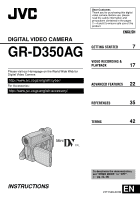
DIGITAL VIDEO CAMERA GR-D350AG Please visit our Homepage on the World Wide Web for Digital Video Camera: http://www.jvc.co.jp/english/cyber/ For Accessories: http://www.jvc.co.jp/english/accessory/ Dear Customer, Thank you for purchasing this digital video camera. Before use, please read the safety - JVC GR-D350 | Instruction Manual - Page 2
only with JVC Data Battery. Use the JVC BNVF707U/VF714/VF733U battery packs. Using generic non-JVC batteries can cause damage to the internal charging circuitry. ● Make sure you only use cassettes with the Mini DV mark . This camcorder is designed exclusively for the digital video cassette. Only - JVC GR-D350 | Instruction Manual - Page 3
. Continue using the camcorder or AC Adapter under these conditions could lead to fire or electric shock. Contact your JVC dealer. Do not attempt to repair the malfunction yourself. ÷ To prevent shock, do not open the cabinet. No user serviceable parts inside. Refer servicing to qualified personnel - JVC GR-D350 | Instruction Manual - Page 4
following notes concern possible physical damage to the camcorder and to the user. When carrying, be sure to always securely attach and use tip over, causing serious damage to the camcorder. CAUTION! Connecting cables (Audio/Video, S-Video, etc.) to the camcorder and leaving it on top of the TV - JVC GR-D350 | Instruction Manual - Page 5
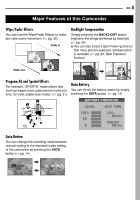
You can check the battery status by simply pressing the DATA button. (੬ pg. 13) BATTERY CONDITION LEVEL MAX TIME 100% 50 0 LCD 80min FINDER 90min Auto Button You can change the recording mode between manual setting to the standard mode setting of the camcorder by pressing the AUTO button - JVC GR-D350 | Instruction Manual - Page 6
use cassettes with the Mini DV mark . This camcorder is designed exclusively for the digital video cassette. Only cassettes marked " " can be used with this unit. Remember that this camcorder is not compatible with other digital video formats. Remember that this camcorder is intended for - JVC GR-D350 | Instruction Manual - Page 7
22 Index 8 Provided Accessories 11 Power 12 Operation Mode 14 Auto/Manual Mode 14 Power-Linked Operation Video Unit Equipped With A DV Connector (Digital Dubbing 33 Connection To A Personal Computer 34 REFERENCES 35 TROUBLESHOOTING 35 USER MAINTENANCE 38 CAUTIONS 39 SPECIFICATIONS - JVC GR-D350 | Instruction Manual - Page 8
8 EN GETTING STARTED Index 23 8 9 22 ) ~ 4 1 5 + 26 6 2 7 3 , !" 28 29 30 31 32 24 # $ % & 25 27 ( 33 - JVC GR-D350 | Instruction Manual - Page 9
EJECT] (੬ pg. 16) Connectors The connectors are located beneath the covers. )Audio/Video Output Connector [AV] (੬ pg. 21, 32) ~S-Video Output Connector [S] (੬ pg. 21, 32) +DC Input Connector [DC] (੬ pg. 12) ,Digital Video Connector [DV IN/OUT] (i.LINK*) (੬ pg. 33, 34) * i.LINK refers to the IEEE1394 - JVC GR-D350 | Instruction Manual - Page 10
pg. 15) 1:15 PM 1. 1. 2006 During Video Playback 1Auto/Manual Mode Indicator A : Auto Mode M : Manual Mode 2 : Night-Scope Indicator (੬ pg. 26) on the camcorder.) 8Battery Remaining Power Indicator (੬ pg. 37) 9Approximate Zoom Ratio (੬ pg. 18) !Zoom indicator (੬ pg. 18) "Digital Image Stabilizer - JVC GR-D350 | Instruction Manual - Page 11
Strap guide 2 2 1 AC Adapter AP-V17E 2 Battery Pack BN-VF707U 3 Audio/Video Cable (ø3.5 mini-plug to RCA plug) 1 3 4 Shoulder Strap (੬ pg. 11 for attachment) 5 Lens Cap (੬ pg. 11 for attachment) Eyelet NOTES: ● In order to maintain optimum performance of the camcorder, provided cables may - JVC GR-D350 | Instruction Manual - Page 12
● It is recommended that only genuine JVC batteries are used in this camcorder. Using generic non-JVC batteries can cause damage to the internal charging circuitry the optional AA-VF7 Battery Charger, you can charge the BN-VF707U/VF714U/VF733U battery pack without the camcorder. ● After 5 minutes - JVC GR-D350 | Instruction Manual - Page 13
though you tried to press DATA several times, there may be a problem with your battery. In such a case, consult your nearest JVC dealer. GETTING STARTED EN 13 Using AC Power Perform step 4 - 5 in "Charging The Battery Pack". NOTE: The provided AC Adapter features automatic voltage selection in the - JVC GR-D350 | Instruction Manual - Page 14
the camcorder by opening/ closing the LCD monitor or pulling out/pushing in the viewfinder. INFORMATION: The following explanations in this manual supposes the using the Menus. (੬ pg. 22) OFF: Allows you to switch off the camcorder. PLAY: ● Allows you to play back a recording on the tape. ● Allows - JVC GR-D350 | Instruction Manual - Page 15
Button located on the switch. 2 Make sure the LCD monitor is closed and locked. Pull out the viewfinder fully and adjust it manually for best viewability. 3 Turn the Diopter Adjustment Control until the indications in the viewfinder are clearly focused. Example: Diopter Adjustment Control CAUTION - JVC GR-D350 | Instruction Manual - Page 16
the cassette holder still does not open, turn the camcorder off then on again. ● If the tape does the cassette holder cover. Cassette holder Make sure the window side is facing out. Erase protection tab 1 the cassette holder cover. ÷ When the battery pack's charge is low, you may not be - JVC GR-D350 | Instruction Manual - Page 17
SP LP 30 min. 45 min. 60 min. 90 min. 80 min. 120 min. VIDEO RECORDING EN 17 Tape Remaining Time Approximate tape remaining time appears on the display. "---min" means the camcorder is calculating the remaining time. When the remaining time reaches 2 minutes, the indication starts blinking - JVC GR-D350 | Instruction Manual - Page 18
VIDEO provide more dramatic results. Hold the camcorder in the desired position and tilt while in RecordStandby, lock the focus by using the manual focus (੬ pg. 27), then zoom in or out is done through Digital image processing, and is therefore called Digital Zoom. ● During Digital zoom, the quality - JVC GR-D350 | Instruction Manual - Page 19
code starts counting up again from "00:00:00". This means the camcorder may record the same time codes as those existing in a previously recorded (੬ pg. 24) VIDEO RECORDING EN 19 Quick Review Enables to check the end of the last recording. 1) Press QUICK REVIEW during the RecordingStandby mode. - JVC GR-D350 | Instruction Manual - Page 20
battery and no operation (example: zooming is performed), the camcorder shuts off automatically. To turn on again, set the Power Switch to "OFF", then to "PLAY". ● When a cable camcorder's Stop mode is automatically engaged. Shuttle Search Allows high-speed search in either direction during video - JVC GR-D350 | Instruction Manual - Page 21
cable. Consult the JVC Service Centre described on the sheet included in the package for details on its availability. Make sure to connect the end with a core filter to the camera. The core filter reduces interference. VIDEO PLAYBACK EN 21 1 Make sure all units are turned off. 2 Connect the camcorder - JVC GR-D350 | Instruction Manual - Page 22
if you wish to set other function menus. ● The "3" indicator shows the setting that is currently saved inside the camcorder's memory. 3) Press MENU. The Menu Screen closes. Video Playback Menus REC MODE (੬ pg. 25) Sub Menu SOUND MODE (੬ pg. 25) NARRATION (੬ pg. 25) BRIGHT (੬ pg. 25) DATE - JVC GR-D350 | Instruction Manual - Page 23
off this mode when recording with the camcorder on a tripod. ZOOM [32X]: When set to "32X" while using digital zoom, the zoom magnification will reset to 32X since digital zoom will be disengaged. 64X: Allows you to use the Digital Zoom. By digitally processing and magnifying images, zooming is - JVC GR-D350 | Instruction Manual - Page 24
is connected to a TV. TIME CODE [OFF]: Time code is not displayed. ON: Time code is displayed on the camcorder and on the connected TV. Frame numbers are not displayed during recording. (੬ pg. 18) DEMO MODE OFF: Automatic demonstration will not take place. [ON]: Demonstrates - JVC GR-D350 | Instruction Manual - Page 25
displayed. ON SCREEN OFF / [LCD] / LCD/TV When set to "OFF", the camcorder's display disappears. TIME CODE [OFF] / ON ☞ pg. 18, "Time Code" ADVANCED FEATURES The settings below are effective only for video playback except "REC MODE" and "BRIGHT". The parameters (except "OFF" in ON SCREEN - JVC GR-D350 | Instruction Manual - Page 26
mode on a TV with a normal screen ratio, refer to your TV's instruction manual. 16:9 : For playback on TVs with an aspect ratio of 16:9. and a still image will be recorded for approx. 5 seconds, then the camcorder re-enters the Record-Standby mode. ● You can perform Snapshot also during recording - JVC GR-D350 | Instruction Manual - Page 27
FEATURES FOR RECORDING EN 27 Manual Focus Exposure Control The camcorder's Full Range AF system offers continuous shooting ability from close-up (as close as approx. 5 cm to the subject) to infinity. However, correct focus - JVC GR-D350 | Instruction Manual - Page 28
When shooting objects under a spotlight. ● When zooming. M 1 Set the Power Switch to "REC". 2 Set the recording mode to " ". (੬ pg. 14) 3 Set "EXPOSURE" to "MANUAL" in FUNCTION Menu. (੬ pg. 23) ● The exposure control menu appears. 4 Adjust zoom so that the subject fills the LCD L monitor or the view - JVC GR-D350 | Instruction Manual - Page 29
MODE" (੬ pg. 26) ● "STROBE" in "EFFECT" (੬ pg. 31) ● Digital Zoom (੬ pg. 18) ● Depending on the shooting location and condition, optimum result may usually adjusted automatically. However, more advanced camcorder operators control this function manually to achieve a more professional colour/ tint - JVC GR-D350 | Instruction Manual - Page 30
you adjust white balance manually, the setting is retained even if the power is turned off or the battery removed. These effects let you make pro-style scene transitions. Use them to spice up the transition from one scene to the next. Wipe or Fader works when video - JVC GR-D350 | Instruction Manual - Page 31
set to " ", but can be changed to your desired setting. When Twilight is chosen, the camcorder automatically adjusts the focus from approx. 10 m to infinity. From less than 10 m, adjust the focus manually. SHUTTER OFF: Disables the function. (Factory-preset) SHUTTER 1/50: The shutter speed is fixed at - JVC GR-D350 | Instruction Manual - Page 32
still images only. NOTE: The S-Video cable is optional. Be sure to use the YTU94146A S-Video cable. Consult the JVC Service Centre described on the sheet included in the package for details on its availability. Make sure to connect the end with a core filter to the camera. The core filter reduces - JVC GR-D350 | Instruction Manual - Page 33
dubbing, start recording on the video unit. (Refer to the video unit's instruction manual.) 5 To stop dubbing, stop recording on the video unit, then stop playback on this camcorder. NOTES: ● It is recommended to use the AC Adapter as the power supply instead of the battery pack. (੬ pg. 13) ● If - JVC GR-D350 | Instruction Manual - Page 34
the battery pack. (੬ pg. 13) ● When using a DV cable, be sure to use the optional JVC VC-VDV206U or VC-VDV204U DV cable depending on the type of DV connector (4 or 6 pins) on the PC. ● The date/time information cannot be captured into the PC. ● Refer to the instruction manuals of the PC and Software - JVC GR-D350 | Instruction Manual - Page 35
TROUBLESHOOTING If, after following the steps in the chart below, the problem still exists, please consult your nearest JVC dealer. The camcorder pg. 22, 23, 31) Digital Zoom does not work. ● 32X optical zoom is selected. ➜Set "ZOOM" to "64X" or "800X". (੬ pg. 23) Video Playback The tape is moving, - JVC GR-D350 | Instruction Manual - Page 36
battery has run out and the previously set date/time has been erased. ➜Consult your nearest JVC 22, 23) Other problems When the image is printed camcorder is connected via the DV connector, the camcorder does not operate. ● The DV cable was plugged/unplugged with power turned on. ➜Turn the camcorder - JVC GR-D350 | Instruction Manual - Page 37
TROUBLESHOOTING EN 37 Picture does not appear on the LCD monitor. ● The viewfinder is pulled the power supply (battery, etc.) and wait a few minutes for the indication to clear. When it does, you can resume using the camcorder. If the indication remains, consult your nearest JVC dealer. UNIT IN - JVC GR-D350 | Instruction Manual - Page 38
38 EN USER MAINTENANCE Cleaning The Camcorder Before cleaning, turn off the camcorder and remove the battery pack and cleaning agents such as benzine or alcohol. ● Cleaning should be done only after the battery pack has been removed or other power units have been disconnected. ● Mould may form if - JVC GR-D350 | Instruction Manual - Page 39
a fully discharged battery pack. Cassettes To properly use and store your cassettes, be sure to read the following cautions: ● During use ... make sure the cassette bears the Mini DV mark. ... be aware that recording onto prerecorded tapes automatically erases the previously recorded video and audio - JVC GR-D350 | Instruction Manual - Page 40
After the camcorder plays back for about 20 seconds, it stops automatically. Also refer to the cleaning cassette's instructions. If, after using the cleaning cassette, the problems still exist, consult your nearest JVC dealer. Mechanical moving parts used to move the video heads and video tape tend - JVC GR-D350 | Instruction Manual - Page 41
LCD Speaker Monaural SPECIFICATIONS EN 41 For Digital Video Camera Format DV format (SD mode) Signal format PAL standard Recording/Playback format Video: Digital component recording Audio: PCM digital recording, 32 kHz 4-channel (12-BIT), 48 kHz 2-channel (16-BIT) Cassette Mini DV cassette Tape - JVC GR-D350 | Instruction Manual - Page 42
AE 31 Q Quick Review 19 R Recording Capacity Tape 17 S Shutter Effects 31 Snapshot Mode 26 Sound Mode 23, 25 Speaker Volume 20 Specifications 41 Spot Exposure Control 29 T Tape Speed (REC MODE 23, 25 Telephoto Setting 24 Time Code 18, 24 Tripod Mounting 16 Troubleshooting 35 W Warning - JVC GR-D350 | Instruction Manual - Page 43
MEMO - JVC GR-D350 | Instruction Manual - Page 44
EN GR-D350AG © 2006 Victor Company of Japan, Limited AG Printed in Malaysia 0106MAR-NF-VM
-
 1
1 -
 2
2 -
 3
3 -
 4
4 -
 5
5 -
 6
6 -
 7
7 -
8
-
9
-
10
-
11
-
12
-
13
-
14
-
15
-
16
-
17
-
18
-
19
-
20
-
21
-
22
-
23
-
24
-
25
-
26
-
27
-
28
-
29
-
30
-
31
-
32
-
33
-
34
-
35
-
36
-
37
-
38
-
39
-
40
-
41
-
42
-
43
-
44
 |
 |

ENGLISH
GR-D350AG
LYT1509-001B
EN
PAL
Dear Customer,
Thank you for purchasing this digital
video camera. Before use, please
read the safety information and
precautions contained in the pages
2 – 4 and 6 to ensure safe use of this
product.
Please visit our Homepage on the World Wide Web for
Digital Video Camera:
For Accessories
:
INSTRUCTIONS
DIGITAL VIDEO CAMERA
GETTING STARTED
7
VIDEO RECORDING &
PLAYBACK
17
ADVANCED FEATURES
22
REFERENCES
35
TERMS
To deactivate the demonstration,
set “DEMO MODE” to “OFF”.
(
±
pg. 22, 24)
42