JVC GR-D372 Instructions - Page 29
MENUS FOR DETAILED ADJUSTMENT, Changing The Menu Settings, Video Recording and D.S.C. Recording Menus
 |
UPC - 046838026935
View all JVC GR-D372 manuals
Add to My Manuals
Save this manual to your list of manuals |
Page 29 highlights
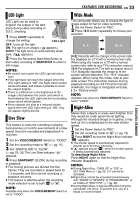
MENUS FOR DETAILED ADJUSTMENT EN 29 Changing The Menu Settings This camcorder is equipped with an easy-to-use, on-screen menu system that simplifies many of the more detailed camcorder settings. (੬ pg. 29 - 32) 1 3 2 Lock Button VIDEO/ MEMORY Power Switch 4 MENU 1 For Video and D.S.C. Recording Menus: ● Set the VIDEO/MEMORY Switch to "VIDEO" or "MEMORY". ● Set the Power Switch to "REC" while pressing M down the Lock Button located on the switch. ● Set the recording mode to " ". (੬ pg. 15) For Video Playback Menu: ● Set the VIDEO/MEMORY Switch to "VIDEO". ● Set the Power Switch to "PLAY" while pressing down the Lock Button located on the switch. ● For D.S.C. Playback Menu, refer to "D.S.C. PLAYBACK" (੬ pg. 24). 2 Open the LCD monitor fully. (੬ pg. 19) 3 Press MENU. The Menu Screen appears. 4 Press 4, 3, 1 or 2 to select the desired function, and press SET. The selected function menu appears. Screen for Video and Screen for Video D.S.C. Recording Menu Playback Menu FUNCTION REC MODE SP LP 5 Setting procedure hereafter depends on the selected function. NOTES: ● You cannot enter Menu Screen during recording. ● Certain functions cannot be set in the Video or D.S.C. Recording Menus. These icons will be displayed in grey/white. Video Recording and D.S.C. Recording Menus FUNCTION (੬ pg. 30) Selected menu icon SETTING (੬ pg. 30) SYSTEM (੬ pg. 31) WIPE/FADER DISPLAY (੬ pg. 31) EF DSC (੬ pg. 32) WB 1) Press 4, 3, 1 or 2 to select the desired selection and press SET. ● Example: WIPE/FADER Menu 2) Press 3 or 4 to select the desired parameter and press SET or 2. Selection is complete. ● The "3" indicator shows the setting that is currently saved inside the camcorder's memory. ● Press 1 whenever you want to cancel or return to the previous Menu Screen. 3) Press MENU. The Menu Screen closes. NOTE: Repeat the procedure if you wish to set other function menus. Video Playback Menu SP LP REC MODE (੬ pg. 32) SOUND MODE (੬ pg. 32) NARRATION (੬ pg. 32) BRIGHT (੬ pg. 32) DATE/TIME (੬ pg. 32) ON SCREEN (੬ pg. 32) TIME CODE (੬ pg. 32) Selected menu icon Example: REC MODE Menu REC MODE 1) Press 3 or 4 to select SP LP the desired parameter and press SET or 2. Selection is complete. ● Repeat the procedure if you wish to set other function menus. "‰" indicator ● The "‰" indicator shows the setting that is REC MODE SP currently saved inside LP the camcorder's memory. ● Press 1 whenever you want to cancel or return to the previous Menu Screen. 2) Press MENU. The Menu Screen closes. ADVANCED FEATURES
-
 1
1 -
2
-
3
-
4
-
5
-
6
-
7
-
8
-
9
-
10
-
11
-
12
-
13
-
14
-
15
-
16
-
17
-
18
-
19
-
20
-
21
-
22
-
23
-
 24
24 -
 25
25 -
 26
26 -
 27
27 -
 28
28 -
 29
29 -
 30
30 -
 31
31 -
 32
32 -
 33
33 -
 34
34 -
35
-
36
-
37
-
38
-
39
-
40
-
41
-
42
-
43
-
44
-
45
-
46
-
47
-
48
-
49
-
50
-
51
-
52
 |
 |
