Kenmore 3103 Installation Instructions - Page 7
Checkforleaks.Afterconnecting
 |
View all Kenmore 3103 manuals
Add to My Manuals
Save this manual to your list of manuals |
Page 7 highlights
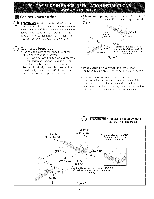
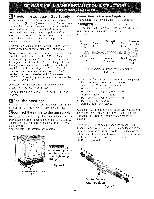
Onceregulatorisin placeo, penthe shutoffvalveinthe gassupplyline.Waita few minutesfor gasto move throughthegasline. Checkfor leaks.Afterconnectingtherangeto thegas supply,checkthe systemfor leakswith a manometerIf. a manometeisr not availabletu, rn onthe gassupplyand usea liquidleakdetector(orsoapandwater)at all jointsandconnectiontso checkfor leaks. Do not use a flame to check for leaks from gas connections. Checking for leaks with a flame may result in a fire or explosion. Tighten all connections as necessary to prevent gas leakage in the range or supply line. Disconnect this range and its individual manual shutoff valve from the gas supply piping system during any pressure testing of that system at test pressures greater than 1/2 psig (3.5 kPa or 14" water column). Isolate the range from the gas supply piping system by closing its individual manual shutoff valve during any pressure testing of the gas supply piping system at test pressures equal to or less than 1/2 psig (3.5 kPa or 14" water column). Electrical Requirements 120 volt, 60 Hertz, properly grounded dedicated circuit protected by a 15 amp circuit breaker or time delay fuse. Note: Not recommended to be installed with a Ground Fault Interrupt (GFI). Do not use an extension cord with this range. Grounding Instructions IMPORTANT Please read carefully. For personal safety, this appliance must be properly grounded. The power cord of this appliance is equipped with a 3prong (grounding) plug which mates with a standard 3prong grounding wall receptacle (see Figure 7) to minimize the possibility of electric shock hazard from the appliance. The wall receptacle and circuit should be checked by a qualified electrician to make sure the receptacle is properly grounded. Preferred Method Grounding type wall receptacle not, under any circumstances, cut, remove, or bypass the grounding prong. LP/Propane Gas Conversion This appliance can be used with Natural gas or LP/Propane gas. It is shipped from the factory for usewith natural gas. If you wish to convert your range for use with LP/Propane gas, use the supplied fixed orifices located in a bag containing the literature marked "FOR LP/PROPANEGAS CONVERSION." Follow the instructions packaged with the orifices for surface, oven and broil burners conversion. The conversion must be performed by a qualified service technician in accordance with the manufacturer's instructions and all local codes and requirements. Failure to follow these instructions could result in serious injury or property damage. The qualified agency performing this work assumes responsibility for the conversion. Failure to make the appropriate conversion can result in serious personal injury and property damage. Figure 7 Power supply cord with 3prong grounding plug. Where a standard 2-prong wall receptacle is installed, it is the personal responsibility and obligation of the consumer to have it replaced by a properly grounded 3prong wall receptacle. Do not, under any circumstances, cut or remove the third (ground) prong from the power cord, Disconnect electrical supply cord from wall receptacle before servicing cooktop. Moving the Appliance for Servicing and Cleaning Turn off the range line fuse or circuit breakers at the main power source, and turn off the manual gas shut-off valve. Make sure the range is cold. Remove the service drawer (warmer drawer on some models) and open the oven door. Lift the range at the front and slide it out of the cut-out opening without creating undue strain on the flexible gas conduit. Make sure not to pinch the flexible gas conduit at the back of the range when replacing the unit into the cutout opening. Replace the drawer, dose the door and switch on the electrical power and gas to the range. 7
-
 1
1 -
 2
2 -
 3
3 -
 4
4 -
 5
5 -
 6
6 -
 7
7 -
 8
8 -
 9
9 -
 10
10 -
 11
11 -
 12
12 -
13
-
14
-
15
-
16
-
17
-
18
-
19
-
20
-
21
-
22
-
23
-
24
-
25
-
26
-
27
-
28
 |
 |
