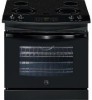
Kenmore 4559 Installation Instructions
Kenmore 4559 - 30 in. Electric Drop-In Range Manual
 |
View all Kenmore 4559 manuals
Add to My Manuals
Save this manual to your list of manuals |
Kenmore 4559 manual content summary:
- Kenmore 4559 | Installation Instructions - Page 1
you call for Service 10 important Notes to the Installer 1. Read att instructions contained in these installation instructions before installing range. 2. Remove all packing material from the oven and the drawer compartments before connecting the electrical supply to the range. 3. Observe all - Kenmore 4559 | Installation Instructions - Page 2
to these symbols and follow all instructions given. * Be sure your range is installed and grounded properly by a cluallfled installer or service technician. * This range must be electrlcally grounded in accordance with local codes or, in their absence, with the Natlanal Electrical Code ANSI/NFPA No - Kenmore 4559 | Installation Instructions - Page 3
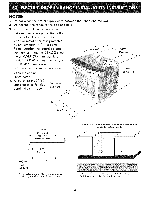
Cutout Dimensions ' 30" (76.2 cm Min.) See Note 3 ',mJn. I 18" Min. cmMin.) Shave Raised Edge to Clear Space for a 311/2"(81 cm) Wide Cooktop Rim. Locate Cabinet Doors 1" (2.5 cm) Min. from Cutout Opening 311/2" (81 cm) Exact C 1/2" _nin. 24" Min. 61 cm Min.) Smoothtop Models Grounded - Kenmore 4559 | Installation Instructions - Page 4
NOTES: 1. Do not pinch the power supply cord between the range and the wall. 2. Do not seal the range to the side cabinets. 3. 24" (61 cm) minimum clearance between the cooktop and the bottom of the cabinet when the bottom of wood or metal - Kenmore 4559 | Installation Instructions - Page 5
cord kit #903056-9010 by calling the Service Center. 2. These appliances should be connected oven is still cold may damage the oven controls. Electrical connection It is the responsibility and obligation of the consumer to contact a qualified installer to assure that the electrical installation - Kenmore 4559 | Installation Instructions - Page 6
of the conduit, if used in USA, in a new branch circuit installation (1996 NEC), mobile home, recreational vehicles, where local code do not permit Power Supply White Wire -'_-_ J (Neutra) r_ :L.L_.L___ Black If oven is used in a new branch circuit instaffafion (1996 NEC), mobile home, - Kenmore 4559 | Installation Instructions - Page 7
a requirement for installation of the range, but is an added convenience. The appliance should be placed on a table or the front of the appliance should be raised to be able to fully open the door. Please refer to the Use and Care Guide for oven door removal instructions. 1. Install base cabinets - Kenmore 4559 | Installation Instructions - Page 8
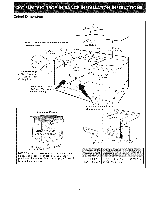
thickness is greater than 1/2" (1.3cm), relocate anti-tip bracket to the lower position 1/4" (6.4 mm) below (see figure 4). 2. Anti-slide brackets installation (Figure 5): A.Ptace the range so that it is about 6" out of the cabinet. B. Insert from below the shoulder screws in the bottom bracket (one - Kenmore 4559 | Installation Instructions - Page 9
the door using the screws provided with the range. C. Alternate Anti tip installation (Model wlth lift- up cooktop only_)_ 1. Anti-tip/anti-slide screws installation: A. Slide the range to its flnal position. B. Lift the cooktop and secure range burner box to cabinet with screws supplied to - Kenmore 4559 | Installation Instructions - Page 10
oven (some models) provides additional cooling of the oven electrical and electronic components. The fan will continue to run after the oven has serial plate on your oven. Before You Call for Service Read the Avoid Service Checklist and operating instructions in your Owner's Guide. It may save you - Kenmore 4559 | Installation Instructions - Page 11
todo c6digo o reglamento. 4. AsegOrese de dejar estas instrucciones con el consumidor Note imporfanfe pare el consumidor Mantenga estas instrucciones con el manual del usuario pare futures referencias. Impreso en Canada P/N 318201628 (1202) Rev. A English - pages 1-10 EspaSot - p6ginas 11-20 - Kenmore 4559 | Installation Instructions - Page 12
la temperatura de la pieza sin encogerse, ladearse o descolorareis. No instale la cocina encima de una alfombra a menos que coloque una placa de todo exceso de derrames. Siga Jas instrucciones para ia pre-iimpieza en el Manual del usuario. R_esqo de voJcamiento * Un ni_o o adulto puede volcar la - Kenmore 4559 | Installation Instructions - Page 13
Gabinefe Dimensiones I 30" (76.2cm) , Lije la parte elevade del borde para obtener las 311/2'' (81 cm) de ancho dd reborde de la plancha de cocinar. 11/2"Max. (3,8 cm) M6x. 1/2" min. Ubique ias puertas de los armarios un minimo de 1" de ia abertura. (76,2 cm Min.) Vea Note 3 mJfl. j_, _,, 18 - Kenmore 4559 | Installation Instructions - Page 14
NOTAS: 1. No peJJizque el cord6n eJ_ctrico entre Ja estufa y Ja pared. 2. No selle la estufa a los armadas de lado. 3. Un espacio m[nimo de 24" (61 cm) entre la superficie de la estufa y el rondo del armada cuando el rondo del armario de madera o metal est6 protegido par no menos de 1/4" (0.64 cm) - Kenmore 4559 | Installation Instructions - Page 15
Requerimientos El ctricos Se debe proveer ei voltaje y la frecuencia apropiados a este electrodomSstico, y conectarse a un circuito individual correctamente puesto a tierra, protecjido pot un interruptor o un fusible de 40A o 50A Observe todos los c6dlgos que goblernan y ordenanzas locales 1. Un - Kenmore 4559 | Installation Instructions - Page 16
Esfe elecfrodom&sflco esf6 fabrlcado con un surnlnlsfro el&cfrlco neutro blanco y un alambre de cobre conectado al armaz6n. El armaz6n esfa puesfo a tlerra pot un enlace de la conexi6n a flerra con la conexi6n del neufro al final de la linea el&cfrlca, sl es usado en los estados unldos una nueva - Kenmore 4559 | Installation Instructions - Page 17
muestra en ia Figura 1. Cepiiie a nivei ei borde ievantado_ para que libre un filete de 311/2" (81 cm) de ancho en tableros con bordes iaminados. 3. Instale ia caja de conexiones elSctricas en un armario adjunto o debajo del piso (In estufa tiene 48"/122 cm de alambre). Abra un agujero de 11 - Kenmore 4559 | Installation Instructions - Page 18
L_ Instrucciones de instalaci6n de la fljaci6n anti-inclinaci6n A. Instalaci6n preferida anti-vuelco _Todos los modelos). 1. Esta estufa puede traer soportes antivuelco, fijados al dorso de ta estufa con dos tornillos. Si el grueso del tablero es m6s de 1/2" (1.3 cm), coloque de nuevo el soporte - Kenmore 4559 | Installation Instructions - Page 19
montados en la estufa deberan tocalizarse debajo de los cabinetes anti-vuelco braquets "L" cuando la estufa se encuentre en su posici6n final). 3. Instale la rejilla de decoraci6n baja por debajo de la puerta, utilizando los tornillos y incluidos como kit de instalaci6n de la estufa. C. Instalacion - Kenmore 4559 | Installation Instructions - Page 20
llarnar al servicio Lea la secci6n Lista de Controt de Aver_as en su Manual del Usuario. Esto le podr6 ahorrar tiempo y gastos. Esta tista incluye artefacto. Lea la garanfia y ta informaci6n sobre el servicio en su Manual del Usuario para obtener el nOmero de tel6fono gratuito y la direcci6n del
-
 1
1 -
 2
2 -
 3
3 -
 4
4 -
 5
5 -
 6
6 -
 7
7 -
8
-
9
-
10
-
11
-
12
-
13
-
14
-
15
-
16
-
17
-
18
-
19
-
20
 |
 |
I
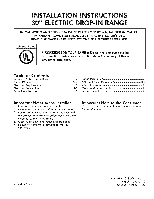
STALLAT
30"
CT
C
I
STRUCT
P-I
GE
INSTALLATION
AND
SERVICE
MUST
BE PERFORMED
BY A QUALIFIED
INSTALLER.
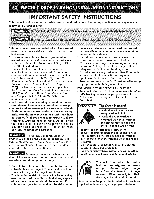
IMPORTANT:
SAVE FOR LOCAL
ELECTRICAL
INSPECTOR'S
USE.
READ
AND
SAVE
THESE
INSTRUCTIONS
FOR FUTURE
REFERENCE.
United
States
FOR YOUR
SAFETY:
Do
not
store
or
use gasoline
or other
flammable
vapors
and
liquids
in
the
vicinity
of this
or
any
other
appliance.
Table of Contents
important
Safety
instructions
.........................................
2
Cutout
Dimensions
.......................................................
3-4
Electrical
Requirements
...................................................
5
Electrical
Connection
..................................................
5-6
Serial
Plate Location
.......................................................
6
Range installation
............................................................
7
Anti-tip
Bracket
Installation
........................................
8-9
Check
Operation
...........................................................
10
Model
and Serial
Number
Location
...........................
10
Before
you
call
for
Service
...........................................
10
important
Notes
to
the
Installer
1.
Read att instructions
contained
in these
installation
instructions
before
installing
range.
2.
Remove
all packing
material
from
the oven and
the drawer
compartments
before
connecting
the
electrical
supply
to the range.
3.
Observe
all governing
codes and
ordinances.
4.
Be
sure
to leave
these instructions
with
the
consumer.
important
Note
to the
Consumer
Keep these
instructions with
your
owner's
guide
for
future
reference.
Printed
in Canada
P/N
318201628
(1202) Rev. A
English -
pages
1-10
Espahot -
p6ginas
11-20