Kenmore 4559 Installation Instructions - Page 9
should
 |
View all Kenmore 4559 manuals
Add to My Manuals
Save this manual to your list of manuals |
Page 9 highlights
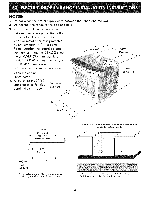
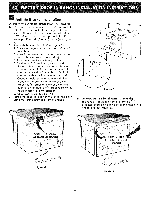
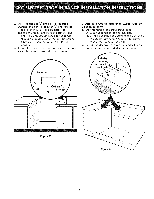
2. Anti-Tip cabinet "L" brackets Installation: A.Instatl the anti-tip cabinet "L" brackets as shown on Figure 7, one on each side. B. Slide the range into its flnal position. (The anti-tip L brackets attached to the range should be located under the anti-tip cabinet L brackets when the range is at its flnal position.) 3. Install the decorative lower trim under the door using the screws provided with the range. C. Alternate Anti tip installation (Model wlth lift- up cooktop only_)_ 1. Anti-tip/anti-slide screws installation: A. Slide the range to its flnal position. B. Lift the cooktop and secure range burner box to cabinet with screws supplied to prevent range from tipping (Figure 8). 2. Install the decorative lower trim under the door using the screws provided with the range. P mounting screws 2 on each Figure 7 Figure 8 9
-
 1
1 -
2
-
3
-
 4
4 -
 5
5 -
 6
6 -
 7
7 -
 8
8 -
 9
9 -
 10
10 -
 11
11 -
 12
12 -
 13
13 -
 14
14 -
15
-
16
-
17
-
18
-
19
-
20
 |
 |
