KitchenAid KBFO42FTX Installation Guide - Page 17
Classic and Architect, Series, Custom Side Panels - bottom freezer refrigerator
 |
UPC - 883049033983
View all KitchenAid KBFO42FTX manuals
Add to My Manuals
Save this manual to your list of manuals |
Page 17 highlights
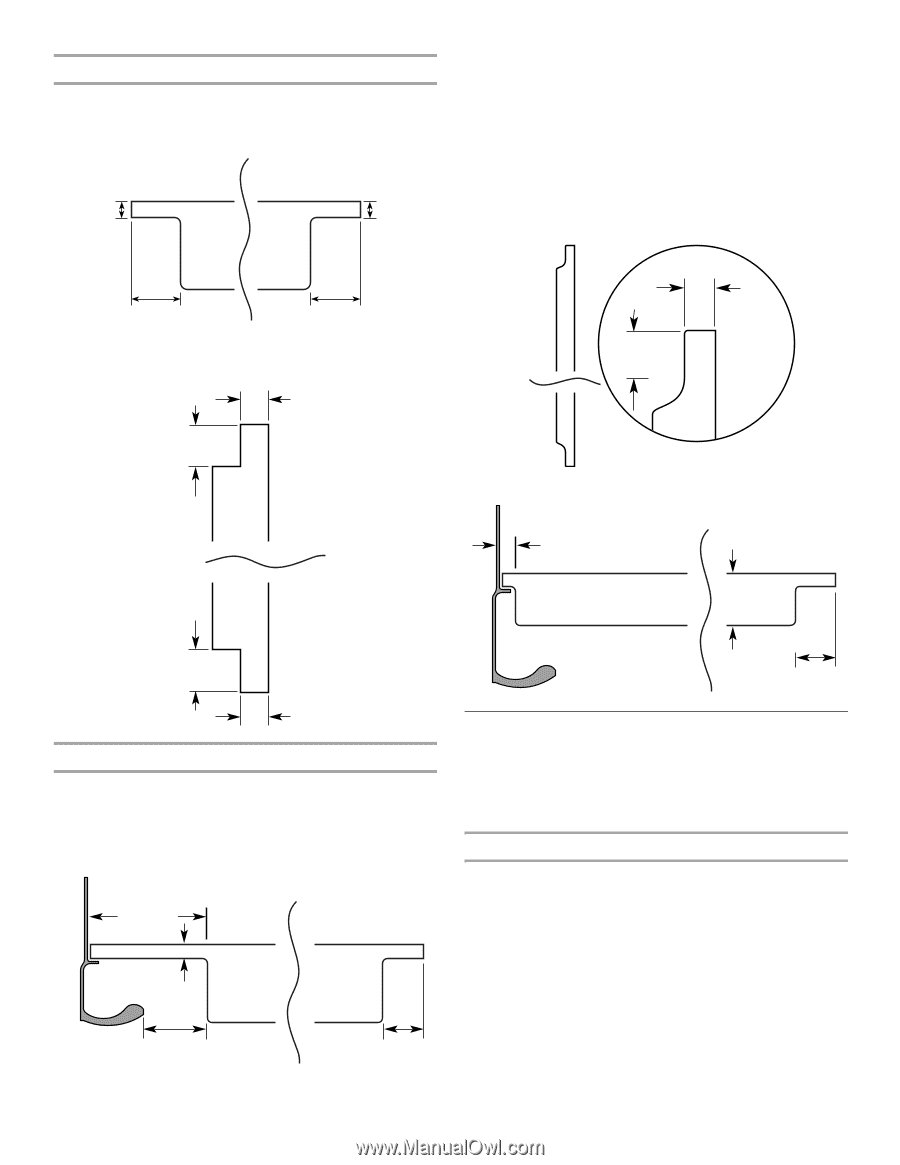
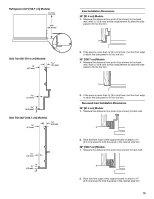
Top Grille Panel - Routing Requirements If the custom panels are thicker than ¹⁄₄" (6.35mm), the top and bottom edges of the top panel should be edge routed ¹⁄₂" (1.27 cm) and ³⁄₈" (9.5 mm), respectively. Both ends should be edge routed 2.2 cm) as shown. ¹⁄₄" (6.35 mm) max. Top Grille Top Grille ¹⁄₄" (6.35 mm) max. If an extended handle kit is used, rout the handle side ¹⁄₄" (6.35 mm). All other routing dimensions would remain the same as the standard handle. Make sure your product location will allow doors with extended handles to be opened to 90 degrees. See "Door Swing Dimensions." For more information on ordering extended handles, see "Classic Series Factory Panels and Kits." NOTE: For both types of handles, rout the top and bottom edges of the refrigerator panel ¹⁄₂" (1.27 cm). Rout the bottom of the freezer panel ¹⁄₂" (1.27 cm). Door Panel - Side View ⁷⁄₈" (2.2 cm) ⁷⁄₈" (2.2 cm) NOTE: When creating a panel with face detail, the offsets will be hidden and must be accounted for in order to center the detail in the top grille. ¹⁄₄" (6.35 mm) max. ¹⁄₂" Top (1.3 cm) min. Panel ¹⁄₂" (1.3 cm) min. Extended Handle - Top View Center face detail between offsets ¹⁄₄" (6.35 mm) Door Panel ¹⁄₄" (6.35 mm) max. 1" (2.54 cm) max Hinge Side Door Panel Handle Handle ³⁄₈" (9.5 mm) min. Bottom ¹⁄₄" (6.35 mm) max. Door Panel - Routing Requirements If the custom panels are thicker than ¹⁄₄" (6.35 mm), then all edges of the panels must be routed. If the standard handle is used, rout the entire handle side of both panels 3¹⁄₄" (8.25 cm) to allow for finger clearance. Then rout the hinge side of the refrigerator panel 1" (2.54 cm). Rout both sides of the freezer panel 1" (2.54 cm). Standard Handle - Top View 3¹⁄₄" (8.25 cm) min. Hinge Side ¹⁄₄" (6.35 mm) max. Door Panel Door Panel 1" (2.54 cm) Classic and Architect® Series Custom Side Panels Custom side panels may be needed when not enough space is available to have cabinets on both sides of the refrigerator or when the refrigerator is placed and the end of a cabinet run. You may choose an Inset, Flush, or Recessed Inset panel installation. Refrigerator and Side Trim Dimensions The width and height of a side panel are determined by the type of installation you are planning. NOTES: ■ The dimensions shown are actual product dimensions and may not reflect the needed panel installation dimensions. ■ The side panel should be a minimum of ¹⁄₂" (1.27 cm) thick to avoid warping. ■ If the opening depth is 25" (63.5 cm) or more, you may want to install a support board on the rear wall. 2" (5 cm) min. 1" (2.54 cm) 17
-
 1
1 -
2
-
3
-
4
-
5
-
6
-
7
-
8
-
9
-
10
-
11
-
 12
12 -
 13
13 -
 14
14 -
 15
15 -
 16
16 -
 17
17 -
 18
18 -
 19
19 -
 20
20 -
 21
21 -
 22
22 -
23
-
24
-
25
-
26
-
27
-
28
-
29
-
30
-
31
-
32
-
33
-
34
-
35
-
36
-
37
-
38
-
39
-
40
-
41
-
42
-
43
-
44
-
45
-
46
-
47
-
48
-
49
-
50
-
51
-
52
-
53
-
54
-
55
-
56
-
57
-
58
-
59
-
60
-
61
-
62
-
63
-
64
-
65
-
66
-
67
-
68
-
69
-
70
-
71
-
72
-
73
-
74
-
75
-
76
-
77
-
78
-
79
-
80
-
81
-
82
-
83
-
84
 |
 |