KitchenAid KERA205PWH User Guide
KitchenAid KERA205PWH - 30 Inch Electric Range Manual
 |
View all KitchenAid KERA205PWH manuals
Add to My Manuals
Save this manual to your list of manuals |
KitchenAid KERA205PWH manual content summary:
- KitchenAid KERA205PWH | User Guide - Page 1
ELECTRIC RANGE Use & Care Guide For questions about features, operation/performance, parts, accessories or service, call: 1-800-422-1230 or visit our website at www.kitchenaid.com Table of Contents...2 Models KERI201 KERI203 KERA205 W10017760 - KitchenAid KERA205PWH | User Guide - Page 2
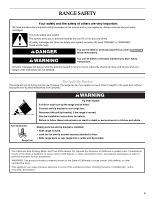
TABLE OF CONTENTS RANGE SAFETY 3 The Anti-Tip Bracket 3 PARTS AND FEATURES 5 COOKTOP USE 7 Ceramic Glass 7 Cookware 7 Cooking 21 RANGE CARE 22 Self-Cleaning Cycle 22 General Cleaning 23 Oven Light(s 24 Storage Drawer 25 Oven Door 25 TROUBLESHOOTING 26 ASSISTANCE OR SERVICE 27 WARRANTY - KitchenAid KERA205PWH | User Guide - Page 3
to follow these instructions can result in death or serious burns to children and adults. Anti-Tip Bracket Range Foot Making sure the anti-tip bracket is installed: • Slide range forward. • Look for the anti-tip bracket securely attached to floor. • Slide range back so rear range foot is under - KitchenAid KERA205PWH | User Guide - Page 4
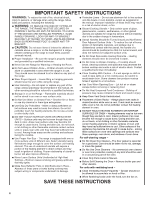
Proper Apparel - Loose-fitting or hanging garments should never be worn while using the range. s User Servicing - Do not repair or replace any part of the range unless specifically recommended in the manual. All other servicing should be referred to a qualified technician. s Storage in or on the - KitchenAid KERA205PWH | User Guide - Page 5
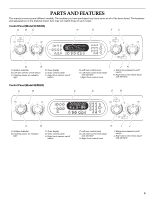
PARTS AND FEATURES This manual covers several different models. The cooktop you have purchased may have some or all of the items listed. The locations and appearances of the features - KitchenAid KERA205PWH | User Guide - Page 6
Oven display D. Oven control panel E. Right front simmer on/off switch Range F. Left rear control knob G. Left front control knob (dualsize element) I. Hot surface indicator lights (on some models) J. Automatic oven light K. Door gasket L. Broil element (not shown) M. Bake element (not shown) ( - KitchenAid KERA205PWH | User Guide - Page 7
such as plastic or aluminum foil, to touch any part of the entire cooktop. s Do not use the cooktop Use the following chart as a guide for cookware material characteristics. COOKWARE CHARACTERISTICS Heats very quickly and evenly. s Follow manufacturer's instructions. s Use on low heat settings. s - KitchenAid KERA205PWH | User Guide - Page 8
so can result in death or fire. Use the following chart as a guide when setting heat levels. SETTING RECOMMENDED USE Dual-Size Element s Large-diameter cookware and LO. Push in and turn to setting. OFF Lo Hi REMEMBER: When range is in use or (on some models) during the Self-Cleaning cycle, - KitchenAid KERA205PWH | User Guide - Page 9
cooking areas or elements will function as usual. When this feature is on, the wattage to the burner is significantly reduced. It provides a wide range of temperatures for simmering. Choose from the higher levels for stocks and water-based foods or the lower levels for sauces, puddings and gravies - KitchenAid KERA205PWH | User Guide - Page 10
ELECTRONIC OVEN CONTROL Style 1 Electronic Oven Control (Convection - Model KERA205) B C D E F G AM CLEAN TIME NIGHT PM A F PROBE TEMP LIGHT MIN HR SEC MIN C DELAY ON HR MIN CONTROL LOCKED COOK TIME START TIME STOP TIME MED LOW HI H I J K L M A. Convection oven settings B. - KitchenAid KERA205PWH | User Guide - Page 11
Style 3 Electronic Oven Control (Non-Convection - Model KERI201) AB CD E F A. Oven settings B. Proof bread setting C. Oven display D. Clock/time of day display E. Number pads G HI J K F. Options selection pad G. Self-clean H. Cook time (length of cooking time) I. Stop time L MN J. Timer - KitchenAid KERA205PWH | User Guide - Page 12
use a thermometer to measure oven temperature because opening the oven door during cycling may give incorrect readings. The oven provides accurate oven will be warmer by the displayed amount. Use the following chart as a guide. Fahrenheit and Celsius Press options, then 1 on the keypad for Celsius. - KitchenAid KERA205PWH | User Guide - Page 13
a thermometer to measure oven temperature because opening the oven door during cycling may give incorrect readings. The oven provides accurate oven will be warmer by the displayed amount. Use the following chart as a guide. Fahrenheit and Celsius Press options, then 1 on the keypad for Fahrenheit. - KitchenAid KERA205PWH | User Guide - Page 14
the following chart as a guide. BAKEWARE/ RESULTS RECOMMENDATIONS Light stone s Crisp crusts s Follow manufacturer's instructions. Ovenproof glassware, ceramic glass or ceramic s doneness. A meat thermometer is not supplied with this appliance. s Insert the thermometer into the center of the - KitchenAid KERA205PWH | User Guide - Page 15
2" (5 cm) of space around bakeware and oven walls. Use the following chart as a guide. NUMBER POSITION ON RACK OF PAN(S) 1 Center of rack. 2 Side by side or in 30 seconds to 2 minutes. It will come back on once the door is closed. To Bake or Roast: Before baking and roasting, position racks - KitchenAid KERA205PWH | User Guide - Page 16
models) s Use only the broiler pan and grid provided with the range. It is designed to drain juices and help avoid spatter and the broiler pan, then place it in the center of the oven rack. Close the door to the broil stop position to ensure proper broiling operation. OR (On some models) press - KitchenAid KERA205PWH | User Guide - Page 17
and crisping. s Keep heat loss to a minimum by opening the oven door only when necessary. s Choose cookie sheets without sides and roasting pans the end of a non-delayed cook time. Use the following chart as a guide. SETTING FOODS MEATS Baked potatoes, Chicken: whole and pieces Meat loaf, Roasts: - KitchenAid KERA205PWH | User Guide - Page 18
while the fan constantly circulates the hot air. If the oven door is opened during convection roasting, the convection fan will turn off the number pads to enter a temperature other than 325°F (163°C). The convection roast range can be set between 170°F and 500°F (77°C and 260°C). 2. Press START. - KitchenAid KERA205PWH | User Guide - Page 19
. Close the door. 1. Press CONVECT BROIL. Press the number pads to enter a temperature other than 450°F (260°C) (style 1) or 500°F (260°C) (styles 2 and 3). The convection broil range can be set between 300°F and 500°F (149°C and 260°C). 2. Press START. Allow the oven to preheat for 5 minutes. Style - KitchenAid KERA205PWH | User Guide - Page 20
also be set to keep the oven on for only part of the Sabbath. When the Sabbath Mode is set, display throughout the Sabbath Mode. When the oven door is opened or closed, the oven light will to enter a temperature other than 325°F (163°C). The bake range can be set between 170°F and 500°F (77°C and - KitchenAid KERA205PWH | User Guide - Page 21
2, then place broiler pan on guide 1. See "Positioning Racks and Bakeware" for diagram. Put 2 cups (500 mL) of boiling water in the broiler pan. Close the door. 1. Press BREAD PROOF. Style 1: The display will show 100°F (37°C). Styles 2 and 3: The display will show "brd." 2. Press START. Let the - KitchenAid KERA205PWH | User Guide - Page 22
RANGE Failure to follow these instructions can result in burns. and more smoke. Keep the kitchen well-ventilated during the Self- clean, rub, damage or move the oven door gasket. The door gasket is essential for a good seal. . Use the following charts as a guide to determine the desired cleaning level. - KitchenAid KERA205PWH | User Guide - Page 23
2. Press START. The oven door will automatically lock and "DOOR LOCKED" or "LOCKED," the start . Always follow label instructions on cleaning products. as soon as the entire appliance is cool. These spills may Polish (sample included): See "Assistance or Service" section to order. s Liquid detergent - KitchenAid KERA205PWH | User Guide - Page 24
this happens, a light coating of vegetable oil applied to the rack guides will help them slide. s Steel-wool pad BROILER PAN AND GRID instructions. Porcelain enamel only, not chrome s Dishwasher Oven Light(s) The oven light(s) is a 40-watt appliance bulb. The light(s) will come on when the oven door - KitchenAid KERA205PWH | User Guide - Page 25
pull it away from the oven door frame. Oven Door For normal range use, it is not suggested to remove the oven door. However, if removal is necessary, make sure the oven is off and cool. Then, follow these instructions. The oven door is heavy. To Remove: 1. Open oven door all the way. 2. Flip up the - KitchenAid KERA205PWH | User Guide - Page 26
"Cooktop Controls" section. s Is the appliance level? Level the appliance. See the Installation Instructions. Oven will not operate s Is the , call for service. See "Assistance or Service" section. Self-Cleaning cycle will not operate s Is the oven door open? Close the oven door all the way - KitchenAid KERA205PWH | User Guide - Page 27
calling for assistance or service, please check "Troubleshooting." It may save you the cost of a service call. If you still need help, follow the instructions below. When calling, please know the purchase date and the complete model and serial number of your appliance. This information will help - KitchenAid KERA205PWH | User Guide - Page 28
, when this major appliance is operated and maintained according to instructions attached to or furnished with the product, KitchenAid or KitchenAid Canada (hereafter "KitchenAid") will pay for factory specified parts and repair labor to correct defects in materials or workmanship. Service must be
-
 1
1 -
 2
2 -
 3
3 -
 4
4 -
 5
5 -
 6
6 -
 7
7 -
8
-
9
-
10
-
11
-
12
-
13
-
14
-
15
-
16
-
17
-
18
-
19
-
20
-
21
-
22
-
23
-
24
-
25
-
26
-
27
-
28
 |
 |
ELECTRIC RANGE
Use & Care Guide
For questions about features, operation/performance, parts, accessories or service, call:
1-800-422-1230
or visit our website at
www.kitchenaid.com
Table of Contents
............................................................................................................
2
Models KERI201 KERI203 KERA205
W10017760