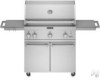
KitchenAid KFRS361TSS User Guide - Page 11
Installation Instructions - weight
 |
View all KitchenAid KFRS361TSS manuals
Add to My Manuals
Save this manual to your list of manuals |
Page 11 highlights
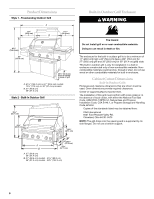
INSTALLATION INSTRUCTIONS Style 1 - Freestanding Outdoor Grill Installation WARNING Excessive Weight Hazard Use two or more people to move and install grill. Failure to do so can result in back or other injury. Attach Cabinet Doors (on some models) 1. Remove foam wrapping from both cabinet doors. 2. Position hinge pins on the door with the hinge brackets on the cabinet. Gently push down to slide the pins into place. 1. Unpack grill. Remove all packaging materials and remove grill from wooden skid. 2. Move grill into desired outdoor location. 3. Open the hood. Attach Side Shelf (on some models) 4. Open doors below grill and remove carton. Unpack side shelf. 5. Locate 4 screws. Install 2 screws in the top 2 holes on each side of the grill. Leave screws away from side of grill about ¼" (0.64 cm). A B A. Door hinge pin B. Hinge bracket 6. Install side shelf on left side of the grill. Position the side shelf so that the large end of the keyhole slots are over the screws. Place shelf onto the 2 mounting screws. Let the shelf slide down so the screws are in the narrow neck of the slots. A Remove Packaging Material Inside the Grill 1. Cut the tiedowns holding the grates together. 2. Remove condiment shelf, warming shelf and grill grates from inside the grill and remove packaging material. 3. Remove foam block and wrap from inside the grill. A B B C D A. Top of side shelf B. Keyhole slot C. Front of side shelf D. Side of grill 7. Install the bottom 2 screws and tighten. 8. Tighten the top 2 screws. A. Foam block B. Foam wrap 4. Replace the grill grates. 11
-
 1
1 -
2
-
3
-
4
-
5
-
 6
6 -
 7
7 -
 8
8 -
 9
9 -
 10
10 -
 11
11 -
 12
12 -
 13
13 -
 14
14 -
 15
15 -
 16
16 -
17
-
18
-
19
-
20
-
21
-
22
-
23
-
24
-
25
-
26
-
27
-
28
-
29
-
30
-
31
-
32
-
33
-
34
-
35
-
36
-
37
-
38
-
39
-
40
-
41
-
42
-
43
-
44
-
45
-
46
-
47
-
48
-
49
-
50
-
51
-
52
-
53
-
54
-
55
-
56
-
57
-
58
-
59
-
60
 |
 |
