KitchenAid KGCU463VSS Installation Guide - Page 9
Installation Instructions - parts
 |
UPC - 883049155975
View all KitchenAid KGCU463VSS manuals
Add to My Manuals
Save this manual to your list of manuals |
Page 9 highlights
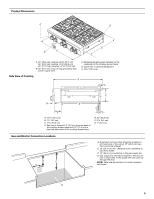
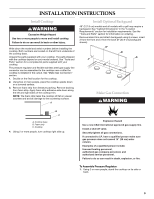
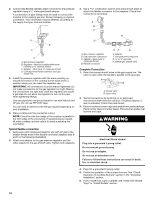
INSTALLATION INSTRUCTIONS Install Cooktop WARNING Excessive Weight Hazard Use two or more people to move and install cooktop. Failure to do so can result in back or other injury. Write down the model and serial numbers before installing the cooktop. Both numbers are located on the left front underside of the cooktop base. Unpack the parts supplied with your cooktop. The parts shipped with the cooktop depend on your model ordered. See "Tools and Parts" section for a complete list parts supplied with your cooktop. The pressure regulator and flexible stainless steel gas supply line connector can be assembled to the cooktop now or after the cooktop is installed in the cutout. See "Make Gas Connection" section. 1. Decide on the final location for the cooktop. 2. Using two or more people, place the cooktop upside down on a covered surface. 3. Remove foam strip from literature packing. Remove backing from foam strip. Apply foam strip adhesive-side down along the left and right sides of the cooktop trim. NOTE: The foam strip helps the cooktop sit flat on uneven counters and avoids damage to the countertop surface. A Install Optional Backguard 48" (121.9 cm) models and all models with a grill may require a backguard. See "Cabinet Dimensions" in the "Location Requirements" section for installation requirements. See the "Tools and Parts" section for information on ordering. Remove island trim and attach backguard using 6 screws, insert 3 from the front and 3 from the back (9" [22.9 cm] backguard shown). Make Gas Connection WARNING B C A. Cooktop base B. Foam strip C. Cooktop 4. Using 2 or more people, turn cooktop right side up. Explosion Hazard Use a new CSA International approved gas supply line. Install a shut-off valve. Securely tighten all gas connections. If connected to LP, have a qualified person make sure gas pressure does not exceed 14" (36 cm) water column. Examples of a qualified person include: licensed heating personnel, authorized gas company personnel, and authorized service personnel. Failure to do so can result in death, explosion, or fire. To Assemble Pressure Regulator: 1. Using 2 or more people, stand the cooktop on its side or back. 9
-
 1
1 -
2
-
3
-
 4
4 -
 5
5 -
 6
6 -
 7
7 -
 8
8 -
 9
9 -
 10
10 -
 11
11 -
 12
12 -
 13
13 -
 14
14 -
15
-
16
-
17
-
18
-
19
-
20
-
21
-
22
-
23
-
24
-
25
-
26
-
27
-
28
-
29
-
30
-
31
-
32
-
33
-
34
-
35
-
36
-
37
-
38
-
39
-
40
 |
 |
