KitchenAid KGRS505XSS Installation Guide - Page 12
Unscrew and remove the cover over the orifice.
 |
UPC - 883049199481
View all KitchenAid KGRS505XSS manuals
Add to My Manuals
Save this manual to your list of manuals |
Page 12 highlights
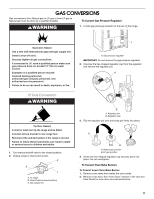
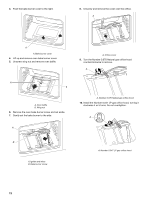
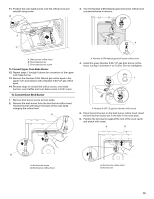
3. Push the bake burner cover to the right. 8. Unscrew and remove the cover over the orifice. A A A. Bake burner cover 4. Lift up and remove oven bake burner cover. 5. Unscrew wing nut and remove oven baffle. A B A. Oven baffle B. Wing nut 6. Remove the oven bake burner screw and set aside. 7. Gently set the bake burner to the side. A A. Orifice cover 9. Turn the Number 0.070 Natural gas orifice hood counterclockwise to remove. A A. Number 0.070 Natural gas orifice hood 10. Install the Number 0.047 LP gas orifice hood, turning it clockwise 4 or 5 turns. Do not overtighten. A B A. Igniter and wires B. Bake burner screw A. Number 0.047 LP gas orifice hood 12
-
 1
1 -
2
-
3
-
4
-
5
-
6
-
 7
7 -
 8
8 -
 9
9 -
 10
10 -
 11
11 -
 12
12 -
 13
13 -
 14
14 -
 15
15 -
 16
16 -
 17
17 -
18
-
19
-
20
-
21
-
22
-
23
-
24
-
25
-
26
-
27
-
28
-
29
-
30
-
31
-
32
-
33
-
34
-
35
-
36
-
37
-
38
-
39
-
40
 |
 |
12
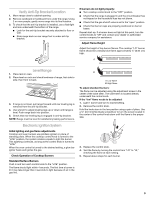
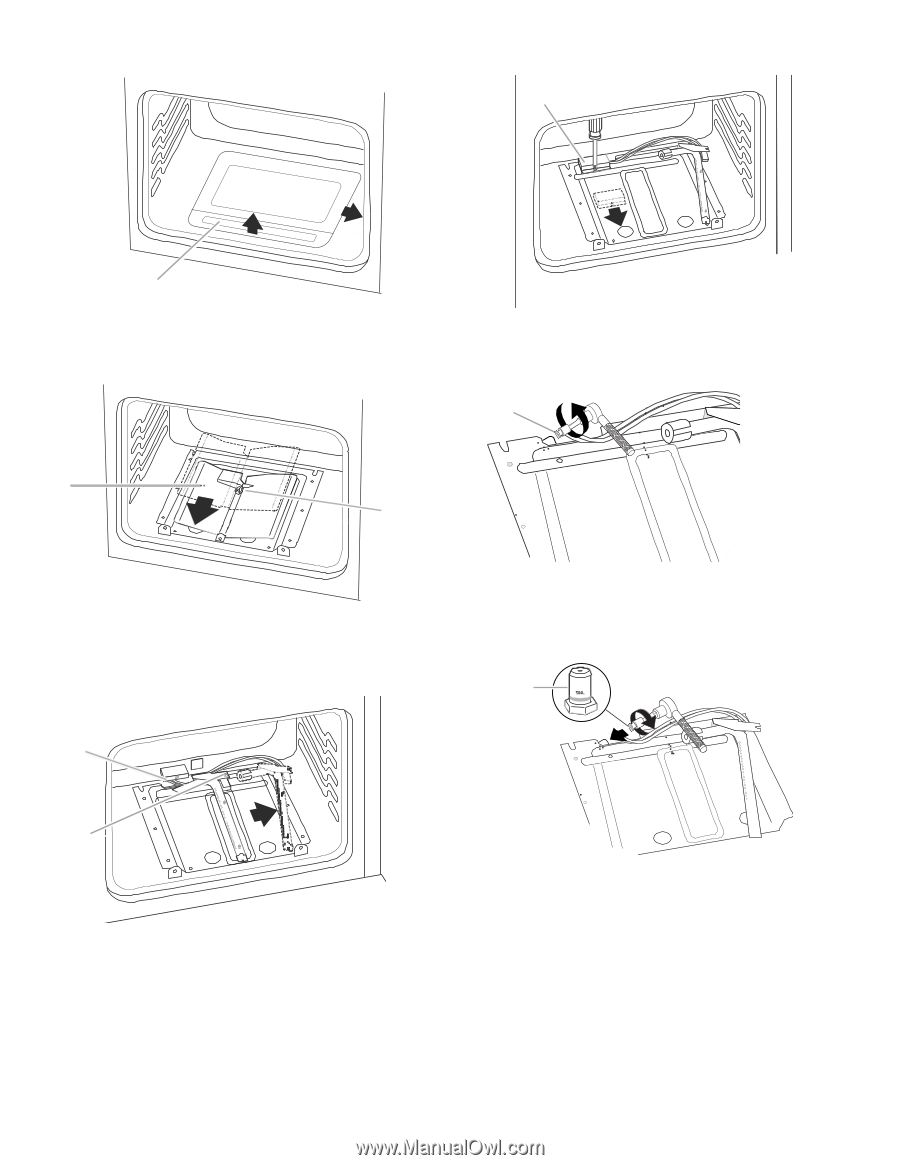
3.
Push the bake burner cover to the right.
4.
Lift up and remove oven bake burner cover.
5.
Unscrew wing nut and remove oven baffle.
6.
Remove the oven bake burner screw and set aside.
7.
Gently set the bake burner to the side.
8.
Unscrew and remove the cover over the orifice.
9.
Turn the Number 0.070 Natural gas orifice hood
counterclockwise to remove.
10.
Install the Number 0.047 LP gas orifice hood, turning it
clockwise 4 or 5 turns. Do not overtighten.
A. Bake burner cover
A. Oven baffle
B. Wing nut
A. Igniter and wires
B. Bake burner screw
A
A
B
A
B
A. Orifice cover
A. Number 0.070 Natural gas orifice hood
A. Number 0.047 LP gas orifice hood
A
A
A