KitchenAid KUBR314KSS Owners Manual - Page 6
Custom Overlay Panel Installation
 |
View all KitchenAid KUBR314KSS manuals
Add to My Manuals
Save this manual to your list of manuals |
Page 6 highlights
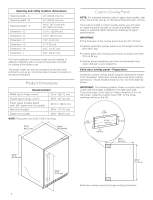
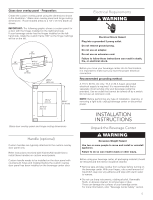
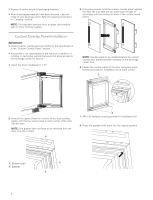
Dispose of and/or recycle all packaging materials. After all packaging materials have been removed, clean the inside of your beverage center. Refer the cleaning instructions in "Cleaning" section. NOTE: For standard stainless steel or glass door models, skip to "Door Closing" section. 3. Using two people, hold the custom overlay panel against the door. Be sure that the top and bottom hinges fit accurately into the routing on back of the custom wood panel. Custom Overlay Panel Installation IMPORTANT: Create custom overlay panel according to the specifications in the "Custom Overlay Panel" section. KitchenAid is not responsible for the removal or addition of molding or decorative panels that would not allow access to the beverage center for service. 1. Open the door completely to 115°. 115° NOTE: Handle needs to be installed before the custom overlay door panel has been installed on the beverage center door. 4. Fasten the custom panel to the door using two wood screws (provided in installation kit) at each corner. A 2. Remove the gasket from the corners of the door, pulling gently until the two screw holes in each corner of the door can be seen. NOTE: The gasket does not have to be removed from the door, only the corners. A A A. M4 x 30 flathead screws (provided in installation kit) 5. Press the gasket firmly back into it's original position. A. Screw holes B. Gasket A B 6
-
 1
1 -
 2
2 -
 3
3 -
 4
4 -
 5
5 -
 6
6 -
 7
7 -
 8
8 -
 9
9 -
 10
10 -
 11
11 -
 12
12 -
13
-
14
-
15
-
16
-
17
-
18
-
19
-
20
-
21
-
22
-
23
-
24
-
25
-
26
-
27
-
28
-
29
-
30
-
31
-
32
-
33
-
34
-
35
-
36
-
37
-
38
-
39
-
40
 |
 |
