KitchenAid KUWL304CSS Use & Care Guide - Page 13
Ice Maker Use - refrigerators
 |
View all KitchenAid KUWL304CSS manuals
Add to My Manuals
Save this manual to your list of manuals |
Page 13 highlights
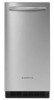
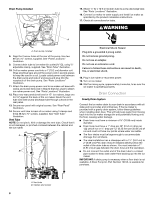
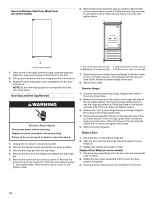
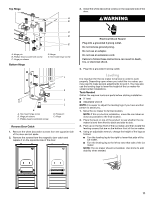
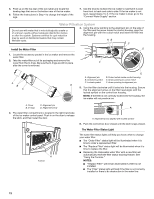
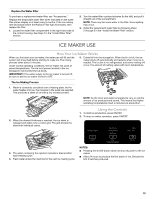
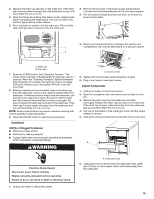
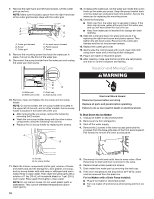
Replace the Water Filter To purchase a replacement water filter, see "Accessories." Replace the disposable water filter when indicated on the water filter status display or at least every 9 months. If the ice making rate decreases before the Replace Filter light illuminates, then replace the filter. 1. Locate the water filter compartment in the right-hand side of the control housing. See Step 3 in the "Install Water Filter" section. 2. Turn the water filter counterclockwise (to the left), and pull it straight out of the compartment. NOTE: There may be some water in the filter. Some spilling may occur. 3. Install the replacement water filter by following steps 2 through 5 in the "Install the Water Filter" section. ICE MAKER USE How Your Ice Maker Works When you first start your ice maker, the water pan will fill and the system will rinse itself before starting to make ice. The rinsing process takes about 5 minutes. Under normal operating conditions, the ice maker will cycle at preset temperatures. The ice level sensor located in the ice storage bin will monitor the ice levels. 5. Cubes fall into the storage bin. When the bin is full, the ice maker shuts off automatically and restarts when more ice is needed. The ice bin is not refrigerated, and some melting will occur. The amount of melting varies with room temperature. IMPORTANT: If the water supply to the ice maker is turned off, be sure to set the ice maker control to OFF. The Ice Making Process 1. Water is constantly circulated over a freezing plate. As the water freezes into ice, the minerals in the water are rejected. This produces a sheet of ice with a low mineral content. NOTE: As the room and water temperatures vary, so will the amount of ice produced and stored. This means that higher operating temperatures result in reduced ice production. 2. When the desired thickness is reached, the ice sheet is released and slides onto a cutter grid. The grid divides the sheet into individual cubes. Using the Controls 1. To start ice production, press ON/OFF. 2. To stop ice maker operation, press ON/OFF. 3. The water containing the rejected minerals is drained after each freezing cycle. 4. Fresh water enters the machine for the next ice making cycle. NOTES: ■ Pressing the On/Off button does not shut off power to the ice maker. ■ Allow 24 hours to produce the first batch of ice. Discard the first 2 batches produced. 13
-
 1
1 -
2
-
3
-
4
-
5
-
6
-
7
-
 8
8 -
 9
9 -
 10
10 -
 11
11 -
 12
12 -
 13
13 -
 14
14 -
 15
15 -
 16
16 -
 17
17 -
 18
18 -
19
-
20
-
21
-
22
-
23
-
24
-
25
-
26
-
27
-
28
-
29
-
30
-
31
-
32
-
33
-
34
-
35
-
36
-
37
-
38
-
39
-
40
-
41
-
42
-
43
-
44
-
45
-
46
-
47
-
48
-
49
-
50
-
51
-
52
-
53
-
54
-
55
-
56
-
57
-
58
-
59
-
60
-
61
-
62
-
63
-
64
-
65
-
66
-
67
-
68
 |
 |