KitchenAid KUWL304CSS Use & Care Guide - Page 4
Warning
 |
View all KitchenAid KUWL304CSS manuals
Add to My Manuals
Save this manual to your list of manuals |
Page 4 highlights
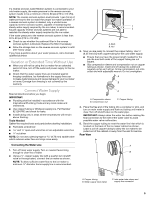
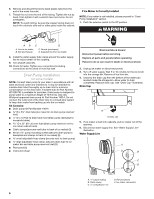
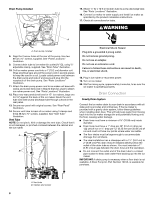
Location Requirements ■ To ensure proper ventilation for your ice maker, the front side must be completely unobstructed. The ice maker may be closed-in on the top and three sides, but the installation should allow the ice maker to be pulled forward for servicing if necessary. ■ Installation of the ice maker requires a cold water supply inlet of ¹⁄₄" (6.35 mm) OD soft copper tubing with a shutoff valve or a Whirlpool supply line Part Number 8212547RB, and a Whirlpool approved drain pump, Part Number 1901A, only to carry the water to an existing drain. ■ Choose a well ventilated area with temperatures above 55°F (13°C) and below 110°F (43°C). Best results are obtained between 70°F and 90°F (21ºC and 32°C). ■ The ice maker must be installed in an area sheltered from the elements, such as wind, rain, water spray, or drip. ■ When installing the ice maker under a counter, follow the recommended opening dimensions shown. Place electrical and plumbing fixtures in the recommended location as shown. NOTES: ■ Check that the power supply cord is not damaged, or pinched or kinked between the ice maker and the cabinet. ■ Check that the water supply line is not damaged, or pinched or kinked between the ice maker and the cabinet. ■ Check that the drain line (on some models) is not damaged, or pinched or kinked between the ice maker and the cabinet. ■ Check that the ice maker door is not flush with the standard cabinets to avoid problems with opening the ice maker door. 34" (86.4 cm) Min. 34¹⁄₂" (87.6 cm) Max. 11¹⁄₂" (29.2 cm) 3¹⁄₂" (8.9 cm) 9" (22.9 cm) 24" (60.1 cm) A 28¹⁄₂" (72.4 cm) B 15" (38.1 cm) A. Recommended location for electrical and plumbing fixtures B. Floor level ■ Choose a location where the floor is even. It is important for the ice maker to be level in order to work properly. If needed, you can adjust the height of the ice maker by changing the height of the leveling legs. See "Leveling." 4 Electrical Requirements WARNING Electrical Shock Hazard Plug into a grounded 3 prong outlet. Do not remove ground prong. Do not use an adapter. Do not use an extension cord. Failure to follow these instructions can result in death, fire, or electrical shock. Before you move your ice maker into its final location, it is important to make sure you have the proper electrical connection: A 115 volt, 60 Hz., AC only, 15- or 20-amp electrical supply, properly grounded in accordance with the National Electrical Code and local codes and ordinances, is required. It is recommended that a separate circuit, serving only your ice maker, be provided. Use a receptacle which cannot be turned off by a switch or pull chain. IMPORTANT: If this product is connected to a GFCI (Ground Fault Circuit Interrupter) equipped outlet, nuisance tripping of the power supply may occur, resulting in loss of cooling. Ice quality may be affected. If nuisance tripping has occurred, and if the condition of the ice appears poor, dispose of it. Recommended Grounding Method The ice maker must be grounded. The ice maker is equipped with a power supply cord having a 3 prong grounding plug. The cord must be plugged into a mating, 3 prong, grounding-type wall receptacle, grounded in accordance with the National Electrical Code and local codes and ordinances. If a mating wall receptacle is not available, it is the personal responsibility of the customer to have a properly grounded, 3 prong wall receptacle installed by a qualified electrician. Water Supply Requirements Check that the water supply lines are insulated against freezing conditions. Ice formations in the supply lines can increase water pressure and damage your ice maker or home. Damage from frozen supply lines is not covered by the warranty. A cold water supply with water pressure of between 30 and 120 psi (207 and 827 kPa) is required to operate the ice maker. If you have questions about your water pressure, call a licensed, qualified plumber. Reverse Osmosis Water Supply IMPORTANT: ■ A reverse osmosis water filtration system is not recommended for ice makers that have a drain pump installed. ■ For gravity drain systems only. ■ The pressure of the water supply coming out of a reverse osmosis system going to the water inlet valve of the ice maker needs to be between 30 and 120 psi (207 and 827 kPa).
-
 1
1 -
 2
2 -
 3
3 -
 4
4 -
 5
5 -
 6
6 -
 7
7 -
 8
8 -
 9
9 -
 10
10 -
11
-
12
-
13
-
14
-
15
-
16
-
17
-
18
-
19
-
20
-
21
-
22
-
23
-
24
-
25
-
26
-
27
-
28
-
29
-
30
-
31
-
32
-
33
-
34
-
35
-
36
-
37
-
38
-
39
-
40
-
41
-
42
-
43
-
44
-
45
-
46
-
47
-
48
-
49
-
50
-
51
-
52
-
53
-
54
-
55
-
56
-
57
-
58
-
59
-
60
-
61
-
62
-
63
-
64
-
65
-
66
-
67
-
68
 |
 |
