Kodak ATS Operation Manual
Kodak ATS - Ektagraphic III ATS Slide Projector Manual
 |
UPC - 041771070632
View all Kodak ATS manuals
Add to My Manuals
Save this manual to your list of manuals |
Kodak ATS manual content summary:
- Kodak ATS | Operation Manual - Page 1
Operating Manual KODAK EKTAGRAPHIC III Slide Projectors PRESENTATION TECHNOLOGIES - Kodak ATS | Operation Manual - Page 2
not disassemble this projector. Use a qualified service technician when service or repair is required. Incorrect reassembly can cause electric shock the next time the projector is used. 12. Use only safety electrical low-voltage (SELV) devices. 13. The use of an accessory attachment not recommended - Kodak ATS | Operation Manual - Page 3
Operating Manual KODAK EKTAGRAPHIC III Slide Projectors - Kodak ATS | Operation Manual - Page 4
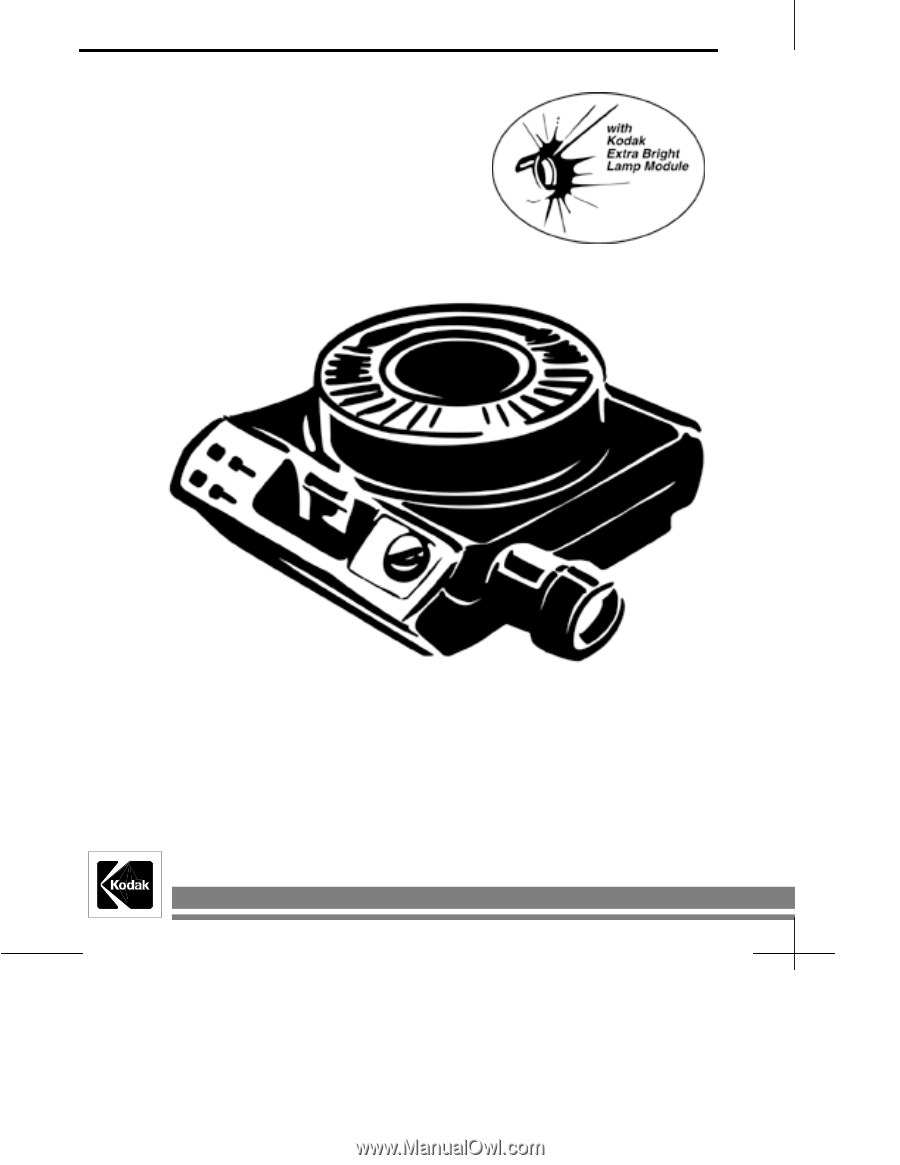
Congratulations! You have just purchased a KODAK EKTAGRAPHIC III Slide Projector with a KODAK Extra Bright Lamp Module. This new lamp module procides 30% greater light intensity so your images look brighter, richer and more saturated. This module features a " - Kodak ATS | Operation Manual - Page 5
Service 30 Appendix A 31 Serial Number The serial number of your projector is printed on the label affixed to the power cord retainer on the base of the projector. Record this number, as well as the model identification, date, and place of purchase, for future reference. KODAK EKTAGRAPHIC III Slide - Kodak ATS | Operation Manual - Page 6
Foot 5 - Elevating Adjustment Wheel 6 - Elevating Foot Release Button 7 - Lens 8 - Viewer (Model ATS) 9 - Focus Knob 10 - Autofocus (Models A, AMT, & ATS) 11 - Select Bar 12 - Timer (Models AMT & ATS) - Power Cord 24 - Power Cord Retainer 25 - Leveling Foot 2 KODAK EKTAGRAPHIC III Slide Projector - Kodak ATS | Operation Manual - Page 7
to read the instructions in this operating manual to become familiar with your KODAK EKTAGRAPHIC III Slide Projector and how to operate it properly. Operation Startup Models III BR and ABR Only Important Before you turn on your new KODAK EKTAGRAPHIC III BR or ABR Slide Projector, it is critical - Kodak ATS | Operation Manual - Page 8
used outside the United States of America, please use a proper adapter that ensures grounding and polarization. Although the Models III BR and ABR are approved to the standards of UL and CSA, they are not intended to meet approval in all countries worldwide. 4 KODAK EKTAGRAPHIC III Slide Projector - Kodak ATS | Operation Manual - Page 9
the remote-control receptacle, aligning the raised dot with the metallic rivet head. This receptacle also accepts plugs for accessories, such as Kodak dissolve controls. Plug the power cord into a grounded outlet with 110- to 125-volt 60 Hz current only. KODAK EKTAGRAPHIC III Slide Projector 5 - Kodak ATS | Operation Manual - Page 10
ring, invert the tray, and align the index hole with the index notch. Slide and hold the tray release latch in the direction of the arrow, and turn the bottom plate until the index hole and notch align. Then release the latch. 80-Slide Tray 140-Slide Tray 6 KODAK EKTAGRAPHIC III Slide Projector - Kodak ATS | Operation Manual - Page 11
the film's shiny side. Insert your first slide into the first slot in the tray so that the number is visible on the outer circumference of the tray. Insert your second slide in the second slot with the emulsion (dull side) facing your first slide, and so on. KODAK EKTAGRAPHIC III Slide Projector 7 - Kodak ATS | Operation Manual - Page 12
the inner circumference of the tray. Replace the lock ring by turning it clockwise until it is secure. When you use a dissolve control, put your slides into two trays (one for oddand one for even-numbered slides). 8 KODAK EKTAGRAPHIC III Slide Projector - Kodak ATS | Operation Manual - Page 13
80-slide tray in the zero position, the raised index mark is at slot 20. If you start with slide 6, it will align at slot 26. For a 140-slide tray in the zero position, the index mark is at slot 35. So, if you start with slide 12, it will align at slot 47. KODAK EKTAGRAPHIC III Slide Projector 9 - Kodak ATS | Operation Manual - Page 14
) handy in case the lamp burns out during a presentation. Replacing the entire module makes the change quick and easy. (See "Maintenance" on page 21 for instructions on changing the lamp module.) See your dealer in Kodak products to order this module. 10 KODAK EKTAGRAPHIC III Slide Projector - Kodak ATS | Operation Manual - Page 15
. Turn autofocus off if glass slides make the autofocus motor run continuously. Random Projection For random projection of any slide in the tray: • press and hold down the select bar, • rotate the tray to the desired slide, and • release the select bar. KODAK EKTAGRAPHIC III Slide Projector 11 - Kodak ATS | Operation Manual - Page 16
rear of the projector. Timer (Models AMT & ATS only) To time your slides, use the timer switch for slide changes from 3 to 22 seconds. To interrupt the timer, press either the forward or reverse button. For manual operation, slide the timer switch to Off. 12 KODAK EKTAGRAPHIC III Slide Projector - Kodak ATS | Operation Manual - Page 17
E Plus only) "ready" condition. In a dissolve program, it indicates that • both projectors are receiving power • both power switches are set at fan • both projection lamps are properly at 180˚. (See "Appendix A" for contact identification descriptions.) KODAK EKTAGRAPHIC III Slide Projector 13 - Kodak ATS | Operation Manual - Page 18
slide upside down into the projector gate. Push the slide all the way down. After viewing the slide, press forward, reverse, or the select bar to eject the slide. Selecting Slide Projection Lenses When buying is the best choice for glass-mounted slides. 1.UL- KODAK EKTAGRAPHIC III Slide Projector - Kodak ATS | Operation Manual - Page 19
beveled edges around the aperture. Kodak Premium Processing and Kodak Processing labs provide embossed mounts.) Lens Focal Length/ Use the illustration on the following page to help determine the lens focal Projector Distance length and projector distance. KODAK EKTAGRAPHIC III Slide Projector 15 - Kodak ATS | Operation Manual - Page 20
Operation L 75 mm 100 mm 125 mm 150 mm 175 mm 200 mm D 13.3' 17.7' 22.2' 26.6' 31.0' 35.4' 16 KODAK EKTAGRAPHIC III Slide Projector - Kodak ATS | Operation Manual - Page 21
to the slide you wish to remove. Firmly press and hold down the select bar to eject the slide. Adding a Slide When the lock ring is off, you can add a slide to any empty slot. (See "Front-Screen Projection" on page 7.) Replace and secure the lock ring. KODAK EKTAGRAPHIC III Slide Projector 17 - Kodak ATS | Operation Manual - Page 22
"Loading the Slide Tray" on page 6.) Put the tray aside. Remove the slide or object from the projector gate by pressing the forward button or removing the slide manually. Remount damaged slides to protect your projector and slides from subsequent damage. 18 KODAK EKTAGRAPHIC III Slide Projector - Kodak ATS | Operation Manual - Page 23
Viewer Grasp the viewer handle and pull it out from the base of the projector. It will pop into place. Slide the power switch to lamp to project your slides. Closing the Viewer To close the viewer, fold it and push it back into the body of the projector. KODAK EKTAGRAPHIC III Slide Projector 19 - Kodak ATS | Operation Manual - Page 24
manual for additional instructions and features. See your dealer in Kodak products for more information on Kodak dissolve controls. Shutdown To shut down, • remove and store the tray • slide the power switch to off Your projector will remain warm for several minutes. 20 KODAK EKTAGRAPHIC III Slide - Kodak ATS | Operation Manual - Page 25
above 125 volts greatly reduces the lamp life. • Unplug the projector before changing the lamp. • Allow for unrestricted flow of air to the exhaust vent to prolong lamp life. • Gently wipe off any fingerprints with a soft cloth moistened with rubbing alcohol. KODAK EKTAGRAPHIC III Slide Projector 21 - Kodak ATS | Operation Manual - Page 26
Maintenance Changing the Projection Lamp Slide the power switch to Off and unplug the projector. Allow the projector and lamp to cool for about 10 minutes. Push the lamp-module and push the lamp module all the way back into the projector until it latches. 22 KODAK EKTAGRAPHIC III Slide Projector - Kodak ATS | Operation Manual - Page 27
remove the screw. Using a flat-blade screwdriver, apply ample pressure to release each of the metal tabs. Lift off the top of the lamp module. KODAK EKTAGRAPHIC III Slide Projector 23 - Kodak ATS | Operation Manual - Page 28
. (Models without KODAK Extra Bright Clean both sides of the condenser lens and the heat-absorbing glass with a Lamp Module) soft, lint-free cloth. Do not leave fingerprints. Replace the lens and heat-absorbing glass to their original locations. 24 KODAK EKTAGRAPHIC III Slide Projector - Kodak ATS | Operation Manual - Page 29
into slots until all 7 tabs on the top and 2 on the bottom are secured. Insert the screw and tighten. Then insert and seat the lamp. KODAK EKTAGRAPHIC III Slide Projector 25 - Kodak ATS | Operation Manual - Page 30
the projector. Your projector has two thermal fuses that prevent overheating. If your projector will not operate, call the Kodak Information Center or Kodak in your country to obtain the name of a service center nearest you (see "How to Obtain Service" on page 30). 26 KODAK EKTAGRAPHIC III Slide - Kodak ATS | Operation Manual - Page 31
Troubleshooting Consult this guide before calling for service. PROBLEM Projector does not operate CAUSE No power to projector No illumination on screen with slide in Power switch on Off or Fan projector gate Lamp burned out Lamp not seated in socket Slide not in proper focus on screen focus. - Kodak ATS | Operation Manual - Page 32
mount or remount slide. Set projector on a stand equal with center of screen. Check lamp. Check condenser lens. Check slide position and slidemount condition. Reposition tray. See "Clearing a Gate Jam" on page 18. Reposition tray (see "Tray" on page 9). 28 KODAK EKTAGRAPHIC III Slide Projector - Kodak ATS | Operation Manual - Page 33
in your country for the KODAK EKTAGRAPHIC III ABR Slide Projector's warranty coverage. Limitations This warranty does not cover circumstances beyond Kodak's control, projector lamps, or problems caused by failure to follow the care and operating instructions in the manual. Any modification to the - Kodak ATS | Operation Manual - Page 34
How to Obtain Service Assistance Shipping Instructions U.S.: 1-800-242-2424 Canada: 1-800-465-6325 www.kodak.com/go/projectors To obtain service or for assistance in using your KODAK EKTAGRAPHIC Slide Projector, contact the Kodak Information Center at 1-800-242-2424, Monday through Friday, 8 a.m. - Kodak ATS | Operation Manual - Page 35
made at either receptacle will result in a reverse cycle. If a plug with a conducting shell is used, it is connected to the projector frame (chassis) through the special-application receptacle and to earth ground through the projector's power cable. KODAK EKTAGRAPHIC III Slide Projector 31 - Kodak ATS | Operation Manual - Page 36
- Kodak ATS | Operation Manual - Page 37
- Kodak ATS | Operation Manual - Page 38
Presentation Technologies EASTMAN KODKCOMPANY Rochester, New York 14650 www.kodak.com/go/projectors Kodak, Ektagraphic, and kodalux are trademarks. PRESENTATION TECHNOLOGIES Part No. 5B905 12/98 Revision ©EastmanKodak Company Printed In U.S.A.
-
 1
1 -
 2
2 -
 3
3 -
 4
4 -
 5
5 -
 6
6 -
 7
7 -
8
-
9
-
10
-
11
-
12
-
13
-
14
-
15
-
16
-
17
-
18
-
19
-
20
-
21
-
22
-
23
-
24
-
25
-
26
-
27
-
28
-
29
-
30
-
31
-
32
-
33
-
34
-
35
-
36
-
37
-
38
 |
 |
Operating Manual
PRESENTATION TECHNOLOGIES
KODAK
EKTAGRAPHIC III
Slide Projectors