Kodak ATS Operation Manual - Page 13
Removing a Tray, Raised Index Mark, press the, all the way down, align the, with
 |
UPC - 041771070632
View all Kodak ATS manuals
Add to My Manuals
Save this manual to your list of manuals |
Page 13 highlights
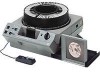
Operation Tray Place the loaded slide tray on the projector. Align the tray index bar with the gate index. The tray will drop into position. Removing the Tray To remove the slide tray: • press the select bar all the way down • align the tray index bar with the gate index. You can then lift off the tray. Raised Index Mark This feature allows you to coordinate tray starting positions for multiple-projector presentations. For an 80-slide tray in the zero position, the raised index mark is at slot 20. If you start with slide 6, it will align at slot 26. For a 140-slide tray in the zero position, the index mark is at slot 35. So, if you start with slide 12, it will align at slot 47. KODAK EKTAGRAPHIC III Slide Projector 9
-
 1
1 -
2
-
3
-
4
-
5
-
6
-
7
-
 8
8 -
 9
9 -
 10
10 -
 11
11 -
 12
12 -
 13
13 -
 14
14 -
 15
15 -
 16
16 -
 17
17 -
 18
18 -
19
-
20
-
21
-
22
-
23
-
24
-
25
-
26
-
27
-
28
-
29
-
30
-
31
-
32
-
33
-
34
-
35
-
36
-
37
-
38
 |
 |

KODAK EKTAGRAPHIC III Slide Projector
9
Operation
Tray
Place the loaded slide tray on the projector. Align the
tray index bar
with the
gate index
. The tray will drop into position.
Removing the Tray
To remove the slide tray:
•
press the
select bar
all the way down
•
align the
tray index bar
with the
gate
index
.
You can then lift off the tray.
Raised Index Mark
This feature allows you to
coordinate tray starting positions
for multiple-projector
presentations. For an 80-slide tray
in the zero position, the
raised
index mark
is at slot 20. If you
start with slide 6, it will align at
slot 26. For a 140-slide tray in the
zero position, the index mark is at
slot 35. So, if you start with
slide 12, it will align at slot 47.