Kodak ESP Office 6150 Extended User Guide - Page 11
Networking Your Printer, Connecting to a wireless network, Before you connect, Using the LCD keyboard - wireless setup
 |
View all Kodak ESP Office 6150 manuals
Add to My Manuals
Save this manual to your list of manuals |
Page 11 highlights
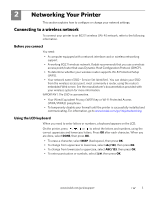
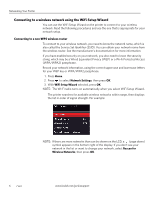
2 Networking Your Printer This section explains how to configure or change your network settings. Connecting to a wireless network To connect your printer to an 802.11 wireless (Wi-Fi) network, refer to the following information. Before you connect You need: • A computer equipped with a network interface card or wireless networking support. • A working 802.11 wireless network. Kodak recommends that you use a wireless access point/router that uses Dynamic Host Configuration Protocol (DHCP). • To determine whether your wireless router supports Wi-Fi Protected Setup (WPS). • Your network name (SSID - Service Set Identifier). You can obtain your SSID from the wireless access point, most commonly a router, using the router's embedded Web server. See the manufacturer's documentation provided with your wireless system for more information. IMPORTANT: The SSID is case sensitive. • Your Wired Equivalent Privacy (WEP) key or Wi-Fi Protected Access (WPA/WPA2) passphrase. • To temporarily disable your firewall until the printer is successfully installed and communicating. For information, go to www.kodak.com/go/inkjetnetworking. Using the LCD keyboard When you need to enter letters or numbers, a keyboard appears on the LCD. On the printer, press , , or to select the letters and numbers, using the correct uppercase and lowercase letters. Press OK after each character. When you are done, select DONE, then press OK. • To erase a character, select BKSP (backspace), then press OK. • To change from uppercase to lowercase, select abc/123, then press OK. • To change from lowercase to uppercase, select ABC/123, then press OK. • To enter punctuation or symbols, select !@#, then press OK. www.kodak.com/go/aiosupport 5
-
 1
1 -
2
-
3
-
4
-
5
-
 6
6 -
 7
7 -
 8
8 -
 9
9 -
 10
10 -
 11
11 -
 12
12 -
 13
13 -
 14
14 -
 15
15 -
 16
16 -
17
-
18
-
19
-
20
-
21
-
22
-
23
-
24
-
25
-
26
-
27
-
28
-
29
-
30
-
31
-
32
-
33
-
34
-
35
-
36
-
37
-
38
-
39
-
40
-
41
-
42
-
43
-
44
-
45
-
46
-
47
-
48
-
49
-
50
-
51
-
52
-
53
-
54
-
55
-
56
-
57
-
58
-
59
-
60
-
61
-
62
-
63
-
64
-
65
-
66
-
67
-
68
-
69
-
70
-
71
-
72
-
73
-
74
-
75
-
76
-
77
-
78
-
79
-
80
-
81
-
82
-
83
-
84
-
85
-
86
-
87
-
88
-
89
-
90
-
91
-
92
-
93
-
94
 |
 |
