Konica Minolta Fujitsu fi-6800 Getting Started - Page 6
Test-Scanning Documents, Launch ScandAll PRO.
 |
View all Konica Minolta Fujitsu fi-6800 manuals
Add to My Manuals
Save this manual to your list of manuals |
Page 6 highlights
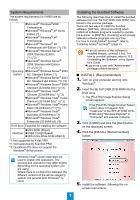
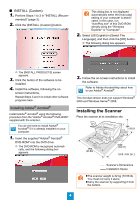
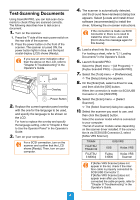
Test-Scanning Documents Using ScandAll PRO, you can test-scan documents to check if they are scanned correctly. The following describes how to test-scan a document: 1. Turn on the scanner. 1. Press the "I" side of the main power switch on the rear side of the scanner. 2. Press the power button on the front of the scanner. The scanner is turned ON, the power button lights in blue, and the liquid crystal display (LCD) shows [Ready]. If you see an error indication other than the above on the LCD, refer to "Chapter 8 Troubleshooting" in the Operator's Guide. LCD Menu Function /Enter Send to /Pause Check Clear /Back Stop Scan Counter iMFF Reset Eject Overlay Power Button 2. Replace the current operator panel overlay with the one for the language to be used, and specify the language to be shown on the LCD. For how to replace the overlay and specify the language setting, refer to "Chapter 4 How to Use the Operator Panel" in the Operator's Guide. 3. Turn on your computer. For a SCSI connection, turn on the scanner and confirm that the LCD shows [Ready]. Then, turn on your computer. 4. The scanner is automatically detected, and the [Found New Hardware] dialog box appears. Select [Locate and install driver software (recommended)] to install the driver, following the on-screen instructions. If the connection is made via SCSI Connector 2, there is no need to install the driver here. Just click [Don't show this message again for this device]. 5. Load a sheet into the scanner. For loading a sheet, refer to "2.1 Loading Documents" in the Operator's Guide. 6. Launch ScandAll PRO. Select the [Start] menu J [All Programs] J [Fujitsu ScandAll PRO] J [ScandAll PRO]. 7. Select the [Tool] menu J [Preferences]. D The [Setup] dialog box appears. 8. On the [Scan] tab, select a driver to use, and then click the [OK] button. When the connection is made via SCSI/USB Connector 2, click [ISIS/VRS]. 9. Select the [Scan] menu J [Select Scanner]. D The [Select Scanner] dialog box appears. 10. Select the scanner you want to use, and then click the [Select] button. Select the scanner model which is connected to your computer. The list of scanner models varies depending on the scanner driver installed. If the connection is via SCSI/USB Connector 2, select [Kofax VRS Scanner]. TWAIN FUJITSU TWAIN 32 FUJITSU fi-6800dj ISIS/VRS ISIS Kofax VRS Fujitsu fi-6800 Kofax VRS Scanner If [Kofax VRS Scanner] does not appear in the list, check if the interface cable is properly connected to SCSI/USB Connector 2. If [Kofax VRS Scanner] does not appear even after you have connected the cable properly, refer to "Chapter 8 Troubleshooting" in the Operator's Guide. 6
-
 1
1 -
 2
2 -
 3
3 -
 4
4 -
 5
5 -
 6
6 -
 7
7
 |
 |
