Konica Minolta bizhub C552 bizhub C452/C552/C652 Twain Driver User Manual - Page 19
Settings in the Main Window, Importing Images, TWAIN driver
 |
View all Konica Minolta bizhub C552 manuals
Add to My Manuals
Save this manual to your list of manuals |
Page 19 highlights
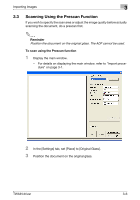
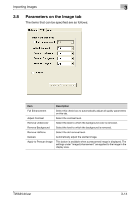
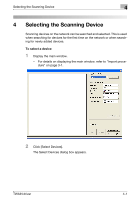
Importing Images 3 3.6 Settings in the Main Window The following settings and operations are available from the main window. 23 1 4 56 7 8 No. Item 1 Save/Restore Setting 2 Settings 3 Image 4 Area 5 PUSH Scan 6 Scan 7 Prescan 8 Select Devices Description Settings can be saved and loaded at a later time. Set basic scan parameters. For details, refer to "Parameters on the Settings tab" on page 3-12. Set image-processing parameters. For details, refer to "Parameters on the Image tab" on page 3-14. Specify the area to be scanned. For details, refer to "Parameters on the Area tab" on page 3-15. Select this check box to start scanning when the [Start] key in the control panel is pressed. Begins scanning the selected document. When the document is placed on the glass, a preview of the scanned image can be shown at a coarse resolution. Documents can be scanned efficiently by performing a prescan and adjusting the image or specifying an area to be scanned before clicking [Scan]. Click this button to change the scanning device. For details, refer to "Selecting the Scanning Device" on page 4-1. TWAIN driver 3-11
-
 1
1 -
2
-
3
-
4
-
5
-
6
-
7
-
8
-
9
-
10
-
11
-
12
-
13
-
 14
14 -
 15
15 -
 16
16 -
 17
17 -
 18
18 -
 19
19 -
 20
20 -
 21
21 -
 22
22 -
 23
23 -
 24
24 -
25
-
26
-
27
-
28
-
29
-
30
-
31
 |
 |
