Kyocera KM-C830D KM-C830 Operation Guide Rev-1B - Page 19
Duplex Unit indicator
 |
View all Kyocera KM-C830D manuals
Add to My Manuals
Save this manual to your list of manuals |
Page 19 highlights
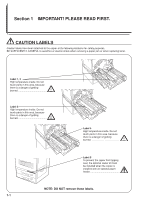
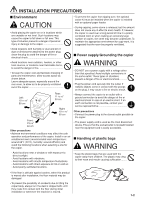
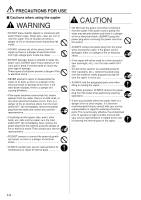
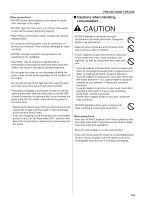
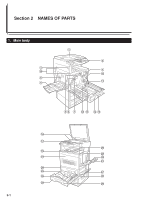
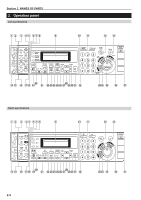
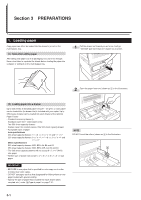
1 Original cover (Open/close this cover when you are setting the original on the platen.) 2 Operation panel (Perform copy operations here.) 3 Main switch (Turn this switch ON ( | ) before copying.) 4 Toner container (black) 5 Toner container (yellow) 6 Toner container (magenta) 7 Toner container (cyan) 8 Left cover (Open this cover if a paper misfeed occurs in the paper conveyor section.) 9 Copy eject tray (Finished copies can be ejected and stored on this tray.) 0 Transfer unit release lever (Operate this lever if a paper misfeed occurs in the transfer section.) ! Transfer unit @ Waste toner tank # Oil roller unit $ Paper conveyor % Paper conveyor release lever (Operate this lever if a paper misfeed occurs in the paper conveyor section or during cleaning operations.) ^ Original size indicator lines (Be sure to align the original with these lines when setting an original on the platen.) & Platen (Set originals here for copying. Lay originals face-down and align the edges with the size indicator lines located on the left and rear sides of the platen.) * Copy storage table (Finished copies can be ejected and stored on this table.) ( Front cover (Open this cover if a paper misfeed occurs inside the copier, when you need to replace a toner cartridge, the waste toner tank or the oil roller, as well as during cleaning operations.) ) Multi-bypass tray ⁄ Multi-bypass extension (Pull out this extension when copying onto 8 1/2" x 11" [A4R] size paper or larger.) ¤ Insert guides (Align these guides to fit the width of the paper that is to be set on the multi-bypass tray.) ‹ No.2 drawer (This drawer has a storage capacity of 500 sheets of copy paper.) › No.1 drawer (in standard copiers [for 1-sided copies only]) (This drawer has a storage capacity of 500 sheets of copy paper.) Duplex Unit (in duplex copiers [for 2-sided copies]) (This unit allows you to make duplex [2-sided] copies.) Section 2 NAMES OF PARTS fi Paper length guide release levers (Pinch these levers and adjust the guide plate to fit the length of the paper that is to be loaded in that drawer.) fl Paper width guide release levers (Pinch these levers and adjust the guide plates to fit the width of the paper that is to be loaded in that drawer.) ‡ Right side drawer cover (Open this cover if a paper misfeed occurs in the paper feed section.) - Handles for transport (Pull these bars out - there are two on both the left and right sides of the copier - in order to use them as handles.) · Paper size indicator (This indicator will remain out until the corresponding drawer has been selected. Once the drawer is selected, the indicator will light when there is paper loaded in that drawer, and it will blink when the drawer is empty or when a paper jam has occurred in that drawer.) , Paper size indicator (in standard copiers [for 1-sided copies only]) (This indicator will remain out until the corresponding drawer has been selected. Once the drawer is selected, the indicator will light when there is paper loaded in that drawer, and it will blink when the drawer is empty or if a paper jam has occurred in that drawer.) Duplex Unit indicator (in duplex copiers [for 2-sided copies]) (This indicator will light when any one of the 2-sided copy modes is selected, and it will blink if a paper jam has occurred in the Duplex Unit. The indicator will remain out as long as the 2-sided copy modes are not in use.) * The illustrations used in this guide show the copier with the optional Paper Feeder (see page 8-4) attached. 2-2
-
 1
1 -
2
-
3
-
4
-
5
-
6
-
7
-
8
-
9
-
10
-
11
-
12
-
13
-
 14
14 -
 15
15 -
 16
16 -
 17
17 -
 18
18 -
 19
19 -
 20
20 -
 21
21 -
 22
22 -
 23
23 -
 24
24 -
25
-
26
-
27
-
28
-
29
-
30
-
31
-
32
-
33
-
34
-
35
-
36
-
37
-
38
-
39
-
40
-
41
-
42
-
43
-
44
-
45
-
46
-
47
-
48
-
49
-
50
-
51
-
52
-
53
-
54
-
55
-
56
-
57
-
58
-
59
-
60
-
61
-
62
-
63
-
64
-
65
-
66
-
67
-
68
-
69
-
70
-
71
-
72
-
73
-
74
-
75
-
76
-
77
-
78
-
79
-
80
-
81
-
82
-
83
-
84
-
85
-
86
-
87
-
88
-
89
-
90
-
91
-
92
-
93
-
94
-
95
-
96
-
97
-
98
-
99
-
100
-
101
-
102
-
103
-
104
-
105
-
106
-
107
-
108
-
109
-
110
-
111
-
112
-
113
-
114
-
115
-
116
-
117
-
118
-
119
-
120
-
121
-
122
-
123
-
124
-
125
-
126
-
127
-
128
-
129
-
130
-
131
-
132
-
133
-
134
-
135
-
136
-
137
-
138
-
139
-
140
-
141
-
142
-
143
-
144
-
145
-
146
-
147
-
148
-
149
-
150
-
151
-
152
-
153
-
154
-
155
-
156
-
157
-
158
-
159
-
160
-
161
 |
 |