Kyocera TASKalfa 2420w TASKalfa 2420w PrintNet Enterprise Client Operation Gui - Page 7
Creating a Print Set for Submittal, New Job, Add Files
 |
View all Kyocera TASKalfa 2420w manuals
Add to My Manuals
Save this manual to your list of manuals |
Page 7 highlights
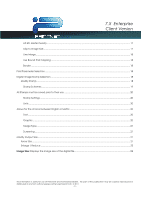
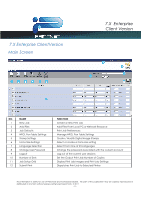
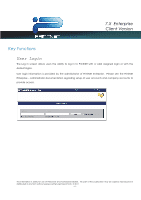
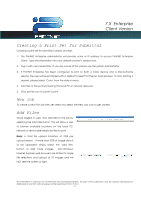
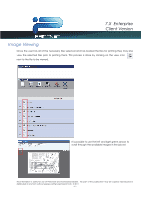
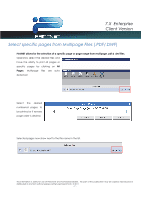
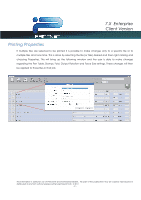
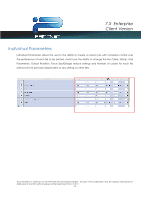
7.X Enterprise Client Version Creating a Print Set for Submittal Creating a print set for submittal is simple and fast. 1. The PrintNET Enterprise administrator will provide a link or IP address to access PrintNET Enterprise Client. Type this information into your default browser's address bar. 2. Log in with user credentials. If you are unsure of this, please see the system administrator. 3. If PrintNET Enterprise has been configured to print to both a Color device and a Monochrome device, the user will be prompted with a default to select for the job build process. If color printing is desired, please select 'Color' from the slide-in menu. 4. Add files to the set by browsing the local PC or network resource 5. Click printer icon to submit a print New Job To create a new Print job the user need only select the New Job Icon to get started. Add Files Once logged in users may add files to the job by selecting the Add Files button. This will allow a user to browse available locations on the local PC, network or removable media for files to print. Note: A total file upload limitation of 2GB per upload session. If more than 2GB of image data is to be uploaded, simply select the 'add files' button to add more images. Non-Windows Internet Explorer web browsers are limited to single file selections and upload of 10 images and will NOT see the screen at right. This information is solely for use of Personnel and Authorized Dealers. No part of this publication may be copied, reproduced or distributed in any form without express written permission from. ” 2011 - 5 -
-
 1
1 -
 2
2 -
 3
3 -
 4
4 -
 5
5 -
 6
6 -
 7
7 -
 8
8 -
 9
9 -
 10
10 -
 11
11 -
 12
12 -
13
-
14
-
15
-
16
-
17
-
18
-
19
-
20
-
21
-
22
-
23
-
24
 |
 |