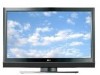
LG 26LC7D Owner's Manual (English) - Page 95
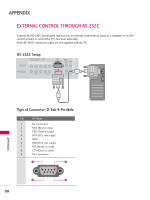
Power Command2:a, Input Select Command2:b, To control Power On/Off of the TV.
 |
UPC - 719192171350
View all LG 26LC7D manuals
Add to My Manuals
Save this manual to your list of manuals |
Page 95 highlights
01. Power (Command2:a) To control Power On/Off of the TV. Transmission [k][a][ ][Set ID][ ][Data][Cr] Data 0 : Power Off Data 1 : Power On Acknowledgement [a][ ][Set ID][ ][OK/NG][Data][x] * In a like manner, if other functions transmit 'FF' data based on this format, Acknowledgement data feedback presents status about each function. 02. Input Select (Command2:b) To select input source for the TV. Transmission [k][b][ ][Set ID][ ][Data][Cr] Data 0: Digital Data 5: Component 2 Data 1: Analogue Data 6: RGB-PC Data 2: AV1 Data 7: HDMI1/DVI Data 3: AV2 Data 8: HDMI2 Data 4: Component 1 Acknowledgement [b][ ][Set ID][ ][OK/NG][Data][x] 03. Aspect Ratio (Command2:c) To adjust the screen format. You can also adjust the screen format using the ARC button on remote control or in the Special menu. Transmission [k][c][ ][Set ID][ ][Data][Cr] Date 0: Auto 1: 4:3 2: 16:9 3: 14:9 (-10) ~ D: 14:9 (0) ~ 17: 14:9 (10) 18: Zoom (-16) ~ 28: Zoom (0) ~ 38: Zoom (16) 39: Cinema Zoom (1) ~ 48: Cinema Zoom (16) Acknowledgement [c][ ][Set ID][ ][OK/NG][Data][x] * Using the PC input, you select either 16:9 or 4:3 screen aspect ratio. 04. Screen Mute (Command2:d) To select screen mute on/off. Transmission [k][d][ ][Set ID][ ][Data][Cr] Data 0 : Screen mute off (Picture on) Data 1 : Screen mute on (Picture off) Acknowledgement [d][ ][Set ID][ ][OK/NG][Data][x] 05. Volume Mute (Command2:e) To control volume mute on/off. You can also adjust mute using the MUTE button on remote control. Transmission [k][e][ ][Set ID][ ][Data][Cr] Data 0 : Volume mute on (Volume off) Data 1 : Volume mute off (Volume on) Acknowledgement [e][ ][Set ID][ ][OK/NG][Data][x] 06. Volume Control (Command2:f) To adjust volume. You can also adjust volume with the volume buttons on remote control. Transmission [k][f][ ][Set ID][ ][Data][Cr] Data Min : 0 ~ Max : 64 Refer to 'Real data mapping1' as shown below. Acknowledgement [f][ ][Set ID][ ][OK/NG][Data][x] 07. Contrast (Command2:g) To adjust screen contrast. You can also adjust contrast in the Picture menu. Transmission [k][g][ ][Set ID][ ][Data][Cr] Data Min : 0 ~ Max : 64 Refer to 'Real data mapping1' as shown below. Acknowledgement [g][ ][Set ID][ ][OK/NG][Data][x] 08. Brightness (Command2:h) To adjust screen brightness. You can also adjust brightness in the Picture menu. Transmission [k][h][ ][Set ID][ ][Data][Cr] Data Min : 0 ~ Max : 64(*transmit by Hexadecimal code) Refer to 'Real data mapping1' as shown below. Acknowledgement [h][ ][Set ID][ ][OK/NG][Data][x] 09. Colour (Command2:i) To adjust the screen colour. You can also adjust colour in the Picture menu. Transmission [k][i][ ][Set ID][ ][Data][Cr] Data Min : 0 ~ Max : 64 Refer to 'Real data mapping1' as shown below. Acknowledgement [i][ ][Set ID][ ][OK/NG][Data][x] *Real data mapping 1 0 : Step 0 A : Step 10 (SET ID 10) F : Step 15 (SET ID 15) 10 : Step 16 (SET ID 16) 63 : Step 99 (SET ID 99) 64 : Step 100 Tint: R50 ~ G50, Balance: L50 ~ R50 93 APPENDIX
-
 1
1 -
2
-
3
-
4
-
5
-
6
-
7
-
8
-
9
-
10
-
11
-
12
-
13
-
14
-
15
-
16
-
17
-
18
-
19
-
20
-
21
-
22
-
23
-
24
-
25
-
26
-
27
-
28
-
29
-
30
-
31
-
32
-
33
-
34
-
35
-
36
-
37
-
38
-
39
-
40
-
41
-
42
-
43
-
44
-
45
-
46
-
47
-
48
-
49
-
50
-
51
-
52
-
53
-
54
-
55
-
56
-
57
-
58
-
59
-
60
-
61
-
62
-
63
-
64
-
65
-
66
-
67
-
68
-
69
-
70
-
71
-
72
-
73
-
74
-
75
-
76
-
77
-
78
-
79
-
80
-
81
-
82
-
83
-
84
-
85
-
86
-
87
-
88
-
89
-
 90
90 -
 91
91 -
 92
92 -
 93
93 -
 94
94 -
 95
95 -
 96
96 -
 97
97 -
 98
98
 |
 |