LG 47LH30FR-MA Owner's Manual - Page 119
On Screen DisplayOSD. But, in case of Screen
 |
View all LG 47LH30FR-MA manuals
Add to My Manuals
Save this manual to your list of manuals |
Page 119 highlights
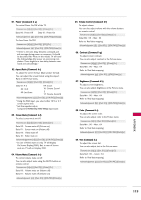
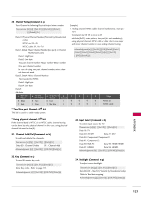
01. Power (Command: k a) To control Power On/Off of the TV. Transmission [k][a][ ][Set ID][ ][Data][Cr] Data 00 : Power Off Data 01 : Power On Acknowledgement [a][ ][Set ID][ ][OK/NG][Data][x] To show Power On/Off. Transmission [k][a][ ][Set ID][ ][FF][Cr] Acknowledgement [a][ ][Set ID][ ][OK/NG][Data][x] * If there is the time delay between command and ack message during power on sequence, It should be described like "Note: In this model, TV will send the Acknowledge after power on processing completion. There might be a time delay between command and acknowledge." 02. Aspect Ratio (Command: k c) To adjust the screen format. (Main picture format) You can adjust the screen format using the Aspect Ratio in the Picture menu. Transmission [k][c][ ][Set ID][ ][Data][Cr] Data 01: 4:3 02: 16:9 04: Zoom 10: Cinema Zoom1 09: Just Scan 1F: Cinema Zoom16 Acknowledgement [c][ ][Set ID][ ][OK/NG][Data][x] * Using the RGB input, you select either 16:9 or 4:3 screen aspect ratio. * Just Scan operates only in Component/HDMI(720p/1080i/1080p) input source. 03. Screen Mute (Command: k d) To select screen mute on/off. Transmission [k][d][ ][Set ID][ ][Data][Cr] Data 00 : Screen mute off (Picture on) Data 01 : Screen mute on (Picture off) Data 00 : Video mute off Data 10 : Video mute on Acknowledgement [d][ ][Set ID][ ][OK/NG][Data][x] * In case of Video mute on only, TV will display On Screen Display(OSD). But, in case of Screen mute on, TV will not display OSD. 04. Volume Mute (Command: k e) To control volume mute on/off. You can also adjust mute using the MUTE button on remote control. Transmission [k][e][ ][Set ID][ ][Data][Cr] Data 00 : Volume mute on (Volume off) Data 01 : Volume mute off (Volume on) Acknowledgement [e][ ][Set ID][ ][OK/NG][Data][x] 05. Volume Control (Command: k f) To adjust volume. You can also adjust volume with the volume buttons on remote control. Transmission [k][f][ ][Set ID][ ][Data][Cr] Data Min : 00 ~ Max : 64 Refer to 'Real data mapping'. Acknowledgement [f][ ][Set ID][ ][OK/NG][Data][x] 06. Contrast (Command: k g) To adjust screen contrast. You can also adjust contrast in the Picture menu. Transmission [k][g][ ][Set ID][ ][Data][Cr] Data Min : 00 ~ Max : 64 Refer to 'Real data mapping'. Acknowledgement [g][ ][Set ID][ ][OK][Data][x] 07. Brightness (Command: k h) To adjust screen brightness. You can also adjust brightness in the Picture menu. Transmission [k][h][ ][Set ID][ ][Data][Cr] Data Min : 00 ~ Max : 64 Refer to 'Real data mapping'. Acknowledgement [h][ ][Set ID][ ][OK/NG][Data][x] 08. Color (Command: k i) To adjust the screen color. You can also adjust color in the Picture menu. Transmission [k][i][ ][Set ID][ ][Data][Cr] Data Min : 00 ~ Max : 64 Refer to 'Real data mapping'. Acknowledgement [i][ ][Set ID][ ][OK/NG][Data][x] 09. Tint (Command: k j) To adjust the screen tint. You can also adjust tint in the Picture menu. Transmission [k][j][ ][Set ID][ ][Data][Cr] Data Red : 00 ~ Green : 64 Refer to 'Real data mapping'. Acknowledgement [j][ ][Set ID][ ][OK/NG][Data][x] 119 APPENDIX
-
 1
1 -
2
-
3
-
4
-
5
-
6
-
7
-
8
-
9
-
10
-
11
-
12
-
13
-
14
-
15
-
16
-
17
-
18
-
19
-
20
-
21
-
22
-
23
-
24
-
25
-
26
-
27
-
28
-
29
-
30
-
31
-
32
-
33
-
34
-
35
-
36
-
37
-
38
-
39
-
40
-
41
-
42
-
43
-
44
-
45
-
46
-
47
-
48
-
49
-
50
-
51
-
52
-
53
-
54
-
55
-
56
-
57
-
58
-
59
-
60
-
61
-
62
-
63
-
64
-
65
-
66
-
67
-
68
-
69
-
70
-
71
-
72
-
73
-
74
-
75
-
76
-
77
-
78
-
79
-
80
-
81
-
82
-
83
-
84
-
85
-
86
-
87
-
88
-
89
-
90
-
91
-
92
-
93
-
94
-
95
-
96
-
97
-
98
-
99
-
100
-
101
-
102
-
103
-
104
-
105
-
106
-
107
-
108
-
109
-
110
-
111
-
112
-
113
-
 114
114 -
 115
115 -
 116
116 -
 117
117 -
 118
118 -
 119
119 -
 120
120 -
 121
121 -
 122
122 -
 123
123 -
 124
124
 |
 |